GROUP 13 – 1950 BUICK BODY
13-1 1950 BUICK BODY INTRODUCTION
Scope of Group 13
Group 13 contains the most essential adjustment and replacement procedures required for ordinary servicing of bodies. These procedures may be performed by any competent mechanic without specialized experience in 1950 Buick body repair work, and may be accomplished with tools and equipment usually available in a service shop.
Refinishing, repairs to 1950 Buick body panels, and replacement of 1950 Buick body panels are not covered in this Group, since these operations require special tools and equipment as well as specialized training.
In addition to the information contained in Group 13, attention is directed to the Service News which is published as required by the Fisher Body Service Division. Each issue of the Service News which relates to Buick body service is furnished to Buick Dealers through the Buick Service Department. All issues of the Service News should be kept on file for ready reference.
1950 Buick Fisher Body Number Plate
Complete identification of each 1950 Buick body as required for service is provided by a plate riveted to the cowl on right side under the hood. See figure 13-1.

1950 Buick Fisher Body Number Plate
This plate should never be destroyed; if removed during body repairs it should be reinstalled in original location.
The Style Number and Body Number always should be furnished on every 1950 Buick body parts order, and on warranty claims and Product Reports relative to bodies. In addition, the Trim Number or the Paint Number should be furnished if the subject relates to trim or paint.
The Style Number is a combination of the model year, car division number, and actual style number of 1950 Buick body. In figure 13-1, 50 represents the model year 1950, 45 indicates Buick Division; 07 indicates the body style. An X following the style number indicates that body is equipped with the Hydro-Lectric Power System.
The 1950 Buick Body Number is the production serial number of the body. The prefix G denotes the plant in which body was built.
The Trim Number furnishes the key to trim color and material. Trim colors and materials specified for each trim number are given in The Buick Master Parts List.
The Paint Number furnishes the key to the color combination and paint specifications. Paint colors and the manufacturer’s numbers specified for each paint combination number are given in the Buick Master Parts List.
Fisher Body Style Numbers for All 1950 Buick Models
In the service procedures given in Group 13 the last two digits of the body style numbers are used where necessary to distinguish differences between bodies. The complete style numbers of all Fisher Bodies used on 1950 Buick models are as follows:
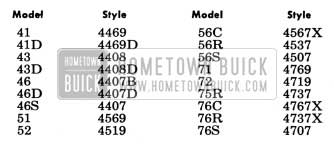
1950 Buick Fisher Body Style Numbers
13-2 CARE OF 1950 BUICK BODY FINISH, PLATED PARTS, AND TRIM
Care of 1950 Buick Paint
Care should always be used in applying polishes. Particular care should be observed when the car is new and in using preparatory cleaners which have abrasive properties, regardless of age of the car, because unskilled application of such cleaners will result in rubbed through or thin spots in the paint. Polishes containing wax should be applied sparingly and thoroughly rubbed to remove any surplus. Excessive coatings of wax tends to cloud the paint and destroy its natural lustre, besides acting as a binder for the accumulation of dirt.
When retouching of paint is required in service the paint should be the same number as specified for the paint combination number on the 1950 Buick body number plate (fig. 13-1). Unless the new paint contains the same pigments in the same proportion as the original paint, the new paint may weather out off-color even though it appears to blend with the original paint at time of application.
Refinishing of Wood Parts – 1950 Buick Estate Wagon
The finish of wood parts on an Estate Wagon might be compared to the finish on a boat or a piece of furniture exposed to the outside elements. If the clear finish becomes damaged, worn through, or weathered so that moisture can seep through, particularly at joints where end grain wood becomes exposed, then discoloration, checking, and cracking of the natural wood will result.
To avoid undue deterioration of the Estate Wagon body it should be refinished once a year, or more often if weather and service conditions are particularly severe on the finish. Even though the exterior finish appears to be in good condition the joints between wooden parts should be inspected at frequent intervals and if any are found open they should be filled immediately to prevent entrance of moisture.
- Wash top and exterior wood surfaces and dry thoroughly. Remove dirt and wax from wood parts with suitable solvent.
- Sand entire 1950 Buick body to smooth out rough spots and insure proper adhesion of new finish.
- Remove discolored wood spots by sanding or bleaching with oxalic acid.
- Brush all bare wood with “Woodlife,” obtainable from Protection Products Manufacturing Company, Kalamazoo 99, Michigan.
- Fill bare wood with Dupont Wood Filler No. 27-905.
- Fill all small cracks with a high grade, heavy body, plastic putty. Any large cracks or open joints 1/8″ or more wide should be thoroughly cleaned out and filled by a wood shim glued in place.
- Spray or brush all wood parts with two coats of Dupont Clear Dulux RK-147. Allow 15 hours drying time between coats.
- Seal all outside plywood to frame joints with clear Dulux applied with an oil can.
- When refinished areas are thoroughly dried, sparingly wax entire 1950 Buick body.
Care of Chrome Plated Parts
Although chrome plating itself is not subject to rust or corrosion there are destructive agents which may seep through the pores of the plating and attack the base metal underneath, causing a corrosive condition which will undermine the chrome plating if neglected. This corrosion of the base metal also exudes out of the pores of the plating and shows up on the surface in the form of rust discoloration.
Road silt and slush thrown up by the car wheels during inclement weather are detrimental to chrome plated parts if allowed to remain on the surface for any length of time. Ordinary traffic film, particularly in industrial areas, contains a certain amount of soot which sets up a chemical reaction during damp weather and this filters by degrees through the pores of chrome plating to attack the base metal. In some localities certain soils or clays contain elements that eventually cause injury to chrome plated parts.
Deterioration of chrome plated parts can be avoided by keeping the parts clean. The accumulation of traffic film, mud, etc., should be removed at reasonable intervals by washing with plain water and wiping thoroughly dry. Seepage of destructive elements through the pores of the chrome plating can be retarded by application of a body polishing wax or a light mineral oil. The material should be applied with a soft cloth and then all surplus should be wiped off.
On parts where symptoms of corrosion appear, a cloth moistened with kerosene may be used to remove the corrosion after which the part should be waxed or oiled as explained above. In cases of excessive corrosion it may be necessary to use a non-abrasive scouring powder or a light rubbing compound. In applying these cleaners on broad chrome surfaces use a straight forward and back motion with the cloth to avoid rings.
Cleaning 1950 Buick Body Trim Fabric
The headlining has a long nap, therefore, a great deal of care must be used to prevent damage when cleaning it.
A soft brush should be used to remove lint or threads from the headlining and the nap should be brushed in even strokes, brushing from the rear to the front.
It is not recommended that air under pressure be used for removing threads or lint because of the danger of matting and streaking the nap. If an air hose is used, however, it is extremely important to hold the nozzle at least 12 or 16 inches away from the headlining with a moderate air stream flowing from the rear to the front.
There are basically two different types of fabric cleaners on the market:
- Volatile cleaners such as naphtha, gasoline, carbon-tetrachloride and many others that are colorless liquids having great solvent powers for grease and oil.
- Alkaline cleaners, soaps and water mixtures which generally emulsify stains satisfactorily but at possible risk to the removal of the color or finish of the fabric.
For the removal of spots caused by ordinary soilage, we definitely recommend the “volatile type cleaner,” preferably a mixture of carbontetrachloride and cleaner’s naphtha.
Do not use any gasoline which is colored or which contains tetra-ethyllead. Do not use volatile fire extinguisher fluid.
Careful application of the following procedure is a prime factor in obtaining satisfactory results and if followed closely will prevent the appearance of unsightly rings. The evident slowness of the method is compensated for by the superior results obtained.
- Obtain, cut and fold several small swatches of clean cheesecloth or other fabrics suitable for this purpose.
- With a brush or whisk broom of medium stiffness, brush away all loose particles of dirt and soil.
- Immerse the small cloth swatch in cleaning so1ution, wring out and allow medium evaporation.
- Place cloth on soiled spot several times, using no friction and only slight tapping pressure. This will pick up loose particles which are too embedded to be removed in the brushing operation. This operation should be repeated several times-in each instance using a new clean area of the cloth. Remember the solvent power of the cleaner does the work and only a minimum of pressure should be applied.
- Immerse a new cloth in cleaner, wring out thoroughly, open and allow to evaporate until barely damp. Apply increased pressure and rub soil area in a backward and forward motion (not circular). The cleaning cloth should be reversed several times in this operation.
- Immerse third cloth, wring out, allow evaporation and apply to both the soil and area surrounding same, using a light brisk motion.
- Repeat brushing operation.
Some cushions and arm rests are padded with foam type rubber and if soaked with hydrocarbon cleaners, the rubber padding will absorb this cleaner and trouble may result.
On door trim pads, use the solvent sparingly, otherwise the solvent power of the cleaner is liable to dissolve the black waterproofing with which the board backing is impregnated and bleed it out through the stitching or thread on to the trim pad fabric cover.
Cleaning Folding Top-Convertible
To clean top, brush with whisk broom to remove dust. Most dirt spots can be readily rubbed off with a piece of crude rubber or art gum. If necessary, the top may then be thoroughly cleaned with mild soap and lukewarm water. If, after drying thoroughly, any spots still remain, they may be removed with ordinary gasoline (not Ethyl), naphtha, carbon-tetrachloride or Carbona. These cleaning agents should be applied very lightly. Do not soak the material.
Care and Cleaning of 1950 Buick Leather Seats
Care of genuine leather is a relatively simple but important matter. If dirt accumulates on the surface, this generates into a hard grit which under pressure will cut the finish and cause the leather to crack or bleed color. The surface should be gone over occasionally with a dry cloth and if dirt should accumulate, the following cleaning instructions should be used :
- Using lukewarm water and a neutral soap, work up a thick suds on a piece of cheesecloth and apply it to leather surface.
- Go over leather surface again using only a damp cloth and no soap.
- Wipe leather dry with a soft cloth.
NOTE: Polishes and cleaners used for auto body finishes, volatile and other clear cleaners, naphtha, furniture polishes, oils, varnishes or household cleansing and bleaching agents should never be used on leather seats.
13-3 CEMENTS AND SEALING COMPOUNDS
Many different compounds are used as cements and sealers in the construction of a 1950 Buick body, and many different brands are available for service use. It would not be practical to stock all of the compounds used, or to discuss here all of the brands available.
The “3-M” compounds listed here have been found satisfactory for the applications indicated and are recommended for the cementing and sealing operations required in servicing a body. They are manufactured by the Minnesota Mining and Manufacturing Company and are generally available through automotive supply houses.
Due to the adhesive properties of these compounds, application with a stick, screwdriver, or similar tool is always unsatisfactory. This method of application is not only wasteful but usually results in smeared painted surfaces and upholstery which are difficult to clean. Sealing guns should be used for application of these compounds. For light bodied compounds the small trigger gun B 182-A is satisfactory. For heavy bodied compounds, a larger gun with flow adjustment should be used.
3-M Weatherstrip Adhesive
This cement is a rubber base adhesive developed especially for bonding rubbers together or to metal surfaces. It may be used for cementing door and rear compartment lid weatherstrips in place, sealing around windshield and rear window glasses, etc. Can be applied with the small pressure gun or with a stiff bristle brush.
3-M Trim Cement
This colored adhesive is used for cementing trim fabrics to metal panels, trunk linings, floor carpets, etc. It is especially developed to adhere to fabrics without bleeding through to cause discoloration. This cement has the “quick tack” and “wet” strength required to permit cementing the fabrics in place quickly and securely. It may be used to cement “Soundsorber” to the deadener pad on the underside of the roof panel.
3-M Felt Pad Adhesive
This is a heavy black cement used for attaching all types of deadener pads to metal panels.
3-M Convertible Top Sealer
This medium bodied sealer, available in black or tan, is used strictly for sealing the seams and tacking areas of the top fabric on convertible coupes. Should be applied with the small trigger type sealing gun.
3-M Autobody Sealer
This semi-heavy black compound is a flexible rubber sealer for general use in sealing welded seams inside the 1950 Buick body. It is also used for sealing 1950 Buick body moldings. It is non-drying and its ability to stay in place without flowing makes this sealer useful for many purposes.
3-M Underseal
This sealer is a sprayable black coating for use on metal surfaces underneath the 1950 Buick body. It is especially useful for sealing all welded seams and crevices against entrance of dust and water. It also acts as an insulator against noise and extremes of temperature.
3-M Caulking Compound
This compound is a pliable, waterproof, non-shrinking, non-hardening putty-like compound used for sealing out moisture and dust in seams and crevices. Can be molded by hand to any shape or form for easy application. Ideally suited for wood station wagon bodies and for hard to get at places on the steel underbody. Can be formed or rolled into “pig tails” and pressed down into crevices with the fingers to make a satisfactory seal.
13-4 1950 BUICK BODY MOUNTINGS
At each closed 1950 Buick body mounting point a rubber shim is placed between the 1950 Buick body and frame, a rubber insulator washer is placed under the frame side rail flange or hanger, and flat steel washers and a tubular spacer limit compression of the rubber parts to a predetermined amount as the body bolt is tightened. See figure 13-2. This form of mounting eliminates metal-to-metal transmission of road and chassis noise into the 1950 Buick body.
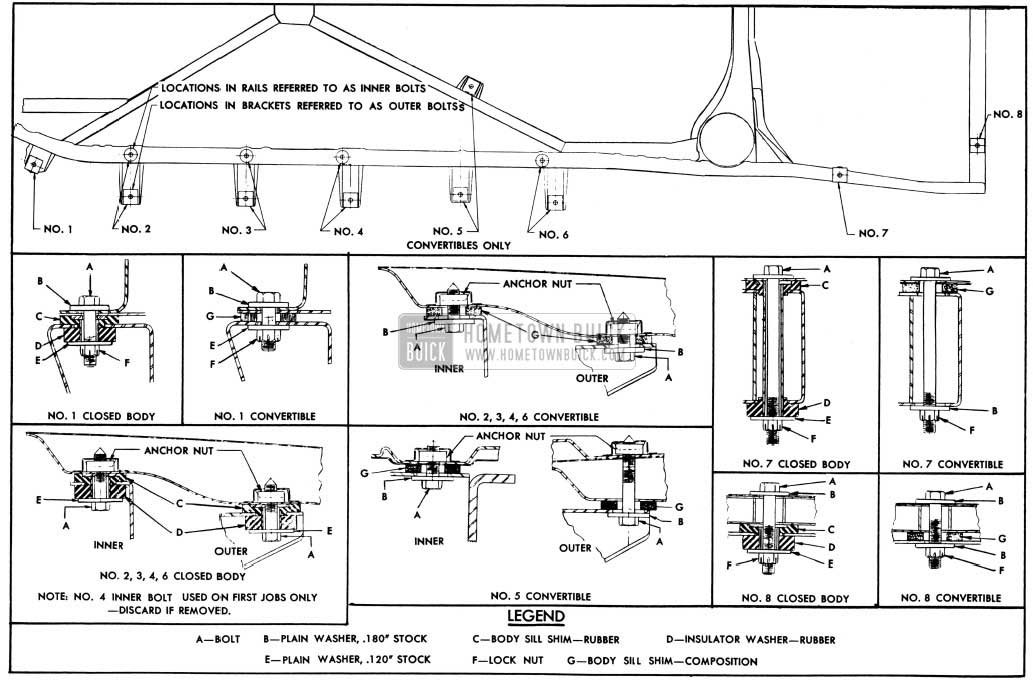
1950 Buick Body Mountings
Note in figure 13-2 that the No.4 inner bolts and mountings were used in first jobs only. If these parts are removed for any reason they may be discarded as mountings are not needed at this point. When these parts are discarded, work 3-M Caulking Compound or other suitable material in around the anchor nuts in body floor pan to prevent them from rattling.
At each convertible coupe mounting point a solid composition shim is placed between the 1950 Buick body and the frame, and a flat washer and bolt anchors the 1950 Buick body to the frame. See figure 13-2.
In addition to the parts shown in figure 13-2, steel shims are added as required at individual mountings to compensate for variations in body and frame in order to insure a firm mounting without distortion of body. Whenever it becomes necessary to remove body mountings, care must be taken to reinstall all of the mounting parts and steel shims in their exact original positions.
Closed bodies should not be re-shimmed to correct distortion of door openings. These openings should be shaped as required by the use of body jacks. The body should rest firmly on all mountings before bolts are tightened and steel shims should be added where body does not contact a mounting. Shims for this purpose are furnished under group 4.023.
Convertible bodies may be re-shimmed in cases where door locks do not latch securely after door is properly adjusted in body opening (par. 13-7) . In such cases, shims placed under the ends of body will close in the body door opening sufficiently to insure proper latching of door locks.
When body bolts are tightened use a torque wrench to tighten all bolts uniformly to 25-30 ft. lbs. torque. The specified torque is very necessary to insure proper compression of convertible body mounting shims, and to insure tightening against the spacers in closed body mountings. Excessive tightening must be avoided as distortion of mountings will result.
Leave A Comment
You must be logged in to post a comment.