1-11 1959 BUICK INSTRUMENT PANEL COMPARTMENT
1959 Buick Instrument Panel Compartment Door – Removal, Installation and Adjustment – All Styles
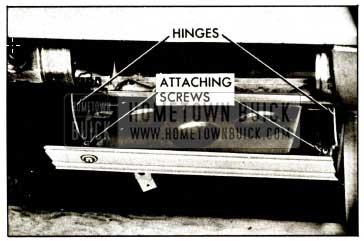
- Mark location of each door hinge on door panel.
- Remove screws securing each hinge to door inner panel and remove door.
- To install, position hinges within locating lines and install attaching screws.
- To reposition compartment door laterally in its opening, loosen attaching screws for each hinge at door inner panel and shift in the desired direction.
- To reposition the door fore and aft, loosen hinge-to-instrument panel attaching screws for each hinge on underside of 1959 Buick instrument panel and shift door to the desired position.
- The door lock striker may be adjusted by loosening attaching screws and moving striker in or out.
1959 Buick Instrument Panel Compartment Door Knob Assembly-Removal and Installation – All Styles
- Open compartment door and remove screw shown in figure 1-39 from lock retainer.
1959 Buick Instrument Panel Compartment Door
- To install, reverse removal procedure.
1959 Buick Instrument Panel Compartment Door Lock Cylinder-Removal and Installation – All Styles
- Note position of lock cylinder key opening when in locked and unlocked position.
- Insert key in lock cylinder and open door.
- Hold lock bolt in rear position, turn key clockwise 90° from unlocked position and remove cylinder with key. (See figure 1-40.)
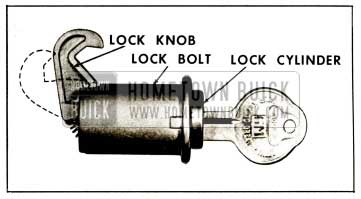
1959 Buick Compartment Door Lock Cylinder
- To install, reverse removal procedure.
1959 Buick Instrument Panel Compartment Box Package Stop-Removal and Installation – All Styles
- Open compartment door and remove screws securing package stop and lower front edge of compartment box. Remove stop.
- To install, reverse removal procedure.
1959 Buick Instrument Panel Compartment Box – Removal and Installation – All Styles
- Remove 1959 Buick instrument panel compartment door.
- Remove screws securing compartment box to return flange around perimeter of opening in 1959 Buick instrument panel and carefully slide box out of opening.
- To install, reverse removal procedure. Make certain package stop is also installed.
1-12 1959 BUICK INSTRUMENT PANEL ASSEMBLIES
1959 Buick Instrument Panel Radio Speaker Grille – Removal and Installation – All Styles
- Remove 1959 Buick instrument panel compartment box.
- Remove four ( 4) nuts and washers securing radio grille underneath upper section of 1959 Buick instrument panel and remove grille.
- To install, reverse removal procedure.
1959 Buick Instrument Upper Panel Assemblies – All Styles
The 1959 Buick instrument upper panel assemblies consist of a left and right assembly. The left assembly which overlaps the right assembly is secured in place by screws. The right assembly is secured in place by screws at the forward edge and left side of the panel assembly and by bolt and clip assemblies with attaching nuts along the rear edge of the assembly.
1959 Buick Instrument Panel Upper Left Assembly – Removal and Installation – All Styles
- Remove screws along base of windshield and screws at 1959 Buick instrument panel cluster area and carefully remove panel assembly.
- To install, check installation of tape at areas on instrument panel contacted by left panel assembly and installation of rubber bumpers adjacent to right panel assembly and reverse removal procedure.
1959 Buick Instrument Panel Upper Right Assembly – Removal and Installation – All Styles
- Remove right instrument side panel assembly, instrument panel compartment box, radio, and instrument panel upper left assembly.
- Remove screws securing assembly along base of windshield opening and at left side of assembly.
- From underside of instrument panel, remove nuts securing rear edge of panel assembly and carefully remove assembly.
- To install, check installation of tape at areas contacted by upper section of instrument panel assembly and reverse removal procedure.
1959 Buick Instrument Panel Upper Cover Assembly – Removal and Installation -“46”, “47”, and “48” Series Styles – Special Order “44” Series Styles
The 1959 Buick instrument panel upper cover assembly is bolted along the rear edge of the upper right panel assembly. (See figure 1-41.)
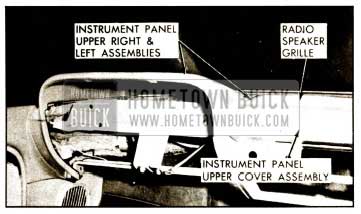
1959 Buick Upper Instrument Panel Assembly
- Remove right instrument side panel assembly instrument panel compartment box, radio, and all other necessary instrument panel hardware items.
- From underside of instrument panel, remove six (6) nut and washer assemblies, securing cover assembly and carefully remove cover assembly.
- To install, reverse removal procedure.
1959 Buick Instrument Panel Cover – “46”, “47” and “48” Series Styles – Special Order “44” Series Styles
- Remove 1959 Buick instrument panel upper cover assembly and place it on a protected bench.
- Carefully detach cemented areas of cover from instrument panel upper cover assembly and remove cover.
CAUTION: The preformed , one-piece cover is subject to permanent damage if the following procedures are not observed.- Handle with care. Bending or distortion causes permanent damage.
- Keep clean and free from cement.
- To install panel cover clean off cement surface of cover assembly.
- Apply a thin coat of neoprene weatherstrip adhesive to upper and lower cementing surfaces of cover corresponding to areas on retainer indicated by “X” and “Z” in Section C-C of figure 1-42 and allow to dry.
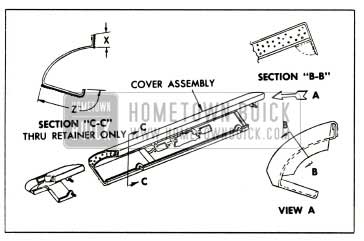
1959 Buick Instrument Panel Cover
- Apply a heavy coat of neoprene weatherstrip adhesive to lower portion of cover retainer as indicated by “Z” in Section “C-C” in figure 1-42.
- Immediately following application of adhesive, carefully position cover on retainer. Check alignment of cover; then firmly and evenly press lower cemented surface of cover to lower flange of retainer.
CAUTION: This adhesive is fast-drying; therefore, perform the operation quickly while the adhesive is still wet.- Working a small area (approximately 6″ lengths) at a time, apply a neoprene type weatherstrip adhesive to rear of upper flange as indicated by “X” and press cover to retainer firmly and evenly.
- At each end of cover assembly apply a neoprene type weatherstrip adhesive and cement flap in place.
- Install cover assembly and all previously removed hardware items.
1959 Buick Instrument Side Panel Assembly – Removal and Installation – All Styles
Each 1959 Buick instrument side panel assembly consists of an instrument side panel and a side panel extension. The panel and extension are secured together by screws at the rear of the panels. (See figure 1-1.)
- To remove left instrument side panel assembly:
- Loosen screws securing outboard end of upper left instrument panel assembly.
- Remove side panel assembly upper and lower attaching screws and carefully remove assembly.
NOTE: Lower attaching screw(s) are located on underside of instrument panel.
- To remove right instrument side panel assembly:
- Open 1959 Buick instrument panel compartment door and remove screws securing instrument side panel extension finishing plate and side panel extension at right side of opening as shown in figure 1-43.
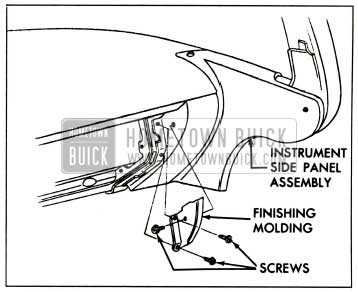
1959 Buick Finishing Moulding
- Remove side panel assembly upper attaching screws and remove assembly.
- To detach side panel extension from instrument side panel, remove side panel assembly, remove screws and washers securing panels together and remove extension panel.
- To install, check installation of anti-squeak tape and reverse removal procedure.
1-13 1959 BUICK INSTRUMENT PANEL MOULDING
1959 Buick Instrument Side Panel Extension Finishing Molding Rt. – Removal and Installation – All Styles
- Open instrument panel compartment door and remove screws securing molding and side panel assembly and remove molding. (See figure 1-43.)
- To install, reverse removal procedure.
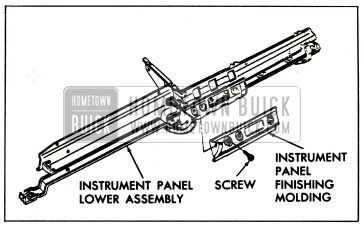
1959 Buick Instrument Panel Finishing Molding – Removal and Installation – All Styles
- Remove radio control knobs and all necessary hardware to expose molding. Then remove screws at left side of molding and screws securing lower edge of molding on underside of 1959 Buick instrument panel and remove molding. (See figure 1-44.)
1959 Buick Instrument Panel Finishing Moulding
- To install, reverse removal procedure.
Leave A Comment
You must be logged in to post a comment.