1959 BUICK REAR QUARTER TRIM AND HARDWARE
3-1 DESCRIPTION
The 1959 Buick rear quarter trim and hardware for all body styles except convertible coupe hardware is entirely new and requires new service procedures. Figures 3-1, 3-2, and 3-3 are phantom views which identify and show the relationship of major component parts of the 1959 Buick rear quarter section of an “11”, “37” and “67” style body.
The 1959 Buick rear quarter section is divided according to body styles as follows:
“11” Style Bodies
“37” Style Bodies
“19” and “29” Style Bodies
“67” Style Bodies

1959 Buick Rear Quarter
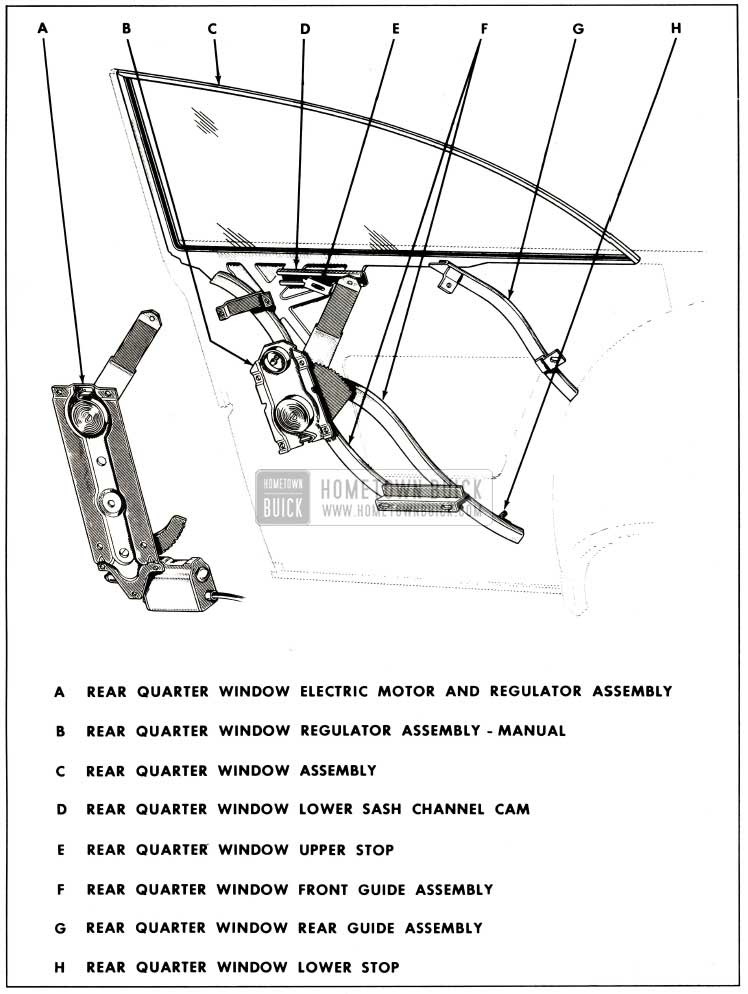
1959 Buick Rear Quarter Window
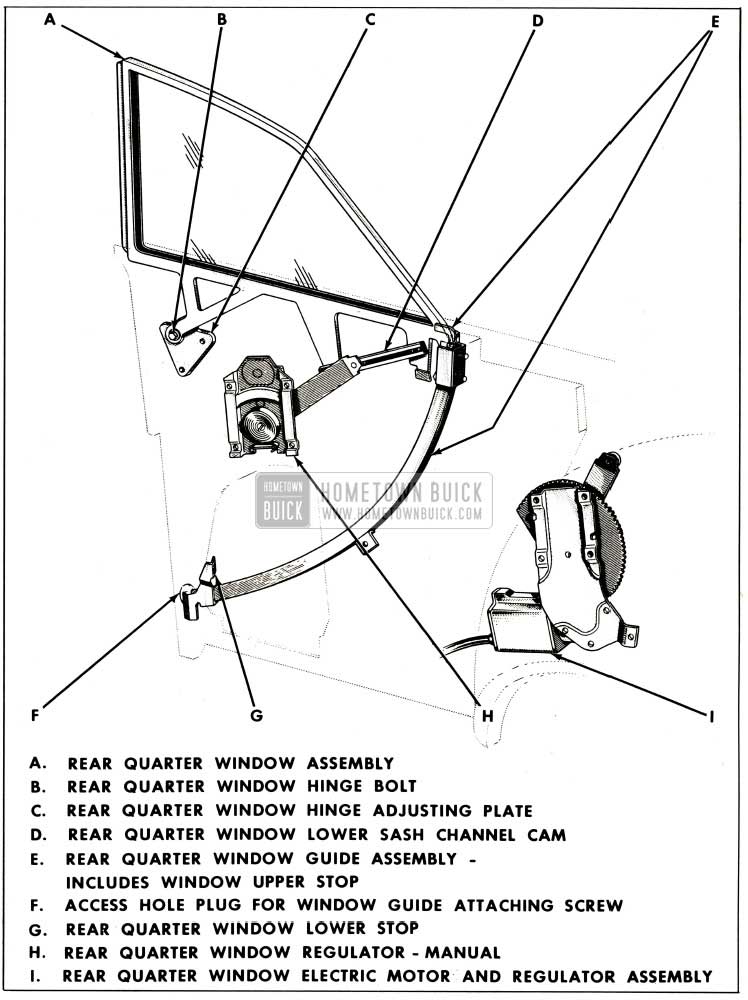
1959 Buick Rear Quarter Window Assembly
3-2 1959 BUICK REAR QUARTER – ALL”11″ STYLES
1959 Buick Rear Quarter Trim Assembly – Removal and Installation
- Remove rear seat cushion and seat back assemblies.
- Remove 1959 Buick rear quarter arm rest assembly. On styles with manually operated windows, remove window regulator handle.
- Using a trim panel removing tool (No. J-6335) carefully pry rear quarter trim assembly retaining nails from tacking strip; then lift trim assembly upwards to disengage from retainers at top of rear quarter inner panel and remove assembly from quarter panel.
NOTE: On styles with electrically operated windows, disengage trim assembly from retainers at top of inner panel; then disconnect window switch junction block from switch and remove trim assembly. - To install 1959 Buick rear quarter trim assembly, reverse removal procedure.
1959 Buick Rear Quarter Window-All “11” Styles – Removal and Installation
- Lower 1959 Buick rear quarter window. Remove back window side garnish molding and rear quarter window garnish molding. Remove rear quarter arm rest and rear quarter trim assembly.
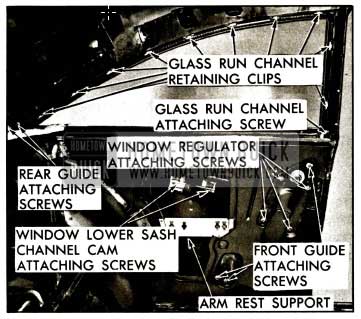
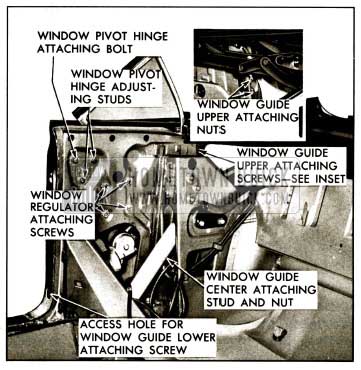
- Remove rear quarter window glass run channel attaching screw (fig. 3-4).
1959 Buick Rear Quarter Hardware Attachments
Disengage glass run channel retainer clips from 1959 Buick rear quarter lock pillar and from side roof rail, then remove channel from window opening.
Adjust 1959 Buick rear quarter window for proper alignment and operation as described under “REAR QUARTER WINDOW ADJUSTMENTS” for “11” styles.
Seal rear quarter inner panel water deflector as specified under “REAR QUARTER INNER PANEL WATER DEFLECTOR” for “11” styles.
1959 Buick Rear Quarter Window Adjustment – All “11” Styles
To adjust 1959 Buick rear quarter window fore or aft, loosen front guide attaching screws (fig. 3-4). Adjust window and guide fore or aft as required and tighten attaching screws.
1959 Buick Rear Quarter Window Glass Run Channel – All ” 11 ” Styles-Removal and Installation
- Lower 1959 Buick rear quarter window. Remove back window side garnish molding and rear quarter window garnish molding.
- Remove rear quarter window glass run channel attaching screw (fig. 3-4). Pull glass run channel inward to disengage retainer clips from slots in rear quarter back pillar and from side roof rail; then remove channel from window opening.
- To install 1959 Buick rear quarter window glass run channel, reverse removal procedure.
1959 Buick Rear Quarter Window Glass Run Outer Sealing Strip-All “11 ” Styles – Removal and Installation
- Remove 1959 Buick rear quarter window.
- Remove screw at each end of sealing strip; then push sealing strip downward, at clip location, to disengage clips from return flange of rear quarter outer panel and remove sealing strip.
- To install rear quarter window glass run outer sealing strip, reverse removal procedure.
1959 Buick Rear Quarter Window Front Guide Assembly – All “11” Styles – Removal and Installation
- Remove rear seat cushion and back. Remove 1959 Buick rear quarter window garnish molding. Remove rear quarter arm rest and rear quarter trim assemblies.
- Detach inner panel water deflector sufficiently to gain access to front guide attaching screws and large access hole (fig. 3-4).
- Remove arm rest support attaching screws and remove arm rest support (fig. 3-4).
- Remove front guide attaching screws (fig. 3-4). Disengage guide from roller on window lower sash channel; move front guide assembly rearward between panels sufficiently to allow upper end of guide to be started out through large access hole, then remove guide assembly.
- To install front guide assembly, reverse removal procedure. Prior to installing guide, lubricate channel of guide with Lubriplate or its equivalent along entire length of channel.
Adjust 1959 Buick rear quarter guide for proper window alignment and operation as described under “REAR QUARTER WINDOW ADJUSTMENTS” for “11” Styles. Seal rear quarter inner panel water deflector as specified under “REAR QUARTER INNER PANEL WATER DEFLECTOR.”
1959 Buick Rear Quarter Window Rear Guide Assembly – All “11” Styles – Removal and Installation
- Remove back window side garnish molding.
- Remove rear guide attaching screws (fig. 3-4).
- Detach rear compartment side trim foundation sufficiently to gain access to rear guide.
- Disengage rear guide from roller on window lower sash channel and remove rear guide from body.
- To install rear guide assembly, reverse removal procedure. Prior to installation of guide lubricate channel of guide with Lubriplate or its equivalent.
1959 Buick Rear Quarter Window Regulator Assembly (Manual or Electric)-All “11” Styles – Removal and Installation
- Lower 1959 Buick rear quarter window and remove rear seat cushion and back. Remove rear quarter window garnish molding, rear quarter arm rest and rear quarter trim assemblies.
- Detach inner panel water deflector sufficiently to gain access to window lower sash channel cam attaching screws and window regulator attaching screws (fig. 3-4).
- Remove arm rest support attaching screws and remove arm rest support (fig. 3-4).
NOTE: On styles equipped with electric window regulators, disconnect feed wire plug from electric motor.
CAUTION: DO NOT OPERATE REGULATOR MOTOR after the window assembly is disengaged from the regulator or after the regulator assembly is removed from the body. Operation of the motor with the load removed may damage the unit. - Remove window lower sash channel cam attaching screws (fig. 3-4). Detach cam from roller on regulator lift arm and remove cam. Lift window to up position and prop in this position.
- On styles equipped with electric window regulators, remove front guide attaching screws (fig. 3-4). Move front guide rearward sufficiently to allow upper end of guide to be started out through large access hole, then remove guide assembly.
- Remove window regulator attaching screws (fig. 3-4) and remove regulator assembly through large access hole. To remove a manually operated regulator, rotate regulator sufficiently to allow lift arm to clear window front guide.
NOTE: The procedure for removing the electric motor from the 1959 Buick rear quarter window regulator is described and illustrated under “REAR DOOR AND / OR REAR QUARTER WINDOW REGULATOR ELECTRIC MOTOR ASSEMBLY” in the Door Section. - To install window regulator assembly, reverse removal procedure. Prior to installing regulator, lubricate regulator and window guide cams as outlined in “LUBRICATIONS” section.
Seal inner panel water deflector as specified under “REAR QUARTER INNER PANEL WATER DEFLECTOR.”
Adjust window front guide as specified under “REAR QUARTER WINDOW ADJUSTMENTS” for “11” styles.
Check operation of window prior to installing 1959 Buick rear quarter trim and inside hardware.
3-3 1959 BUICK REAR QUARTER-37 STYLES
1959 Buick Rear Quarter Arm Rest Assembly – All “37” Styles – Removal and Installation
- Remove rear seat cushion and seat back.
- Remove attaching screws at front and rear of arm rest.
- On styles equipped with electrically operated windows and /or rear quarter cigar lighter, carefully detach .arm rest from rear quarter inner panel sufficiently to disconnect window switch junction block and /or cigar lighter wires.
- Remove arm rest assembly from 1959 Buick rear quarter panel.
- To install arm rest assembly, reverse removal procedure. Where present, check operation of power operated rear quarter window and /or rear quarter cigar lighter.
1959 Buick Rear Quarter Trim Assembly- All “37” Styles – Removal and Installation
- Remove rear seat cushion and seat back assembly.
- Remove 1959 Buick rear quarter arm rest assembly.
- On styles with manually-operated windows, remove window regulator handle and anti-friction washer.
- Remove three screws securing rear quarter panel filler to quarter panel and remove filler.
- Using a trim panel removing tool (No. J-6335) carefully pry trim assembly retaining nails from tacking strip; then, lift trim assembly upward to disengage from retainers at top of rear quarter inner panel and remove assembly from body.
- To install 1959 Buick rear quarter trim assembly, reverse removal procedure.
NOTE: If any retaining nails are broken off they can be replaced with door trim assembly nailing strip replacement tabs which are available as a service part.
1959 Buick Rear Quarter Window Assembly (Manual or Electric) – All “37” Styles – Removal and Installation
- Remove rear seat cushion and back assembly and 1959 Buick rear quarter arm rest and trim assemblies.
- Remove rear quarter window sealing strip assembly from side roof rail and remove rear quarter inner panel access hole cover.
NOTE : On styles equipped with electric window regulators, disconnect feed wire connector from electric motor.
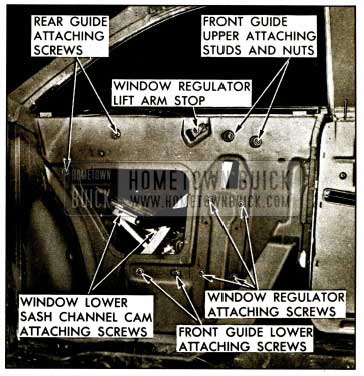
CAUTION: DO NOT OPERATE REGULATOR MOTOR after the window assembly is disengaged from the regulator. Operation of the motor with the load removed may damage the unit. - With the 1959 Buick rear quarter window in the down position remove the lower sash channel cam attaching screws (fig. 3-5). Detach cam from roller on regulator arm and remove cam.
1959 Buick Rear Quarter Hardware Attachments 37 Styles
Adjust 1959 Buick rear quarter window for proper alignment and operation, as described under “REAR QUARTER WINDOW ADJUSTMENTS” for “37” styles. Seal all rear quarter hardware attachments which have been disturbed and inner panel access hole cover as specified under “REAR QUARTER INNER PANEL SEALING” for “37” Styles.
1959 Buick Rear Quarter Window Adjustments – All “37” Styles
- Remove rear seat cushion and seat back assemblies. Remove rear quarter arm rest and trim assemblies.
- To adjust the window fore or aft, loosen the front and rear guide attaching stud nuts and screws (fig. 3-5). Move the window and guides fore or aft as required ; then tighten the front and rear guide attaching screws and stud nuts.
- To adjust the rear quarter window in or out, loosen the window front guide upper attaching stud nuts (fig. 3-5). Adjust the studs in or out as required; then tighten stud nuts.
- To limit the forward travel of the 1959 Buick rear quarter window, adjust the regulator lift arm stop (fig. 3-5), as required.
- To limit the down travel of the rear quarter window, remove the inner panel access hole and adjust the lower stop assembly (located on the lower end of the window front guide cam) up or down, as required.
- A small amount of up or down adjustment may be obtained by loosening the window guide attaching screws and adjusting the guides up or down, also by moving the guides rearward and readjusting the regulator lift arm stop (fig. 3-5).
NOTE: After performing window adjustments seal hardware attaching screws which have been disturbed, as specified under “REAR QUARTER INNER PANEL SEALING” for “37” Styles.
1959 Buick Rear Quarter Window Regulator Assembly (Manual or Electric) – All “37” Styles – Removal and Installation
- Lower 1959 Buick rear quarter window. Remove rear seat cushion and back assemblies and rear quarter arm rest and trim assemblies.
- Remove rear quarter inner panel access hole cover.
NOTE: On styles equipped with electric window regulators, disconnect feed wire plug from electric motor.
CAUTION: DO NOT OPERATE REGULATOR MOTOR after the window assembly is disengaged from the regulator or after the regulator assembly is removed from the body. Operation of the motor with the load removed may damage the unit. - Remove window lower sash channel cam attaching screws (fig. 3-5). Detach cam from roller on regulator lift arm and remove cam.
- Lift window to up position and prop in up position.
- Remove 1959 Buick rear quarter window regulator attaching screws (fig. 3-5). Lower and rotate regulator assembly to maneuver lift arm around front guide assembly; then remove regulator assembly through access hole.
NOTE: The procedure for removing the electric motor from the 1959 Buick rear quarter window regulator is described and illustrated under “REAR DOOR AND / OR REAR QUARTER WINDOW REGULATOR ELECTRIC MOTOR ASSEMBLY” in the Door Section. - To install the rear quarter window regulator assembly, reverse removal procedure. Seal window regulator attaching points as specified under “REAR QUARTER INNER PANEL SEALING” for “37” Styles.
NOTE: For “REAR QUARTER WINDOW REGULATOR ELECTRIC MOTOR ASSEMBLY – All “37” Styles Removal and Installation Instructions, See “Rear Door and / or Rear Quarter Window Regulator Electric Motor Assembly” in the Door Section.
1959 Buick Rear Quarter Window Front Guide Assembly – All “37” Styles – Removal and Installation
- Remove rear seat cushion and seat back. Remove 1959 Buick rear quarter arm rest and trim assemblies. Remove rear quarter inner panel access hole cover.
- With window in up position remove the window front guide upper attaching studs and lower attaching screws (fig. 3-5).
- Maneuver guide assembly between rear quarter panels so that upper end of guide can be started out rear of large access hole, then remove guide assembly.
- To install 1959 Buick rear quarter window front guide assembly, reverse removal procedure. Prior to installation of the front guide assembly, lubricate channels of guide with Lubriplate or its equivalent along full length of channels.
Adjust front guide assembly for proper window alignment and operation as described under “REAR QUARTER WINDOW ADJUSTMENTS” for “37” Styles.
Seal front guide attaching screws as specified under “REAR QUARTER INNER PANEL SEALING” for “37” Styles.
1959 Buick Rear Quarter Window Rear Guide – All “37” Styles – Removal and Installation
- Remove rear seat cushion and back assemblies and 1959 Buick rear quarter arm rest and trim assemblies.
- Remove rear quarter inner panel access hole cover.
- Remove rear guide attaching screws (fig. 3-5), disengage guide from roller on window lower sash channel and remove guide through access hole.
- To install 1959 Buick rear quarter window rear guide, reverse removal procedure. Prior to installation of the rear guide, lubricate channel portion of guide with Lubriplate or its equivalent along entire length of channel. Adjust rear guide assembly for proper window alignment, as described under “REAR QUARTER WINDOW ADJUSTMENTS” for “37” Styles. Seal rear guide attaching screws as specified under “REAR QUARTER INNER PANEL SEALING” for “37” Styles.
1959 Buick Rear Quarter Window Glass Run Outer Sealing Strip – All “37” Styles – Removal and Installation
- Remove rear seat cushion and back assembly. Remove 1959 Buick rear quarter arm rest and trim assemblies.
- Remove rear quarter inner panel access hole cover. Loosen window lower stop attaching screw located on lower end of window front guide assembly, then operate window to the extreme low position.
- On 4737 and 4837 Styles remove sealing strip attaching screws and remove sealing strip from body.
On all other “37” Styles remove screw, where present, securing each end of sealing strip; push sealing strip downward at clip locations to disengage clips from flange of 1959 Buick rear quarter outer panel, then remove sealing strip. - To install 1959 Buick rear quarter window glass run outer sealing strip, reverse removal procedure.
3-4 1959 BUICK REAR QUARTER – “19” & “29” STYLES
1959 Buick Rear Quarter Trim Assembly – All “19” and “29” Styles – Removal and Installation
- Remove rear seat cushion and seat back.
- Remove back window side garnish molding and rear quarter window front garnish molding. Remove screw securing metal trim support.
- Using a trim panel removing tool (No. J-6335) carefully pry trim assembly retaining nails from tacking strip, then lift trim assembly upward to disengage from retainers at top of rear quarter inner panel and remove assembly from quarter panel.
- To install 1959 Buick rear quarter trim assembly, reverse removal procedure.
1959 Buick Rear Quarter Window – All ”19” and “29” Styles – Removal and Installation
- Remove rear seat cushion and seat back. Remove back window side garnish molding and 1959 Buick rear quarter window front garnish molding. Remove rear quarter trim assembly.
- On “19” Styles, remove screws securing glass rubber channel retainer along bottom of window and retainer at front of window. On “29” Style, remove screws securing three glass rubber channel retainers at bottom of window and retainer at top of window.
- Using a suitable tool carefully break sealer bond between rubber channel and body opening.
- Carefully push rear quarter glass and rubber channel assembly inward and remove assembly from opening.
NOTE: The 1959 Buick rear quarter window rubber channel may be removed from the glass as a bench operation. - To install, reverse removal procedure. Prior to installing quarter window glass and rubber channel, clean off old sealer from rubber channel and body opening to insure a smooth sealing surface. Apply a ribbon of medium-bodied sealer in corner of rear quarter side outer panel rabbet, as indicated at “1” in Figure 3-6, completely around window opening.
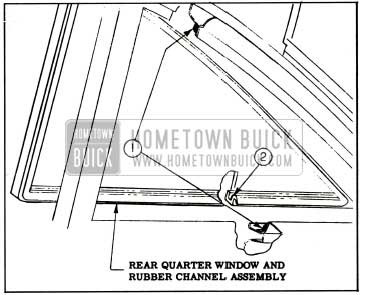
1959 Buick Rear Quarter Window Sealing 19 Styles
After glass and rubber channel have been installed, apply a bead of weatherstrip cement between outer surface of the glass and rubber channel, as indicated at “2” in Figure 3-6, completely around the window and rubber channel. Clean off all excess sealer and cement.
3-5 1959 BUICK REAR QUARTER – “67” STYLES
Folding Top Compartment Side Trim Panel – All “67” Styles – Removal and Installation
- Remove rear seat cushion and seat back.
- Remove attaching screws securing front and rear of side trim panel.
- Raise trim panel and move it inboard.
- Disconnect electrical leads, where present, and remove side trim panel.
- To install folding top compartment s de trim panel, reverse removal procedure.
1959 Buick Rear Quarter Trim Assembly – All “67” Styles – Removal and Installation
- Remove folding top compartment side trim panel.
- On styles with manually-operated windows, remove window regulator handle and anti-friction washer.
- Using a trim panel removing tool (No. J-6335) carefully pry trim assembly retaining nails from tacking strips, then lift assembly upward to disengage from retainers at top of 1959 Buick rear quarter inner panel and remove assembly from body.
- To install rear quarter trim assembly, reverse removal procedure.
NOTE: If any retaining nails are broken off, the y can be replaced with door trim assembly nailing strip replacement tabs which are available as a service part.
1959 Buick Rear Quarter Window Assembly(Manual or Electric) – AII “67” Styles – Removal and Installation
- Lower folding top and operate 1959 Buick rear quarter window to a half down position. Remove rear seat cushion and seat back. Remove folding top compartment side trim panel and rear quarter trim assembly.
- On styles equipped with electric window regulators, remove access hole cover and disconnect the wiring harness electrical feed plug from the regulator motor.
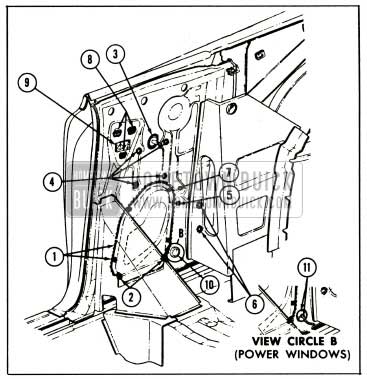
CAUTION: DO NOT OPERATE REGULATOR MOTOR after window is disengaged from regulator. Operation of motor with load removed may damage the unit. - Remove window pivot bolt, shown in Figure 3-7. Disengage window male hinge from female hinge plate; then raise window to disconnect window lower sash channel cam from roller on window regulator lift arm and remove window.
1959 Buick Rear Quarter Hardware Attachments 67 Styles
Adjust 1959 Buick rear quarter window for proper alignment and operation, as described under “REAR QUARTER WINDOW ADJUSTMENTS” for “67” Styles. Seal window pivot bolt and inner panel access hole cover as specified under “REAR QUARTER INNER PANEL SEALING” for “67” Styles.
1959 Buick Rear Quarter Window Adjustments – All “67” Styles
- To adjust the limit of the 1959 Buick rear quarter window up travel, loosen the window guide upper attaching screws (fig. 3-7), then adjust upper stop to desired position and tighten guide attaching screws.
- To adjust the 1959 Buick rear quarter window up or down, fore or aft; or to adjust the top or the rear of the window in or out, the folding top compartment side trim panel and rear quarter trim assembly must be removed to gain access to the pivot hinge bolt and adjusting studs.
- Up or down, fore or aft window adjustment: Loosen pivot bolt and both adjusting stud nuts (fig. 3-7). Position window as required, then tighten pivot bolt and stud nuts.
- In or out adjustment of top of window: Loosen lower adjusting stud nuts and slightly loosen rear stud nut. Adjust lower stud in or out, as required, then tighten both stud nuts (fig. 3-7).
- In or out adjustment of rear of window: Loosen pivot hinge rear adjusting stud nut and slightly loosen lower adjusting stud nut. Loosen window guide upper attaching nuts and center stud nut (fig. 3-7) , Adjust rear adjusting stud in or out, as required, then tighten both stud nuts. Adjust window guide for proper alignment with window and tighten upper attaching nuts and center stud nut.
NOTE: After performing any 1959 Buick rear quarter window adjustment, seal all attaching screws which have been disturbed as specified under “REAR QUARTER INNER PANEL SEALING” for “67” Styles.
1959 Buick Rear Quarter Window Regulator (Manual or Electric) – AII “67” Styles – Removal and Installation
- Remove rear seat cushion and back, folding top compartment side trim panel and 1959 Buick rear quarter trim assembly.
- Remove rear quarter inner panel access hole cover.
- Operate window to full up position and prop in up position.
- On styles equipped with electric window regulators, disconnect feed wire plug from electric motor.
CAUTION: DO NOT OPERATE REGULATOR MOTOR after the regulator assembly is disengaged from the window assembly or after it is removed from the body. Operation of the motor with the load removed may damage the unit. - Remove regulator attaching screws (fig. 3-7). Disengage regulator lift arm roller from window lower sash channel cam and remove regulator assembly through access hole.
- To install window regulator assembly, reverse removal procedure. Lubricate regulator sector, window cams and pivot hinge as specified under “LUBRICATION” Section.
Seal regulator attaching screws and inner panel access hole cover as specified under “REAR QUARTER INNER PANEL SEALING” for “67” Styles.
1959 Buick Rear Quarter Window Regulator Motor Assembly – All “67” Styles
The procedure for removing the electric motor from the 1959 Buick rear quarter window regulator assembly is similar to the procedure described under “REAR DOOR AND/OR REAR QUARTER WINDOW REGULATOR ELECTRIC MOTOR ASSEMBLY” in the Door Section.
1959 Buick Rear Quarter Window Guide- All “67” Styles – Removal and Installation
- Remove rear seat cushion and seat back. Remove folding top compartment side trim panel, and 1959 Buick rear quarter trim assembly.
- Remove inner panel access hole cover and 1959 Buick rear quarter window assembly. On styles equipped with electric window regulators, remove window regulator assembly.
- Remove access hole plug from rear quarter lock pillar and remove window guide attaching screws (fig. 3-7). Disengage window guide from behind window frame and remove guide through large access hole.
- To install rear quarter window guide, reverse removal procedure. Adjust window guide for proper window alignment and operation as described under “REAR QUARTER WINDOW ADJUSTMENTS” for “67” Styles.
Seal window guide attaching screws, access hole plug at lock pillar and inner panel access hole cover as specified under “REAR QUARTER INNER PANEL SEALING” for “67” Styles.
1959 Buick Rear Quarter Window Glass Run Outer Sealing Strip – All “67” Styles – Removal and Installation
- Remove 1959 Buick rear quarter window assembly.
- Remove screws securing sealing strip and remove strip.
- To install rear quarter window glass run outer sealing strip, reverse removal procedure.
3-6 1959 BUICK REAR QUARTER SEALING
Whenever the rear quarter inner panel seals have been disturbed the area must be resealed before the 1959 Buick rear quarter trim is reinstalled. Following are the rear quarter inner panel openings which are sealed to prevent water leakage and possible trim damage.
NOTE: When body caulking compound is used, work compound firmly to metal surfaces and feather edges out to obtain good adhesion.

1959 Buick Rear Quarter Inner Panel Sealing
1959 Buick Rear Quarter Inner Panel “37” Styles
- Apply bead of medium-bodied sealer around entire joint of access hole cover and inner panel and at screw attaching holes.
- Apply body caulking compound at ends of seal for inner panel access hole cover.
- Apply medium-bodied sealer to quarter window guide lower attaching screw hole.
- Apply medium-bodied sealer to quarter window front guide lower attaching screw holes.
- On styles equipped with manual window regulators, apply medium-bodied sealer to regulator attaching screw holes. On all styles equipped with electric window regulators apply body caulking compound to manual regulator attaching holes.
- Apply body caulking compound to gauge hole.
- On styles with manually operated window regulators, apply medium-bodied sealer to seal joint between regulator spindle hole washer and inner panel. On 4737 series style equipped with electric window regulators, apply waterproof body tape over hole in inner panel.
- Apply waterproof body tape over depression for window upper stop attaching holes.
- On styles equipped with electric window regulators, apply medium-bodied sealer to regulator attaching screw holes.
- On styles equipped with electric window regulators, apply medium-bodied sealer to harness clip attaching screws.
- On styles equipped with electric window regulators, apply medium-bodied sealer to wire and grommet.
1959 Buick Rear Quarter Inner Panel Water Deflector Partial Detachment “11” Styles
- Remove 1959 Buick rear quarter trim assembly.
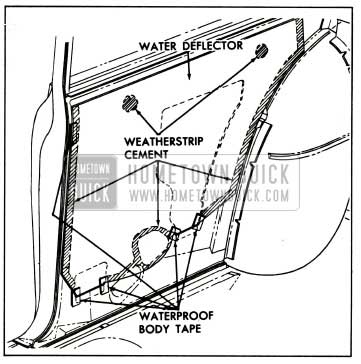
- Remove strips of waterproof body tape securing lower edge of water deflector to quarter inner panel as shown in Figure 3-9.
1959 Buick Rear Quarter Inner Panel Water Deflector
NOTE: Do not tear water deflector.
1959 Buick Rear Quarter Inner Panel Water Deflector Partial Installation
- Inspect water deflector and repair any tears or holes with waterproof body tape applied to both sides of deflector.
- Apply weatherstrip cement to quarter inner panel at bottom edge between access holes and at top of quarter panel at areas indicated in Figure 3-9.
- Insert lower edge of water deflector into retaining slots. Properly position deflector, press to cemented areas between retaining slots to affect a good cement bond, then tape lower corners of water deflector to quarter inner panel at locations indicated in Figure 3-9. Special attention should be given when taping lower corners so as to effect a watertight seal at the ends of the retaining slot and access holes.
- Carefully tape the cut edges of the water deflector together with waterproof body tape. Tape should be applied along full length of cut so as to completely seal deflector and should be pressed firmly to deflector to obtain a good bond and seal.
- Install previously removed quarter trim and hardware.
The following procedure for servicing a quarter inner panel water deflector covers removal and installation of deflector.
1959 Buick Rear Quarter Panel Inner Water Deflector – Complete Removal
- Remove 1959 Buick rear quarter trim assembly.
- Remove strips of waterproof body tape at lower and front edges of water deflector to inner panel as shown in Figure 3-9.
- With a sharp scraper or other suitable tool, break cement bond securing edges of water deflector to quarter inner panel and at the spot locations shown in Figure 3-9 and remove water deflector from quarter inner panel.
1959 Buick Rear Quarter Panel Inner Water Deflector – Installation
- Using old water deflector as a template, trim new deflector to proper size and cut holes for quarter inside hardware.
- Apply an approved weatherstrip cement to quarter inner panel along a line contacted by front and rear edges of water deflector and between lower edges of access holes as indicated in Figure 3-9. Application should be continuous with no skips. Apply cement to spot locations shown in Figure 3-9.
- Position water deflector to inner panel with lower edge in retaining slot. Roll or press cemented areas to obtain a good cement bond.
- Apply waterproof body tape to deflector and inner panel at areas indicated in Figure 3-9. Special attention should be given when taping edges so as to effect a watertight seal.
- Install previously removed 1959 Buick rear quarter trim and hardware.
1959 Buick Rear Quarter Inner Panel Sealing “67” Styles
- Apply bead of medium-bodied sealer completely around joint of access hole cover and inner panel and at screw attaching holes.
- Apply body caulking compound at ends of seal for inner panel access hole cover.
- On styles equipped with manually operated window regulators, apply medium-bodied sealer to seal joint between regulator spindle hole washer and inner panel. On styles equipped with electrically operated window regulators, apply waterproof body tape over hole in inner panel.
- On styles equipped with manually operated window regulators, apply medium-bodied sealer to regulator attaching screw holes.
- On styles equipped with electrically operated window regulators, seal regulator screw attaching holes as outlined in “4” and apply medium-bodied sealer to additional regulator attaching screw hole.
- Apply medium-bodied sealer to window guide attaching screw hole and apply body caulking compound to second hole.
- On styles equipped with electrically operated window regulators, apply medium-bodied sealer to wire harness attaching clip screw hole.
- Apply medium-bodied sealer to window hinge attaching nut and adjusting stud holes.
- Apply body waterproof tape to gauge hole in inner panel.
- On styles equipped with manually operated window regulators, install plug or waterproof body tape to hole in inner panel.
- On styles equipped with electrically operated window regulators, apply medium-bodied sealer to wire and grommet.
1959 Buick Rear Quarter Inner Panel Sealing 67 Styles
Leave A Comment
You must be logged in to post a comment.