6-1 DESCRIPTION
The 1959 Buick headlining assembly is formed to the roof contour by concealed listing wires. The ends of each listing wire are installed in holes in the side roof rail. The wire and listing pocket at the front roof bow are secured to the bow with bend-over metal tabs.
The 1959 Buick headlining is secured at the windshield by cement and tacks or staples and along the side roof rail by tacks, staples or a pronged retainer. A pronged retainer is used on styles that do not have a side roof rail molding.
On all except “39” styles, the rear end of the 1959 Buick headlining incorporates a foundation board which is supported above the back window opening by metal retaining tabs. On “39” styles the headlining is secured at the back window by cement and tacks or staples. In addition, on “39” styles the rear listing wire is secured to the center of the back window inner panel by a metal retainer.
CAUTION: Clean hands are essential when working with 1959 Buick headlining material.
6-2 REMOVAL AND INSTALLATION OF 1959 BUICK HEADLINING
Removal of 1959 Buick Headlining
- Place protective coverings over seat cushions and backs.
- Prior to removing headlining, remove following hardware and trim assemblies.
- Windshield side and upper garnish moldings.
- Rear view mirror support.
- Sunshade support assemblies.
- Dome or side roof rail lamps.
- Coat hooks.
- Rear quarter window upper garnish molding (“11” style only).
- Side roof rail moldings( 4637-39; 4737-39 and 4839 styles only).
- Back window garnish moldings.
- Center pillar finishing molding (“19” styles only).
- Carefully remove tacks or staples securing headlining at windshield opening, along side roof rails on bodies equipped with side roof rail moldings, and at back window opening on “39” style bodies. Then carefully detach cemented edges. (See Views “B” and “C.”)
- On styles where headlining is secured to side roof rails by retainers, use headlining inserting tool J-2772 or similar wide bladed tool and carefully disengage headlining from retainer tabs as shown in View “D”. (Figure 6-1).
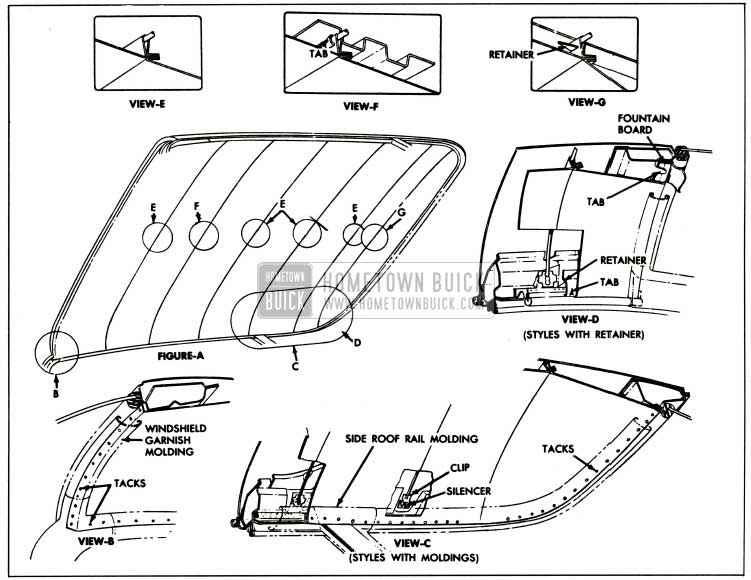
1959 Buick Headlining Assembly
- Working from front to rear of body, disengage headlining listing wires from side roof rails, gathering or rolling headlining with listing wires on outside to keep 1959 Buick headlining clean. At front roof bow bend down metal tabs shown in View “F” which support listing wire.
IMPORTANT: Note into which hole right ends of listing wire s are installed to insure proper installation. (See Views “C” and “D.” Figure 6-1).- On “39” styles, loosen screw securing clip at right end of the two (2) rear listing wires and disengage each wire from clip (See View “C”.) Then disengage rear listing wire from retainer at center of back window inner panel as shown in View “G” and carefully remove headlining assembly from body.
- On all except “39” style bodies, carefully pull headlining assembly rearward after disengaging listing wires to disengage headlining foundation board from retainer tabs at back window opening (See View “D”); then carefully remove 1959 Buick headlining assembly from body.
NOTE: On 4411-19-37 style bodies a back window upper garnish molding is not present. Foundation board is located under inner lip of back window rubber channel. Turn back lip of channel to disengage foundation board.- If necessary, listing wires may be removed from pockets.
Installation of 1959 Buick Headlining
- Install listing wires into 1959 Buick headlining listing pockets and lift entire headlining assembly into body.
- On all except “39” style bodies, center and align rearward end of 1959 Buick headlining and engage foundation board under metal retainer tabs above back window or under inner lip of back window rubber channel. (See View “D”.)
NOTE: Make certain end of listing wire at right side roof rail is installed in correct hole to insure proper contour of headlining. (See View “D”.) On 4411-19-37 style bodies also make certain inner lip of back window rubber channel is properly seated over rear end of headlining assembly. - On “39” styles, center and align headlining at back window inner panel. Install listing wire to side roof rails and engage wire and listing wire pocket to retainer at center of back window inner panel. (See View “G”.) Then working forward, install ends of listing wires into listing wire holes along side roof rail making certain end of each listing wire at right side roof rail is installed in correct hole to insure proper contour of 1959 Buick headlining. (See View “C”.)
NOTE: Two (2) rear wires are secured to right side roof rail by clips and screws. Make certain silencer shown in View “C” is installed under each clip. - At front roof bow, check 1959 Buick headlining for proper centering and bend tabs over listing wire pocket. (See View “F”.) Then install balance of listing wire into holes in side roof rails.
- Center and align 1959 Buick headlining in relation to windshield opening, back window opening on “39” styles, coat hooks and sunshade locations. Then apply trim cement to headlining tacking surfaces at windshield and back window openings, and stretch and stay tack headlining to windshield and back window openings and along side roof rails if tacks are used.
- Remove all “fullness” and “draws” from 1959 Buick headlining material and permanently tack headlining to tacking strips.
NOTE : On those styles where side roof rail moldings are not used, use headlining inserting tool J-2772, or similar wide-bladed tool, and carefully tuck edges of 1959 Buick headlining under metal retainer tabs along both side roof rails (View “D”.) - Install all previously removed hardware and trim assemblies and remove protective coverings.
- Working from front to rear of body, disengage headlining listing wires from side roof rails, gathering or rolling headlining with listing wires on outside to keep 1959 Buick headlining clean. At front roof bow bend down metal tabs shown in View “F” which support listing wire.
Leave A Comment
You must be logged in to post a comment.