SECTION 4-C – 1959 BUICK ESTATE WAGON TAIL GATE
4-6 DESCRIPTION
The 1959 Buick tail gate and tail gate hardware on the 1959 Estate wagons is entirely new and requires new service procedures. All 1959 Buick tail gates incorporate either a manually operated or electrically operated tail gate window which can be lowered into the tail gate or raised into the upper portion of the back body opening. The manually operated tail gate window is operated by means of a window regulator control handle (folding type) located in the tail gate outer panel. The electrically operated tail gate window can be operated from any one of two control switches: (1) control switch located on instrument panel; (2) lock cylinder control switch (key operated) located in tail gate outer panel. A jamb type switch located in the body tail gate opening prevents the up cycle operation of the electrically operated tail gate window when the tail gate is not completely closed.
After lowering the 1959 Buick tail gate window, the tail gate can be opened by means of a tail gate lock remote control inside handle located at the tail gate belt finishing molding. The tail gate lock remote control incorporates a safety feature which prevents operation of the inside handle unless the tail gate window is in the full down position.
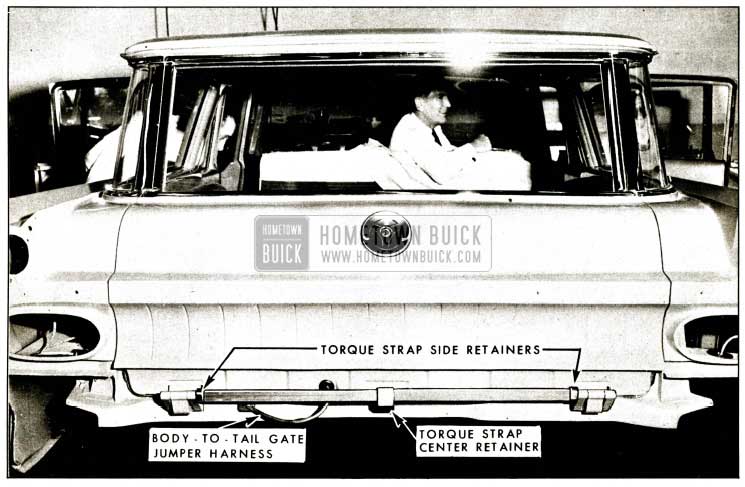
On Estate station wagons the tail gate is counterbalanced by a single torque strap extending between the 1959 Buick tail gate hinges and secured in the center by a retainer attached to the tail gate.
Figure 4-9 is a phantom view which identifies and shows the relationship of major component parts of the 1959 Buick tail gate assembly.

1959 Buick Tail Gate Assembly
Due to the design of the 1959 Buick tail gate hinges the most practical method of removing the 1959 Buick tail gate assembly from the body is to detach the hinges from the body and remove the tail gate with hinges and torque rods attached.
4-7 1959 BUICK TAIL GATE AND HINGES
1959 Buick Tail Gate Assembly – Removal
Due to the design of the 1959 Buick tail gate hinges, the most practical method of removing the 1959 Buick tail gate assembly from the body is to remove the tail gate from the hinges. Where necessary to remove a tail gate hinge the rear bumper must be loosened on the side from which the hinge is being removed to gain clearance for removing the hinge from the body.
- Open 1959 Buick tail gate. Raise floor-to-tail gate filler panel and prop in up position (Figure 4-10).

1959 Buick Tail Gate Assembly Removal

1959 Buick Tail Gate Assembly Removal Illustration
- On styles equipped with electrically operated 1959 Buick tail gate window, disengage body-to-tail gate jumper harness grommet from body (Figure 4-11); then carefully pull jumper harness out of body sufficiently to disconnect connector.
- Scribe or mark position of 1959 Buick tail gate hinge (tail gate side) to facilitate installation in same position.
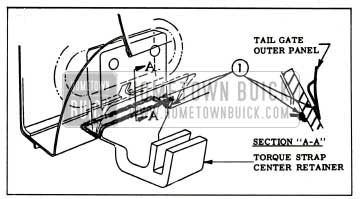
- Loosen (DO NOT REMOVE) tail gate to hinge attaching bolts at both hinges and torque strap center retainer attaching bolts (Figure 4-11).
- Suitably support tail gate to facilitate detachment of tail gate supports; then remove support attaching screws (Figure 4-10) from both sides of tail gate and fold tail gate supports against body.
- With aid of a helper raise 1959 Buick tail gate to approximately a vertical position to relieve torque from strap; then remove tail gate-to-hinge attaching bolts and torque strap center retainer attaching bolts (Figure 4-11). Lift tail gate assembly upward to remove from hinges and torque strap center retainer.
1959 Buick Tail Gate Assembly – Installation
- Clean off old sealer from 1959 Buick tail gate hinge straps (tail gate side) and apply a coat of heavy-bodied sealer to attaching surface of hinge straps, as indicated at “1” in Figure 4-12.
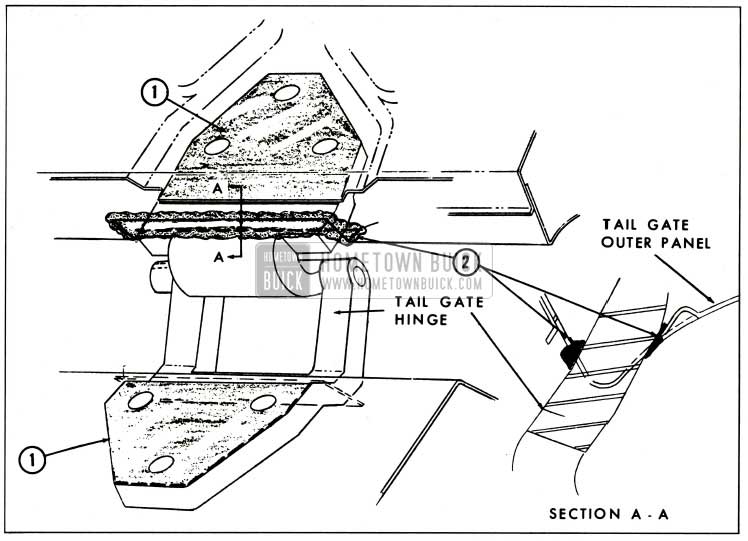
1959 Buick Tail Gate Hinge Anti-Squeak and Sealing
1959 Buick Sealing Torque Strap Canter Retainer
1959 Buick Tail Gate Hinge Assembly – Removal and Installation
- Remove 1959 Buick tail gate assembly, as previously described.
- On side of body from which hinge is being removed, loosen rear bumper sufficiently to allow hinge to be removed from body.
- Scribe or mark position of hinge to facilitate installation in same position.
- Remove hinge attaching bolts and remove hinge from body.
- To install 1959 Buick tail gate hinge assembly, reverse removal procedure. Prior to installing hinge, coat attaching surface of hinge with heavy bodied sealer, as indicated at “3” in Figure 4-12. Install tail gate assembly as described under “TAIL GATE ASSEMBLY Installation.”
1959 Buick Tail Gate Hinge Torque Strap – Removal and Installation
- Remove rear bumper assembly from car.
- Remove torque strap side retainer at each 1959 Buick tail gate hinge (Figure 4-14) and remove torque strap from body.
1959 Buick Tail Gate Torque Strap
1959 Buick Tail Gate Support Assembly – Removal and Installation
- Lower 1959 Buick tail gate.
- Suitably support tail gate to prevent damage to tail gate outer panel. Mark position of support anchor plate on body pillar to facilitate installation in same position.
- Remove 1959 Buick tail gate support attaching screws securing support anchor plates to body and tail gate (Figure 4-22) and remove support assembly.
- To install tail gate support assembly, reverse removal procedure. Align support anchor plate at body with previously made marks.
4-8 1959 BUICK TAIL GATE WINDOW
1959 Buick Tail Gate Window Assembly – Manual or Electric – Removal and Installation
NOTE: The 1959 Buick tail gate has been designed to facilitate servicing (lowering) the window in the event the tail gate cannot be opened due to an inoperative tail gate window. If this condition is encountered, the tail gate inner cover panel can be removed, with the 1959 Buick tail gate in the closed position, by removing all accessible cover attaching screws and pulling cover from under lower retainer. The inner panel access hole cover and the window lower sash channel cam attaching bolts can then be removed which will allow the tail gate window assembly to be manually lowered into the tail gate and facilitate opening the tail gate.
- Remove inner cover panel lower retainer and inner cover panel. Remove tail gate skid strips, tail gate inner cover panel finishing moldings and tail gate inner cover panel.
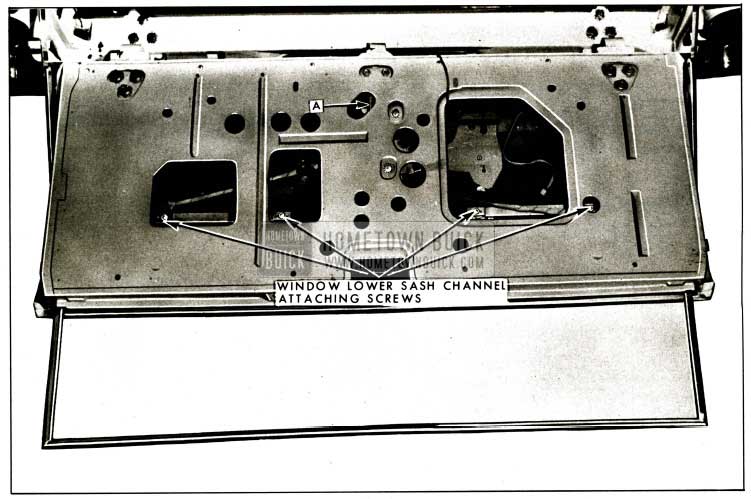
- Detach or cut tail gate inner panel water deflector sufficiently to gain access to window lower sash channel cam attaching bolts (Figure 4-15). Remove tail gate inner panel access hole cover.
1959 Buick Removal of Tail Gate Window Assembly
CAUTION: DO NOT OPERATOR REGULATOR MOTOR after the window assembly is disengaged from the regulator or removed from the 1959 Buick tail gate as operation of the motor with the load removed may damage the unit and make it inoperative.
NOTE: To open the tail gate when window assembly is removed, depress tail gate lock remote control locking lever through access hole “A,” Figure 1,.-15, and at the same time operate the tail gate remote control inside handle.
Prior to resealing tail gate inner panel water deflector, check operation of window and tail gate locking mechanisms. Where necessary, adjust 1959 Buick tail gate window, tail gate lock strikers or 1959 Buick tail gate lock remote control for proper operation. Reseal tail gate inner panel water deflector as specified under “TAIL GATE INNER PANEL SEALING.”
1959 Buick Tail Gate Window Adjustments
The lower end of the tail gate window glass run side channels can be adjusted forward or rearward to tilt the glass for proper alignment with the body run channels and/or to eliminate a binding condition of the window in the side channels. To perform this adjustment, loosen tail gate glass run side channel lower attaching screw at tail gate lock pillar; move lower end of channel forward or rearward, as required, and tighten lower attaching screw.
NOTE: The right and left side channels should be in proper alignment with each other to prevent the window from binding in the channels. The 1959 Buick tail gate window reveal side molding assemblies which incorporate glass channels are adjustable fore or aft for proper alignment with the tail gate glass and upper reveal molding.
- To adjust the 1959 Buick tail gate window forward or rearward for proper alignment with the window glass run channels (on body) and/or to eliminate a binding condition of the window in the tail gate glass run side channels, loosen the tail gate glass run side channel (s) lower attaching bolt at tail gate lock pillar; move lower end of channel forward or rearward, as required, and tighten lower attaching bolt.
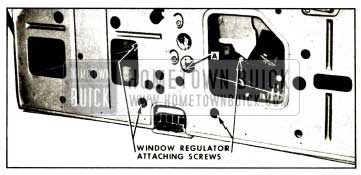
NOTE: The 1959 Buick tail gate window side reveal molding assemblies which incorporate glass run channels are adjustable forward or rearward for proper alignment with the tail gate glass and the upper reveal molding assembly which incorporates a glass channel. - To correct a condition where the glass is “cocked” in the glass run channels, loosen window regulator attaching screws (Figure 4-16), rotate regulator assembly clockwise or counterclockwise, as required, to eliminate “cocked” condition.
1959 Buick Tail Gate Window Regulator Removal
1959 Buick Tail Gate Window Regulator Assembly – Manual or Electric – Removal and Installation
- Remove 1959 Buick tail gate window assembly, as described under “TAIL GATE WINDOW ASSEMBLY-Removal and Installation.”
- Detach tail gate lock remote control right connecting rod from remote control at “A” (Figure 4-16).
- On styles equipped with electrically operated 1959 Buick tail gate window, disconnect tail gate harness connector from regulator motor.
CAUTION: DO NOT OPERATE REGULATOR MOTOR after window assembly is disengaged from the regulator or after the regulator is removed from the tail gate. Operation of the motor with the load removed may damage the unit and make it inoperative. - Remove regulator attaching screws through access holes at locations shown in Figure 4-16. Remove regulator assembly through large access hole.
NOTE: To remove electric motor from regulator assembly see “TAIL GATE WINDOW REGULATOR ELECTRIC MOTOR ASSEMBLY -Removal and Installation.” - To install 1959 Buick tail gate window regulator assembly, reverse removal procedure. Prior to installing regulator, lubricate the teeth on the regulator sectors with “Lubriplate” or its equivalent.
Prior to resealing tail gate inner panel water deflector, check operation of window and tail gate locking mechanism. Where necessary, adjust tail gate window, tail gate lock strikers or tail gate lock remote control for proper operation.
1959 Buick Tail Gate Window Regulator Electric Motor Assembly – Removal and Installation
- Remove 1959 Buick tail gate window regulator and electric motor assembly as described under “TAIL GATE WINDOW REGULATOR ASSEMBLY-Removal and Installation.”
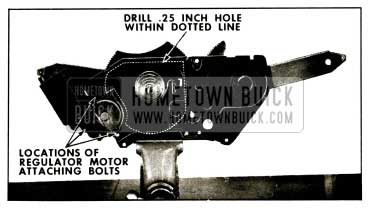
- Place regulator assembly in a vise as shown in Figure 4-17.
1959 Buick Window Regulator Motor Removal
CAUTION: BE SURE to perform steps 3 and 4 before attempting to remove the motor from the regulator. The regulator lift arms which are under tension from the counterbalance spring can cause serious injury if the motor is removed without locking the sectors in position.
NOTE: Do not locate hole less than 1/2 inch away from edge of backplate, sector or holes in backplate and sector. Do not use holes in backplate or sector as they are too large and locking bolt can slip out.
NOTE: Clean off steel chips from the regulator sectors and motor pinion gear after drilling operation.
NOTE: Be sure to remove nut and bolt locking sector after motor is installed.
1959 Buick Tail Gate Window Regulator Outside Handle Assembly – Removal and Installation
- Remove inner cover panel lower retainer and inner cover panel. Remove tail gate skid strips, tail gate inner cover panel finishing moldings and tail gate inner cover panel.
- Detach or cut 1959 Buick tail gate inner panel water deflector sufficiently to gain access to access holes, shown at “A” in Figure 4-18, for removal of handle attaching nuts.
- Carefully raise window until holes in window regulator are aligned with inner panel access holes, shown at “A” in Figure 4-18, for removal and installation of outside handle attaching nuts.
- Through access holes, shown at “A” in Figure 4-18, remove tail gate handle attaching nuts and remove handle assembly and gasket from tail gate. To disassemble 1959 Buick tail gate handle assembly, see “TAIL GATE HANDLE ASSEMBLY Disassembly and Assembly.”
1959 Buick Window Regulator Outside Handle Removal
1959 Buick Tail Gate Window Regulator Outside Handle Lock Cylinder and Cap Assembly – Removal and Installation
- Insert key in lock cylinder and turn window selector lever to lock position.
- Insert a piece of wire (paper clip) in hole on face of lock cylinder cap (selector lever) and depress plunger with wire sufficiently to allow key and selector lever to be turned counterclockwise approximately Ys turn; then, remove lock cylinder and cap (selector lever) assembly and detent spring from handle assembly.
- To install lock cylinder and cap assembly, reverse removal procedure. Prior to installation, lubricate frictional surfaces of lock cylinder and cap parts with “Lubriplate” or its equivalent.
1959 Buick Tail Gate Window Regulator Outside Handle Assembly – Disassembly and Assembly
- Remove window regulator handle assembly.
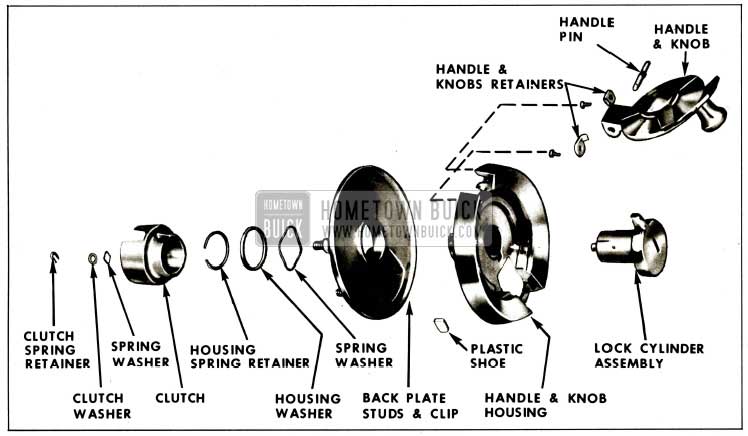
- Using an awl or other suitable tool, remove clutch spring retainer; then remove clutch washer and spring washer, and remove clutch and lock cylinder assembly from unit (Figure 4-19).
1959 Buick Disassembly of Window Regulator Outside Handle
NOTE: Plastic shoes can be removed from handle and knob housing by carefully prying shoes from housing (Figure 4-19).
1959 Buick Tail Gate Window Regulator Outside Handle Lock Cylinder and Case Assembly – Disassembly and Assembly
- Remove window regulator handle assembly.
- Using an awl or other suitable tool, remove clutch spring retainer; then remove clutch washer and spring washer and remove clutch and lock cylinder assembly from unit (Figure 4-19).
- Insert a piece of wire (paper clip) in hole on face of lock cylinder cap (selector lever). While holding lock cylinder case, depress plunger with wire sufficiently to allow key and selector lever to be turned counterclockwise approximately Vs turn; then, remove lock cylinder and cap (selector lever) assembly and detent spring from handle assembly (Figure 4-20).
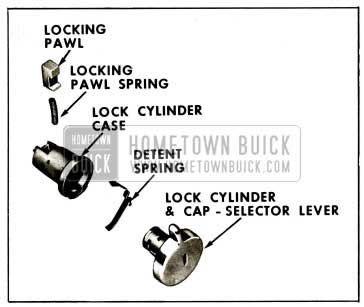
1959 Buick Disassembly of Outside Lock Cylinder and Case
NOTE: When removing lock cylinder and cap assembly from case, place finger over locking pawl to prevent pawl and spring from popping out (Figure 4-20).
1959 Buick Tail Gate Electric Window Lock Cylinder, Switch and Escutcheon Assembly – Removal and Installation – All Buick Estate Wagons Equipped With Electrically Operated Tail Gate Window Regulator
- Remove inner cover panel lower retainer and inner cover panel. Remove tail gate skid strips, tail gate inner cover panel finishing moldings and tail gate inner cover panel.
- Detach or cut tail gate inner panel water deflector sufficiently to gain access to access holes, shown at “A” in Figure 4-18, for removal of assembly attaching nuts.
- Carefully operate window upward until holes in window regulator assembly are aligned with inner panel access holes, shown at “A” in Figure 4-18, for removal and installation of attaching nuts.
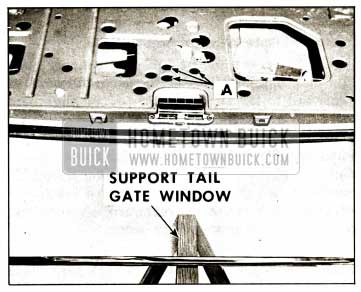
CAUTION: Support portion of window extending out of 1959 Buick tail gate. - Through access holes, shown at “A” in Figure 4-18, remove lock cylinder, switch and escutcheon assembly attaching nuts. Detach assembly from tail gate outer panel sufficiently to disconnect junction block from switch; then, remove assembly and gasket from 1959 Buick tail gate.
To disassemble electric window lock cylinder, switch and escutcheon assembly see “ELECTRIC WINDOW LOCK CYLINDER, SWITCH AND ESCUTCHEON ASSEMBLY-Disassembly and Assembly.”
1959 Buick Tail Gate Electric Window Lock Cylinder and Switch Assembly – Removal and Installation
- Remove 1959 Buick tail gate electric window lock cylinder, switch and escutcheon assembly.
- Disengage lock cylinder and switch retainer (Figure 4-21) and remove lock cylinder and switch assembly from escutcheon.
- To install lock cylinder and switch assembly, reverse removal procedure.
1959 Buick Tail Gate Electric Window Lock Cylinder and Switch Assembly – Disassembly and Assembly
- Using a pointed tool inserted through holes in lock cylinder case, depress tab of switch clips and remove clips (Figure 4-21).
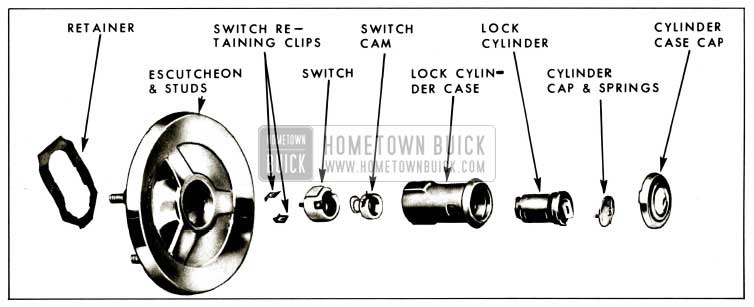
1959 Buick Disassembly of Window Electric Lock Cylinder and Switch
NOTE: The crimped flange on production lock cylinder case caps necessitates damaging cap during removal from lock cylinder case; however, service replacement caps are available which have four (4) bend over tabs for installation.
4-9 1959 BUICK TAIL GATE LOCK
1959 Buick Tail Gate Lock Assembly (Right or Left) – Removal and Installation
- Remove 1959 Buick tail gate window assembly.
- Remove 1959 Buick tail gate window glass run side channel attaching screws (Figure 4-22) and remove channel from side of tail gate from which lock is being removed.
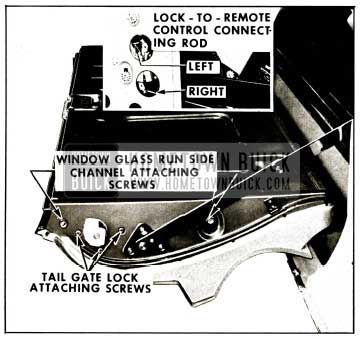
1959 Buick Removal of Tail Gate Lock
1959 Buick Tail Gate Lock Sealing
When attaching connecting rod to lock bell crank lever, make sure bell crank lever is in position, shown in Figure 4-26. When installing connecting rod to remote control, gently pull connecting rod towards remote control lever to seat bell crank lever at lock; turn remote control lever adjusting screw (Inset Figure 4-22) until hole in lever is aligned with end of connecting rod ; then install connecting rod to lever.
NOTE: Check clips at ends of remote control levers for proper retention of connecting rods and replace, if necessary.
Prior to resealing water deflector, check operation of 1959 Buick tail gate locking mechanism.
1959 Buick Tail Gate Lock Striker – Removal and Installation
- Open 1959 Buick tail gate and with pencil mark position of striker on body pillar.
- Remove lock striker attaching screws and remove striker and adjusting plates from body pillar.
- To install 1959 Buick tail gate lock striker, place striker and adjusting plates within marks on body pillar and install striker attaching screws.
1959 Buick Tail Gate Lock Striker Adjustment
- To adjust the tail gate lock striker up or down or forward or rearward, loosen striker attaching screws, shift striker and adjusting plates to desired position, then tighten striker attaching screws.
- DIMENSIONAL SPECIFICATIONS FOR USE OF DOOR LOCK STRIKER EMERGENCY SPACERS.
- Tail gate should be properly aligned before checking spacer requirements.
- To determine if 1959 Buick tail gate lock striker emergency spacers are required, apply moulding clay or body caulking compound in the lock striker notch where the lock extension engages and then close the tail gate to form a measurable impression in the clay or caulking compound.
When dimension “A” from inside face of striker teeth to center of lock extension is less than 1/16″, install emergency spacers and proper length striker attaching screws as directed.
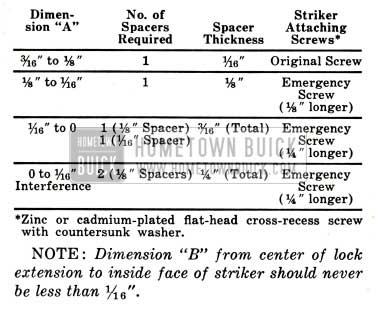
1959 Buick Dimensions of Spacers
NOTE: Dimension “B” from center of lock extension to inside face of striker should never be less than 1/16″.
1959 Buick Tail Gate Lock Remote Control Inside Handle Assembly – Removal and Installation
- Remove tail gate belt finishing molding and tail gate inner cover panel. Detach or cut inner panel water deflector sufficiently to gain access to inner panel.
- Loosen tail gate lock remote control attaching screws (Figure 4-24) and move remote control towards bottom of tail gate sufficiently to disengage end of handle push rod from hole in remote control lever.

1959 Buick Tail Gate Remote Control and Handle Removal
NOTE: In some instances it may be necessary to reach into tail gate and actuate remote control lever to disengage push rod from lever.
NOTE: To engage end of handle push rod into hole in remote control lever, it may be necessary to raise window in 1959 Buick tail gate to gain access to lever. Adjust remote control upward until tabs on handle push rod just contact remote control lever.
Prior to resealing tail gate inner panel water deflector check operation of tail gate locking mechanism and, where necessary, adjust door lock strikers or remote control for proper operation.
1959 Buick Tail Gate Lock Remote Control Assembly – Removal
- Remove 1959 Buick tail gate window assembly.
- Disengage clips securing lock connecting rods to remote control (fig. 4-24) and detach connecting rods from remote control.
- Remove tail gate lock remote control attaching screws (fig. 4-24) . Disengage remote control from inside handle push rod and remove remote control from 1959 Buick tail gate.
1959 Buick Tail Gate Lock Remote Control Assembly – Installation
- Engage inside handle push rod into hole in remote control lever; then loosely install remote control attaching screws.
- Adjust remote control assembly up or down until tabs on push rod just contact remote control lever and tighten remote control attaching screws.
IMPORTANT: If installing a new remote control assembly, remove cotter key at “A” (fig. 4-25), after adjustment, to free locking lever.
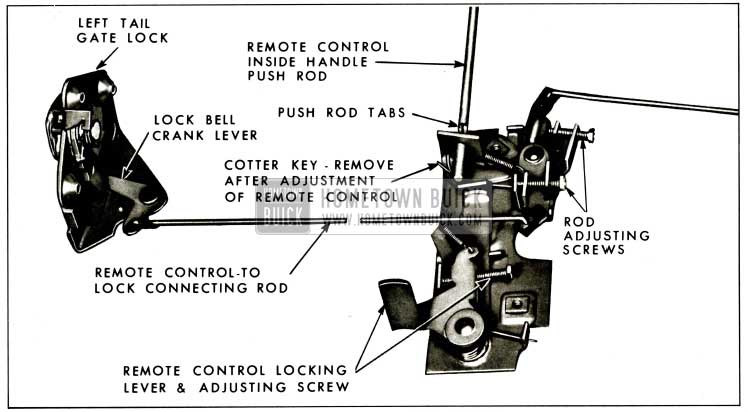
1959 Buick Tail Gate Lock and Remote Control
NOTE: Check clips at ends of remote control levers for proper retention of connecting rods and replace, if necessary.
4-10 1959 BUICK TAIL GATE SEALING
1959 Buick Tail Gate Inner Panel Water Deflector – All Estate Wagon Styles
On all Estate wagon styles a waterproof paper tail gate inner panel water deflector is cemented to the tail gate inner panel and deflects water into the bottom of the tail gate where it can drain out the bottom drain holes. The bottom of the water deflector is cemented to the inner panel in a manner that will deflect water towards designated access holes where the water can readily enter into the bottom of the 1959 Buick tail gate.
IT IS IMPORTANT THAT WHENEVER ANY WORK IS PERFORMED ON THE TAIL GATE WHERE THE WATER DEFLECTOR HAS BEEN DISTURBED, THE DEFLECTOR MUST BE PROPERLY SEALED TO THE TAIL GATE INNER PANEL.
1959 Buick Tail Gate Water Deflector Partial Detachment
- Remove 1959 Buick tail gate inner cover panel lower retainer and inner cover panel. Remove tail gate skid strips, tail gate inner cover panel finishing moldings and tail gate inner cover panel.
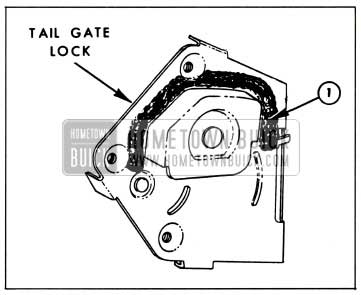
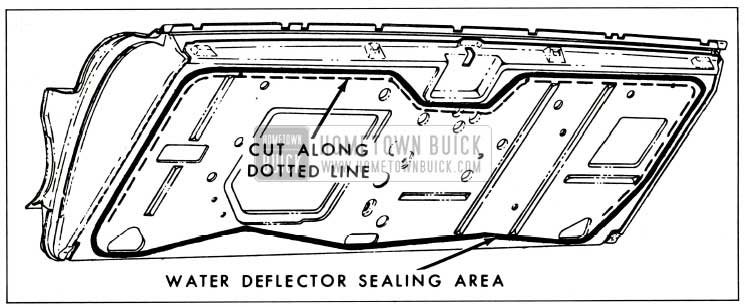
- Carefully cut deflector along top and sides inside cemented edge of deflector, as indicated by dotted line in Figure 4-26.
1959 Buick Tail Gate Inner Panel Water Deflector
NOTE: DO NOT TEAR WATER DEFLECTOR.
Water Deflector – Resealing Procedure
- To reseal water deflector, first inspect water deflector for any tears or holes and, where necessary, repair any tears or holes with waterproof body tape applied to both sides of deflector.
- Properly position water deflector; then carefully tape cut edges of deflector together with waterproof body tape. Tape should be applied along full length of cut to completely seal deflector and should be pressed firmly to deflector to obtain a good bond and seal.
- Install previously removed cover panel. The following procedure for servicing a tail gate inner panel water deflector covers removal of old deflector and installation of a new deflector.
Water Deflector – Removal
- Remove 1959 Buick tail gate inner cover panel lower retainer and inner cover panel. Remove tail gate skid strips, tail gate inner cover panel finishing moldings and tail gate inner cover panel.
- With a sharp scraper or other suitable tool, break cement bond securing edges of water deflector to door inner panel (Figure 4-26) and remove water deflector from 1959 Buick tail gate.
Water Deflector – Installation
- Using old water deflector as template, trim new deflector to proper size.
- Apply a bead of body caulking compound (approximately 3/16″ diameter) to tail gate inner panel along a line as indicated in Figure 4-26.
IMPORTANT: The body caulking compound should be applied along the lower portion of the tail gate exactly as shown in illustration to assure proper drainage of water through inner panel access holes into bottom of 1959 Buick tail gate. - Position water deflector to tail gate inner panel with polyethylene coated side of deflector against inner panel. Firmly press or roll sealed areas to obtain a good bond between deflector and tail gate inner panel.
- Clean off all excess caulking compound; then install previously removed tail gate inner cover panel.
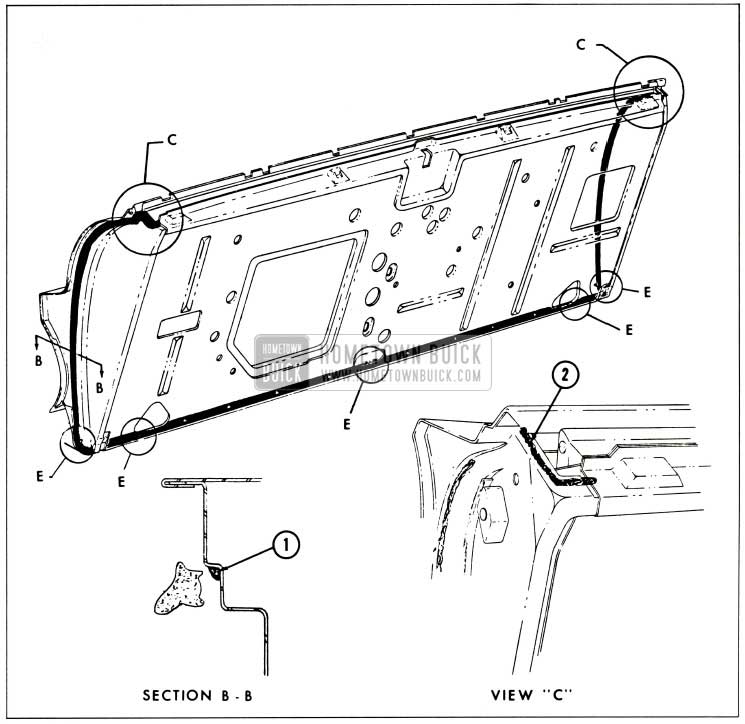
1959 Buick Tail Gate Weatherstrip – Removal
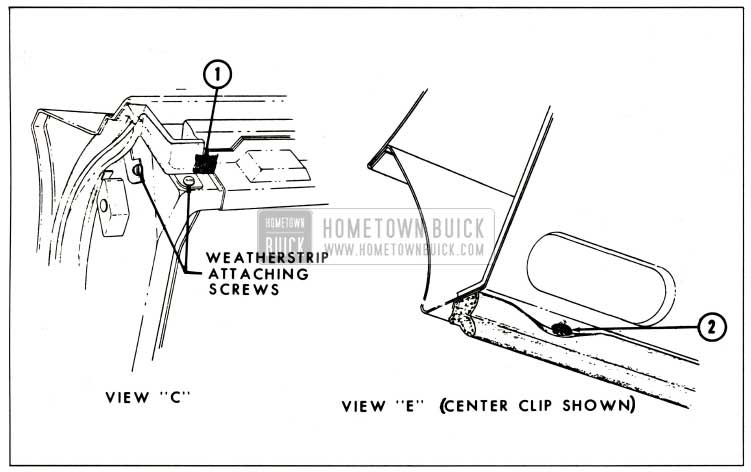
- Remove tail gate belt finishing molding. At both sides of 1959 Buick tail gate, remove screw securing upper tab of weatherstrip and loosen tail gate window glass run side channel upper attaching bolt sufficiently to de ach weatherstrip tab from under screw (Fig. 4-29).
- With a flat-bladed tool, carefully break cement bond securing weatherstrip along 1959 Buick tail gate lock pillars.
- Insert tip of mechanically-retained weatherstrip inserting tool J-5757, or any other suitable tool, at clip locations and carefully snap clips from retaining holes and remove weatherstrip from 1959 Buick tail gate.
1959 Buick Tail Gate Weatherstrip – Installation
- Clean off old cement to insure a clean cementing surface.
- Check weatherstrip clips for proper contour and reform clips, if necessary, using clip reforming tool J-5984 (Figure 4-27).
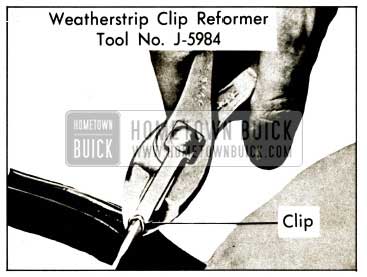
1959 Buick Reforming Weatherstrip Clips
1959 Buick Tail Gate Weatherstrip
NOTE: DO NOT USE EXCESSIVE FORCE OR STRIKE INSERTING TOOL when pushing clips into holes as it may distort shape of clips, resulting in improper weatherstrip retention.
1959 Buick Tail Gate Weatherstrip Illustration
On Estate wagon tail gates, at locations indicated at “E” in Figure 4-28, pull down outer lip of weatherstrip and with a pressure type applicator apply sufficient weatherstrip cement to seal the weatherstrip clip retaining hole as indicated in VIEW “E” Figure 4-28.
1959 Buick Tail Gate Bottom Drain Hole Sealing Strips – Removal and Installation
- With a flat-bladed tool carefully pry out snap-on fastener at each end of strip and remove sealing strip from 1959 Buick tail gate.
- To install sealing strips, reverse removal procedure. To prevent strip from adhering to the tail gate panel and blocking the drain holes, apply a sparing amount of silicone rubber lubricant on the center section of the sealing strip. (See Figure 2-4 under “Front and Rear Door Bottom Drain Hole Sealing Strips.”)
Leave A Comment
You must be logged in to post a comment.