SECTION 1-A 1959 BUICK WINDSHIELD ASSEMBLY
1-1 1959 BUICK WINDSHIELD GARNISH MOLDINGS – ALL STYLES
Description
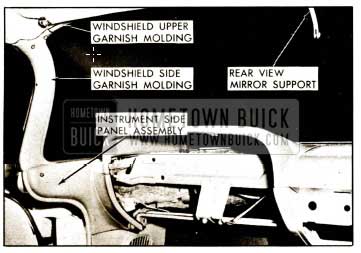
The 1959 Buick windshield garnish moldings which are secured in place by screws consist of an upper right and left garnish molding arid a right and left side garnish molding. The lower garnish molding is an integral part of the upper sections of the instrument panel. The inboard end of each upper garnish molding telescopes over a leg on the rear view mirror support.
1959 Buick Windshield Garnish Moldings
Garnish Mouldings – Removal and Installation
- Place protective coverings over front seat and instrument panel.
- Remove instrument side panel assemblies.
- Remove the side garnish moldings.
NOTE: On “29 ,” “37 ,” “39” and “67” styles the rear flange which overlaps the 1959 Buick windshield pillar pinchweld is secured in place by a screw at the lower end of the flange.

1959 Buick Windshield Garnish Mouldings-Convertibles
NOTE: On convertible styles remove sunshade support assemblies and folding top front roof strikers prior to removing upper garnish moldings.
1-2 1959 BUICK WINDSHIELD REVEAL MOULDINGS
Description
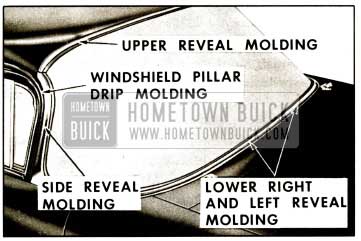
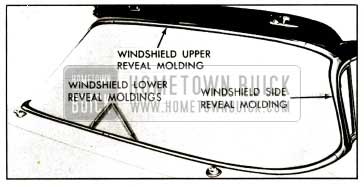
The 1959 Buick windshield reveal moldings consist of a one-piece upper molding, a right and left side reveal molding and a right and left lower reveal molding. The center escutcheon is an integral part of the lower right reveal molding. The upper reveal molding is secured in” place by nut and washer assemblies and by a screw at each end of the molding. The side reveal moldings are secured in place by screws. The lower reveal moldings are secured by clips and screws.
Reveal Molding Removal
- Place protective covering over front seat assembly, instrument panel and front fenders. Protect adjacent paint finish with masking tape.
- On convertible styles, lower top.
- On inside of body remove windshield upper garnish moldings and rear view mirror support.
- On all closed styles, detach headlining along windshield header to expose access holes to molding attaching nut and washer assemblies. Then with aid of 5/16″ deep socket remove molding attaching nut and washer assemblies.
- On convertible styles use 5/16″ deep socket and remove molding attaching nut and washer assemblies through access holes in 1959 Buick windshield header.
- On all styles except convertibles, remove windshield pillar drip molding.
- Loosen lower reveal molding rear attaching screws (see fig. 1-3).
1959 Buick Windshield Reveal Molding
1959 Buick Windshield Reveal Moldings-Convertibles
Remove side reveal molding attaching screws and slide molding rearward to disengage lower end of side reveal molding from end of lower reveal molding and remove molding.
NOTE: Center escutcheon is an integral part of right molding.
Reveal Molding Installation
- To install, replace upper reveal molding attaching nut and washer assemblies where necessary and reverse removal procedure.
- In addition, apply medium-bodied sealer to all reveal molding screw attaching holes; and on “11” and “19” styles also apply a bead of medium-bodied sealer to rear inboard surface of side reveal molding as shown in figure 1-5 prior to installing moldings.
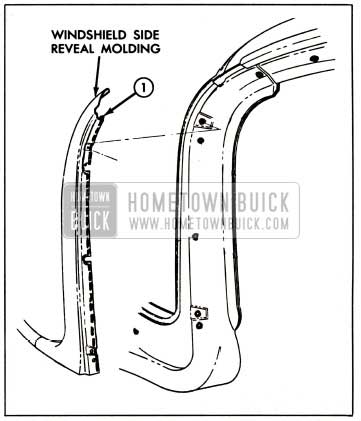
1959 Buick Windshield Side Reveal Molding Installation
1-3 1959 BUICK WINDSHIELD GLASS
1959 Buick Windshield Glass Removal
- On convertible styles lower top.
- Place protective covering over hood, front fenders and front seat assembly.
- Remove 1959 Buick windshield garnish and reveal moldings, and right and left instrument upper panel assemblies.
- On inside of body loosen lip of rubber channel from pinchweld flange along top and sides of windshield as follows:
With palm of hand, apply pressure on edge of glass as shown in figure 1-6.
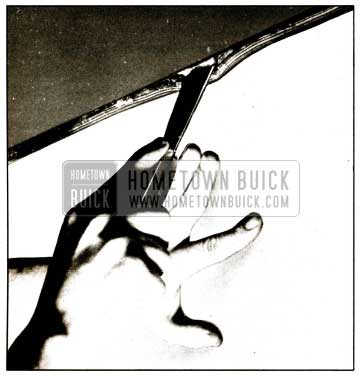
1959 Buick Windshield Removal
At same time use a putty knife or other suitable tool and carefully assist rubber channel over pinchweld flange.
Checking Body Windshield Opening
Due to the size and contour of the wraparound windshield, it is important that the body windshield opening be checked thoroughly before the installation of a replacement 1959 Buick windshield glass. The procedure below outlines the method which may be used to check the windshield opening.
- Remove 1959 Buick windshield from body.
- Check windshield rubber channel for any irregularities.
- Clean off old sealer from around windshield opening and check entire body opening flange for any irregularities.
- Install eight (8) windshield alignment blocks J-7662 shown in figure 1-7 to retaining flange at following locations.
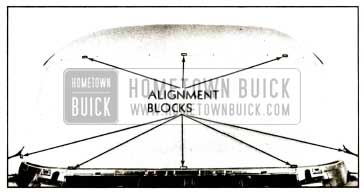
1959 Buick Checking Windshield Opening with Alignment Blocks
Position one (1) block over lower retaining flange just inboard of each wiper transmission. Position another block over lower retaining flange, midway between block at each transmission and corner of windshield opening. Position final block on lower retaining flange in center of windshield opening. Position one (1) block over upper retaining flange at a point immediately above block at each wiper transmission and final block at center of opening.
NOTE: If excessive effort is required to install replacement glass on blocks, remove glass and recheck windshield opening.
CAUTION: Care should be exercised to make certain glass does not strike body metal during installation. Edge chips can lead to future breaks.
1959 Buick Windshield Opening Check
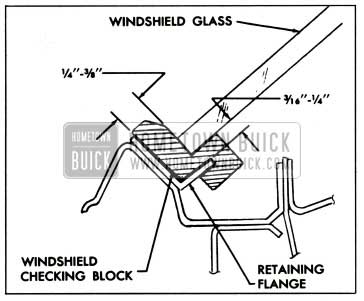
Check glass to body relationships as follows:
- The inside surface of glass should be a uniform distance from retaining flange. The dimension should be from 3/16″ to 1/4″.
- The outer edge of glass should be a uniform distance from body metal, measured in the plane of glass. This dimension should be from 1/4″ to 3/8″.
1959 Buick Windshield Glass Installation
- Check 1959 Buick windshield drain gutter and drain hose at each end of gutter for any obstructions and clean out if necessary.
- Clean out old sealer in glass cavity of windshield rubber channel and around base of rubber channel.
- Install rubber channel to glass.
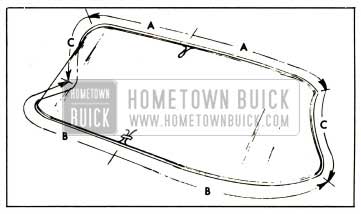
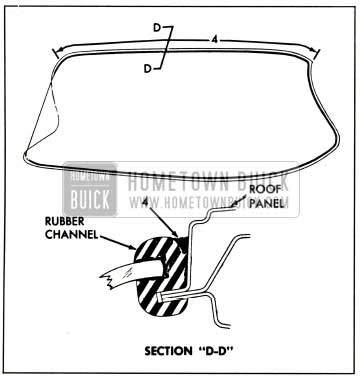
- Insert a strong cord into pinchweld cavity of rubber channel completely around windshield. Tie ends of cord and tape to inside surface of glass at top and bottom center of glass as shown in figure 1-9.
1959 Buick Windshield Installation
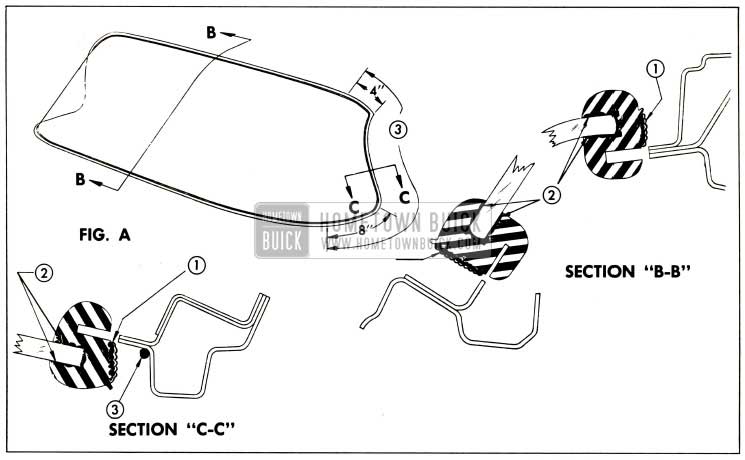
1959 Buick Windshield Sealing
- From top center of windshield to right and left upper corners of windshield as indicated by “A” in figure 1-9.
NOTE: After performing above step, make certain that the engaging lip of the rubber channel is seated adjacent to the outer surface of the retaining flange along distance indicated by “B” and “C” in figure 1-9. This is necessary to relieve as much strain on the glass as possible and to permit easier engagement of the lip over the retaining flange when the string is pulled. - From lower center of windshield to right and left windshield side pillars as indicated by “B.”
- From right and left upper corners of windshield to lower end of windshield pillar as indicated by “C.”
1959 Buick Windshield Sealing Rubber
1-4 REAR VIEW MIRROR SUPPORT – SUN SHADE SUPPORT – FOLDING TOP FRONT ROOF RAIL LOCK HANDLE STRIKER – WINDSHIELD PILLAR DRIP MOULDINGS
Rear View Mirror Support-Removal and Installation – All Styles
- Remove windshield upper right or left garnish molding.
- Remove screws securing upper leg of mirror support and telescoping end of opposite garnish molding and remove support. (See figure 1-1.)
- To install, reverse removal procedure.
Folding Top Front Roof Rail Lock Handle Striker-Removal and Installation – All Convertible Styles
- Disengage folding top from front roof rail.
- With a pencil mark location of striker on 1959 Buick windshield garnish molding. (See figure 1-2.)
- Remove screws securing striker and remove striker.
- To install, align striker within scribe marks and reverse removal procedure.
Sunshade Support Assembly-Removal and Installation – All Styles
- Remove screws securing assembly and remove assembly.
- To install, reverse removal procedure.
Windshield Pillar Drip Moulding – Removal and Installation – All Styles Except Convertibles
- On “37” and “39” styles remove front portion of side roof rail weatherstrip to expose length of drip molding as shown in figure 1-12.
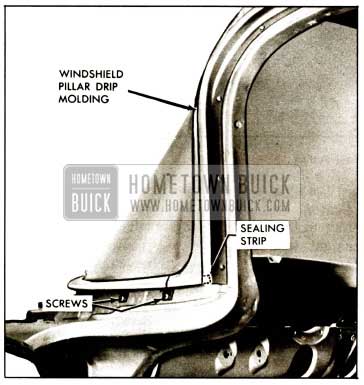
1959 Buick Windshield Pillar Drip Moulding
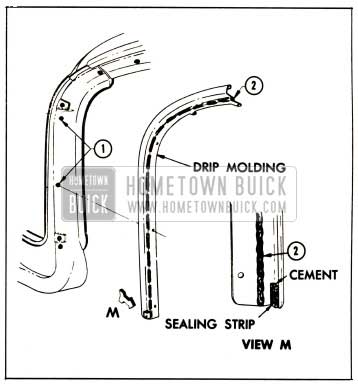
1959 Buick Windshield Pillar Drip Moulding Illustration
Leave A Comment
You must be logged in to post a comment.