SECTION 7-C 1959 BUICK CONVERTIBLE ROOF RAIL WEATHERSTRIPS
7-5 DESCRIPTION
The sealing along each folding top side roof rail is accomplished by a front, center and rear section of weatherstrip. These weatherstrips are attached to the side roof rails with nuts on the three integral studs of each weatherstrip section. In addition, both ends of the side roof rail front weatherstrip and the forward ends of the center and rear side roof rail weatherstrips are secured to the side roof rail with screws. Two additional screws are used to secure the preformed forward section of the side roof rail front weatherstrip to the front roof rail.
“An additional screw is used to secure the folding top compartment side panel weatherstrip portion of the rear side roof rail weatherstrip to the rear quarter inner panel.”
The procedure below outlines the removal and installation of all three (3) sections of weatherstrip. Each section may be removed and installed separately if desired.
7-6 SERVICING PROCEDURES
Removal of Side Roof Rail Weatherstrips
- Lower top halfway.
- Remove weatherstrip attaching screw(s) at end(s) of each section of weatherstrip.
- Remove the two screws at the preformed forward end of the side roof rail front weatherstrip. Remove two screws securing end of front roof rail weatherstrip retainer. Then with a flat-bladed tool, carefully break cement bond between front roof rail rear weatherstrip and side roof rail front weatherstrip at the butt joint.
- Remove weatherstrip attaching nuts and washers and remove weatherstrips. Several of the attaching nuts and washers are shown in Figure 7-16.
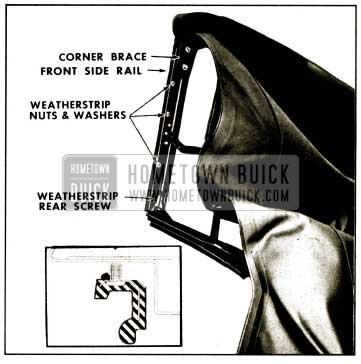
1959 Buick Side Roof Rail Weatherstrip
Installation of Side Roof Rail Weatherstrips
- Clean off cement from front and side roof rails to insure clean cementing surfaces.
- Apply a ribbon of body caulking compound along entire length of attaching surface on each side roof rail weatherstrip section just outboard of the integral studs and reverse removal procedure, Figure 58A-89A.
- Apply an approved weatherstrip cement to adjoining surfaces of the side roof rail front weatherstrip and the front roof rail rear weatherstrip. Install side roof rail weatherstrip to form “butt” joint with front roof rail weatherstrip. Reinstall front roof rail weatherstrip retainer screws. Clean off excess cement and sealer.
- Install the two screws securing preformed forward end of side roof rail front weatherstrip to front roof rail.
- “At the rear of the rear side roof rail weatherstrip, pull folding top compartment side panel weatherstrip section down so that openings in weatherstrip fit around the attaching nuts that secure the rear quarter window glass run channel to the rear quarter inner panel and secure weatherstrip to quarter inner panel with screw and washer assembly.”
Adjustment of Side Roof Rail Weatherstrips
- The side roof rail weatherstrip sections may be adjusted inboard or outboard. To adjust, remove attaching screws, loosen attaching nuts and position as desired. Tighten nuts and reinstall attaching screws. If necessary, drill new holes for attaching screws.
NOTE: The side roof rail weatherstrip front section may also be adjusted fore or aft. - The side roof rail weatherstrips may also be adjusted downward. To perform this adjustment, loosen weatherstrip as required and insert a tapered waterproof cardboard shim between weatherstrip and side roof rail, tighten weatherstrip attaching nuts and reinstall attaching screws.
Front Roof Rail Weatherstrip
Two weatherstrips of different types are used along the front roof rail. The front weatherstrip is a trim covered 3/8″ diameter round rubber which is tacked to the front roof rail trim stick. The rear weatherstrip is a door weatherstrip type section and is secured to the front roof rail by weatherstrip cement and by the rear edge of a two-piece metal retainer. See Figure 7-17.
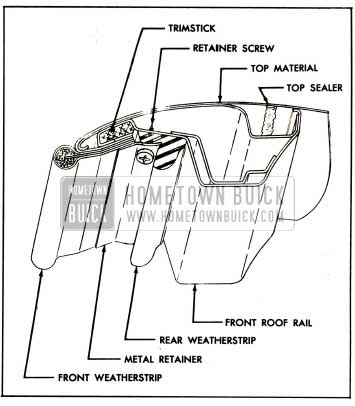
1959 Buick Front Roof Rail Sealing and Construction
To remove either weatherstrip, lower the folding top and remove the two-piece metal retainer; remove tacks securing front weatherstrip or break cement bond securing rear weatherstrip. To install weatherstrip, reverse removal procedure. When installing rear weatherstrip, follow cementing instructions outlined for front door auxiliary weatherstrip.
Leave A Comment
You must be logged in to post a comment.