SECTION 8-B 1959 BUICK POWER WINDOW CIRCUITS AND TROUBLE DIAGNOSIS
8-2 1959 BUICK POWER WINDOWS
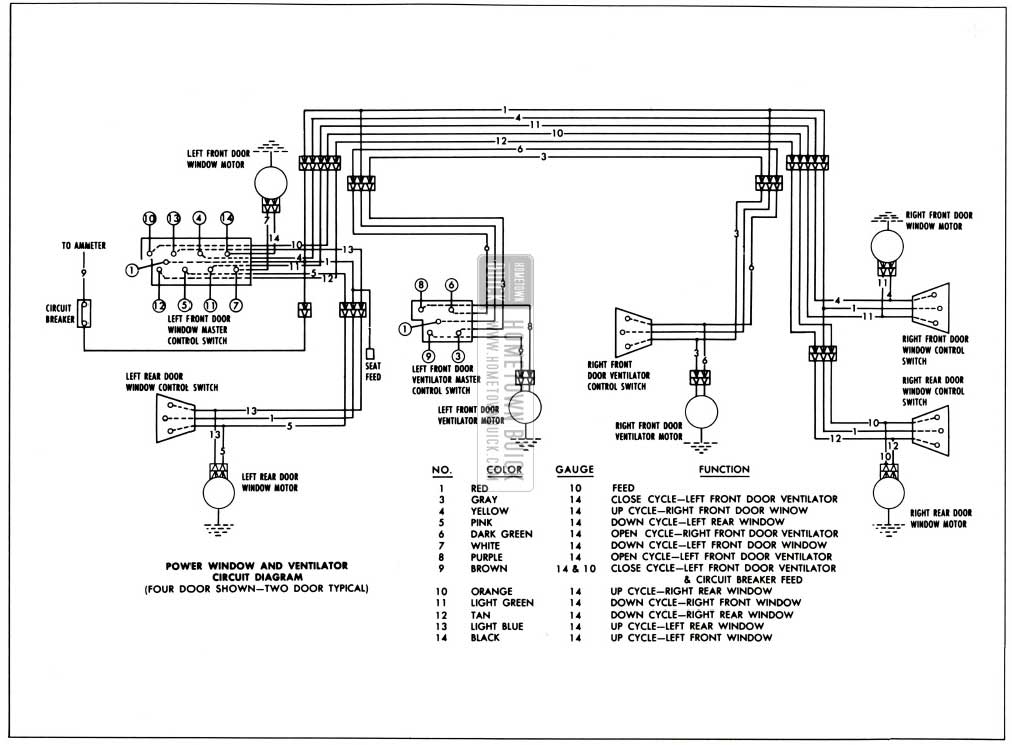
Before performing an intensive checking procedure to determine the failure in the circuit, be sure to check the harness connections beneath the outer ends of the instrument panel for proper installation. A list of typical window failures which could be due to improper connections are outlined later. The checking procedures below may be used to check the operation of a switch or motor after the cause of the electrical failure has been isolated to a particular part of the circuit. Refer to Figure 8-9 for the circuit diagram of the 1959 Buick power window circuit.
1959 Buick Power Window Circuits
Checking Circuit Breaker
- Beneath instrument panel at left shroud, use a light tester to check for presence of current at power feed (brown wire) terminal. If tester does not light, check for an open or short circuit in brown colored wire leading to the ammeter. See Figure 8-10.
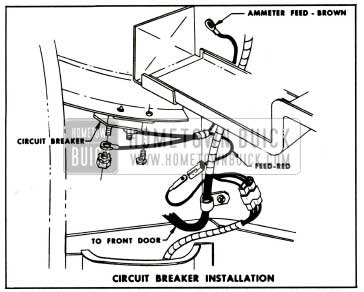
1959 Buick Circuit Breaker Installation
Checking For Current at Door Window Switch
Use light tester to check for current at feed terminal of the window control switch block as shown in Figure 8-11.
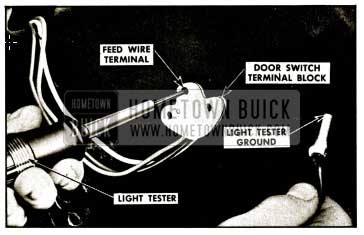
1959 Buick Checking Door Window Control Switch Feed
1959 Buick Checking Door Window Control Switch
Checking Window Control Switch
Place a No. 12 jumper wire on switch terminal block between the power feed terminal and one of the two motor lead terminals. If the motor operates with the jumper wire, but does not operate the switch, the switch is defective.
Repeat this check on the remaining power window motor lead. See Figure 8-6.
Checking Wires Between Door Window and Door Window Motor
- Place a No. 12 gauge jumper wire on switch terminal block between power feed terminal and terminal of motor to be checked.
- With light tester check for current at terminal being checked. If tester does not light, there is an open or short circuit in the harness between the control switch and harness to motor connector.
Checking Door Window Motor
- Check widow regulator and channels for possible mechanical bind of window.
- Check attachment of window motor to inner panel to insure an effective ground.
- Connect one end of a No. 12 gauge jumper wire to the power source and the other end to one of the terminals on the window motor.
- If the motor fails to operate with a jumper wire, the motor is defective and should be repaired or replaced as required. Check the other motor lead in the same manner.
Typical Failures of 1959 Buick Power Window
The following typical failures and corrections have been listed as an aid for eliminating electrical failures in the 1959 Buick power window electrical circuit. The right and left rear door or quarter window circuits are essentially the same as the right front door window circuit; therefore, all references to the right front door window circuit will also apply to the right or left rear door or quarter window circuits. It should be noted that multiple failures in the circuit may lead to a combination of conditions, each of which must be checked separately. See circuit diagram shown in Figure 8-9.
Condition:
None of the windows will operate.
Cause:
Short or open circuit in power feed circuit.
Correction:
- Check circuit breaker operation.
- Check feed connector to power harness beneath left outer end of the instrument panel.
- Check the feed circuit wires for possible short or open circuit.
Condition:
Right door windows do not operate from master control switch on left front door or from respective control switches on right doors. All left door windows operate.
Cause:
Short or open circuit between left and right door harness and power window front harness.
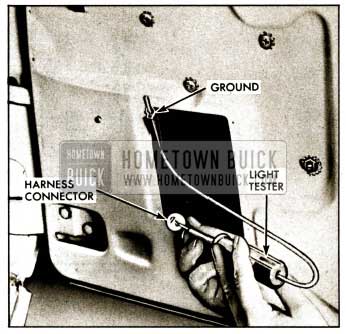
1959 Buick Checking for Current at Harness Connector
Correction:
- Check harness connectors beneath outer ends of instrument for proper installation.
- Check wires in 1959 Buick power window front harness for possible short or open circuit.
Condition:
Right door windows will operate from left door master control switch but will not operate from right door control switches. Left door windows operate.
Cause:
Open or short circuit in feed wire from left door harness to right door harness.
Correction:
Follow up feed wire from left door harness, through power window front harness, into the right door harness for possible short or open circuit.
Condition:
Right rear door window will not operate from master control switch on left door or from switch on right door. All other windows operate.
Cause:
- Short or open circuit in affected window control switch or window motor circuit.
- Possible mechanical failure or bind in window channels.
- Defective window motor.
Correction:
- Check operation of rear door window control switch.
- Check circuit from window control switch to window motor for short or open circuit.
- Check window regulator and channels for possible mechanical failure or bind.
- Check operation of motor.
1959 Buick Power Ventilator Circuit
The 1959 Buick power ventilator circuit is very similar to the power window circuit as shown in Figure 8-9. The checking procedures and troubleshooting procedures outlined for the power windows may also be used in locating and correcting failures in the power ventilator circuit.
Leave A Comment
You must be logged in to post a comment.