SECTION 4-A 1959 BUICK BACK WINDOW
4-1 1959 BUICK BACK WINDOW 39 STYLES
The “39” style bodies feature a new wraparound back window which is secured in the body opening by a conventional rubber channel. Due to the size and contour of the new wraparound back window it is important that the 1959 Buick back window body opening be checked before installation of a replacement glass.
1959 Buick Back Window Assembly – Removal
- Remove rear seat cushion and back assemblies. Place protective coverings over parcel shelf trim and over painted surfaces around 1959 Buick back window.
- Remove 1959 Buick back window garnish moldings.
- Remove back window side and lower reveal moldings. See “Back Window Reveal Moldings” for “39” Styles.
- From inside body, carefully break seal between lip of rubber channel and pinchweld flange around perimeter of glass.
- Carefully push back window and rubber channel assembly rearward until lip of rubber channel is disengaged from pinchweld flange.
- With aid of a helper, lift complete assembly from body opening and place on a protected surface. Remove back window upper reveal moldings from rubber channel and rubber channel from glass.
Checking 1959 Buick Back Window Body Opening – All “39” Styles
Due to the size and contour of the wraparound back window it is important that the back window body opening be checked before the installation of a replacement glass. The following procedure outlines the method which may be used to check the back window body opening.
- Clean off original sealer from 1959 Buick back window body opening.
- Check body pinchweld flange for any irregularities and correct, where necessary.
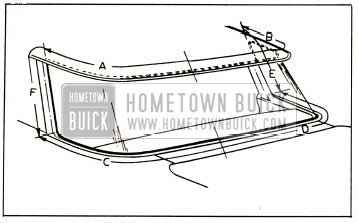
- Install seven (7) windshield checking blocks over pinchweld flange at locations shown in Figure 4-1. DO NOT place checking blocks at the attaching stools for the back window lower reveal moldings.

1959 Buick Back Window Opening Check
- With aid of a helper carefully position replacement glass in 1959 Buick back window opening.
CAUTION: Care should be exercised to make certain glass does not strike body metal during installation. Edge chips can lead to future breaks.- With 1959 Buick back window glass supported and centered in the opening by checking blocks, check relationship of glass to body opening around entire perimeter of glass. The distance between the inside surface of the glass and the pinchweld flange, indicated at “B” in Section “A-A,” Figure 4-1, and between the outer edge of the glass and body metal, indicated at “C” in Section “A-A,” Figure 4-1, should be uniform along the bottom and at the sides of the glass and body opening. Any irregularities should be marked and re-formed. The distance between the outer edge of the glass and body metal, indicated at “C” in Section “A-A,” Figure 4-1, increases at the upper corners and along the top of the opening.
- Mark any sections of body to be reformed; remove glass from opening and re-form opening as required.
- Recheck back window opening again as outlined above. Then MARK CENTER OF GLASS AND BODY OPENING so that the glass can be accurately centered in the opening when installed.
- Install 1959 Buick back window glass.
1959 Buick Back Window Assembly Installation
- Clean original sealer from back window body opening and rubber channel. Check back window body opening and pinchweld flange for any irregularities and correct, where necessary.
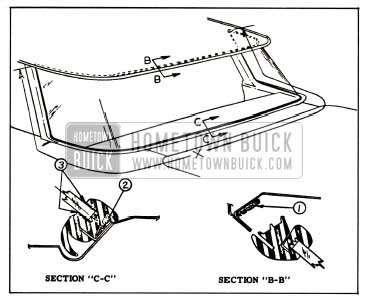
IMPORTANT: If installing a new back window glass, check glass and body opening as described under “Checking 1959 Buick Back Window Body Opening”-“39” Styles. - Apply a continuous ribbon of medium bodied sealer to corner of back window rabbet along sides and top of opening, as indicated at “1” in Section “B-B,” Figure 4-2.
1959 Buick Back Window Sealing-39 Styles
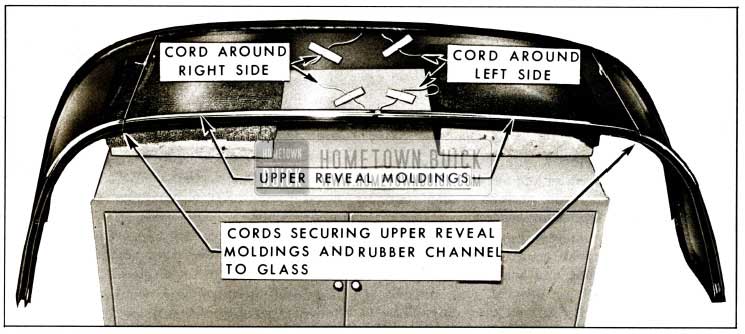
- Install rubber channel to glass; then install back window upper reveal moldings to rubber channel; center moldings according to center marks. Tie moldings and rubber channel to glass, as shown in Figure 4-3.
1959 Buick Back Window Installation
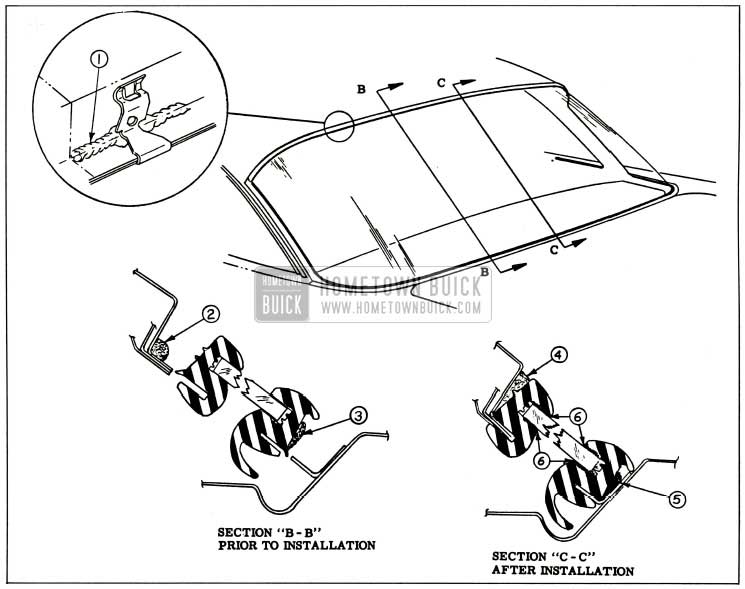
- Insert a strong cord into pinchweld cavity of rubber channel from top center around one side to bottom center; then insert another cord around opposite side. Overlap ends of cords and tape ends to inside surface of glass. (See Figure 4-3.)
NOTE : When inserting cords into pinchweld cavity of rubber channel make sure cords are inserted under cords holding reveal moldings and rubber channel to glass.- Apply a 2 inch wide film of rubber lubricant (soap and water solution) just outboard of pinchweld flange completely around lower portion of back window opening.
- With aid of a helper position glass and rubber channel assembly into body opening snug to outside of pinchweld flange and center glass and channel according to center marks. Remove two cords securing upper reveal moldings and rubber channel to glass.
- Using a suitable tool, pull inner lip of rubber channel (located along lower portion of channel) over pinchweld flange along bottom of opening.
- With aid of a helper applying hand pressure to outside surface of glass, pull cords in rubber channel in sequence A-B-C-D-E-F shown in Figure 4-4 to seat lip of rubber channel over pinchweld flange completely around 1959 Buick back window opening.
1959 Buick Back Window Cord Pulling Sequence
- Using a pressure type applicator, apply sufficient medium-bodied sealer under outer lip of rubber channel as indicated at “2” in Section “C-C,” Figure 4-2 to effect a good seal between body metal and rubber channel along entire lower portion and sides of rubber channel (distance “X” in Figure 4-2).
- Using a pressure type applicator apply weatherstrip cement between ‘ rubber channel and glass on inside and outside of glass as indicated at “3” in Section “C-C,” Figure 4-2 around entire perimeter of glass.
- Install back window lower and side reveal moldings.
NOTE: Seal molding attaching points as specified under “1959 Buick Back Window Reveal Moldings” for “39” Styles.- Clean off all excess sealer and cement; install previously removed parts and remove protective coverings.
1959 Buick Back Window Side Reveal Molding- All “39” Styles – Removal and Installation
- Remove 1959 Buick back window side garnish molding. Remove rear body lock pillar weatherstrip and weatherstrip retainer.
- On inside of body remove one upper and one lower molding clip’ bolt nut. Remove seven (7) molding attaching screws and remove molding from body.
- To install side reveal molding, reverse removal procedure. Seal attaching screw and bolt holes in rear body lock pillar with body caulking compound.
1959 Buick Back Window Lower Reveal Moldings – All Buick “39” Styles – Removal and Installation
- Remove 1959 Buick back window side reveal molding. Remove rear seat cushion and seat back assemblies, rear quarter trim assembly and rear compartment side trim foundation.
- Through rear quarter inner panel access hole and through rear compartment, remove molding attaching nut and sealing washer assemblies, lift moldings upward and remove from body. If removing left molding only, slide molding from under right molding.
- To install lower reveal moldings, reverse removal procedure. Install new nut and sealing washer assemblies to insure adequate sealing at molding clip bolt holes.
4-2 1959 BUICK BACK WINDOW ALL EXCEPT 39 STYLES
1959 Buick Back Window Assembly – Removal
- Remove rear seat cushion and back assemblies. Place protective coverings over parcel shelf trim and over painted surfaces around 1959 Buick back window.
- Remove 1959 Buick back window garnish moldings.
- Remove back window reveal moldings. See “Back Window Reveal Moldings” for 11, 19, 29 and 37 Styles.
- From inside of body, carefully break seal between lip of rubber channel and pinchweld flange around perimeter of glass.
- Carefully push back window and rubber channel assembly outward until lip of rubber channel is disengaged from body pinchweld flange.
- With aid of a helper, lift complete assembly from body opening and place on a protected surface. Remove rubber channel from glass.
1959 Buick Back Window Assembly Installation
- Clean original sealer from back window body opening and rubber channel and install rubber channel to glass.
IMPORTANT: Before installing back window glass, check the back window body opening and pinchweld flange for any irregularities and correct, where necessary. Mark center of back window and body opening. - Check installation of upper and side reveal molding clips at pinchweld flange and replace clips, where necessary. If replacing clips, apply medium-bodied sealer to opening rabbet, as shown at “1” in Figure 4-5, prior to installing clips.
1959 Buick Back Window Sealing
- Apply a continuous bead of medium-bodied sealer approximately 1,4 inch diameter in corner of rabbet, as shown at “2” in Section “B-B,” Figure 4-5, across top of opening on 11, 19 and 29 styles, plus down the sides on “37” styles.
- Insert a strong cord into pinchweld cavity of rubber channel, tie ends together at bottom center and tape to inside surface of glass.
- Apply a continuous ribbon of medium bodied sealer to rubber channel, as shown at “3” in Section “B-B,” Figure 4-5 along bottom of rubber channel on “37” styles; apply sealer along bottom and up sides of rubber channel on 11, 19 and 29 styles.
- With aid of a helper, position 1959 Buick back window assembly into body opening and align center marks. While helper is applying hand pressure to outside surface of glass, carefully pull ends of cord across bottom, up sides and across top of window opening to seat lip of rubber channel over pinchweld flange completely around perimeter of 1959 Buick back window.
- Using a pressure type applicator, apply sufficient medium-bodied sealer under outer lip of rubber channel as indicated at “5” in Section “C-C,” Figure 4-5 to effect a good seal between body metal and rubber channel along entire lower portion of rubber channel.
- Using a pressure type applicator apply weatherstrip cement between rubber channel and glass on inside and outside of glass, as indicated at “6” in Figure 4-5, around entire perimeter of glass.
- Where present, completely fill wedge shaped opening between rubber channel and body opening across top and down sides of back window with medium-bodied sealer as shown at “4” in Section “C-C,” Figure 4-5.
- Install back window moldings as described under “1959 Buick Back Window Reveal Moldings” for 11, 19, 29 and 37 styles.
- Clean off excess sealer and cement; install previously removed parts and remove protective coverings.
1959 Buick Back Window Side Reveal Molding – 4411 and 4419 Styles
- Remove 1959 Buick back window side garnish molding.
- Under lip of back window rubber channel remove nut from molding clip bolt at ends and center of molding.
- On styles on which the roof drip scalp molding overlaps the back window side reveal molding, carefully detach rear portion of roof drip scalp molding sufficiently to remove side reveal molding.
- To install 1959 Buick back window side reveal molding, reverse removal procedure. Prior to installing molding, apply body caulking compound over molding clip bolt holes.
1959 Buick Back Window Side Reveal Molding – Removal and Installation – 4619, 4719 and 4829 Styles; 4411 and 4419 Special Order
- Remove the roof side molding and roof drip scalp molding. (See “Body Exterior Molding” section.)
- Carefully snap side reveal molding from roof drip molding.
- To install 1959 Buick back window side reveal molding, reverse removal procedure.
1959 Buick Back Window Side Reveal Molding – Removal and Installation – All “37” Styles
- On styles with roof panel side molding, remove roof drip scalp molding and roof panel side molding. (See “Body Exterior Moldings.”)
- Remove 1959 Buick back window side garnish molding.
- Under lip of back window rubber channel at upper corners, remove nut from molding clip bolt.
- Using a putty knife or other suitable flat-bladed tool, carefully pry outer edge of molding to free molding from clips under back window rubber channel, then remove molding from body.
- To install 1959 Buick back window side reveal molding, reverse removal procedure. Prior to installing molding, apply body caulking compound over molding clip bolt hole.
- With aid of a helper carefully position replacement glass in 1959 Buick back window opening.
Leave A Comment
You must be logged in to post a comment.