SECTION 7-E 1959 BUICK CONVERTIBLE TOP TRIM ASSEMBLY
7-9 REMOVAL AND INSTALLATION OF 1959 BUICK CONVERTIBLE TOP TRIM ASSEMBLY
Description
The 1959 Buick convertible top trim is attached in a manner similar to that used on past models. The sealing of the top trim assembly is basically the same as on past models. Some of the sealing operations are performed during fabrication of the top, while others must be performed during installation of a service replacement top. These sealing operations are included in the “Installation of Folding Top Trim Assembly” procedure. The materials required for performing the sealing operations are a neoprene-type weatherstrip adhesive for cementing vinyl surfaces and 3M Convertible Top Sealer for sealing the cloth inner lining of the material.
Removal of 1959 Buick Convertible Top Trim Assembly
- Place protective covers on all exposed panels which may be contacted during procedure.
- Remove following trim and hardware items:
- Rear seat cushion and back. (Caution: Disconnect rear seat speaker wire if present.)
- Folding top compartment side trim (arm rests).
- Side roof rail rear weatherstrips; then loosen top flaps from rail.
- At the front of body, raise front roof rail, remove retainers and front weatherstrip and detach top material from front roof rail. See Figure 7-20.

1959 Buick Front Roof Rail Construction
- Detach folding top compartment bag from rear seat back panel, thus exposing rear quarter and rear trim stick attaching bolts.
- At each rear quarter area remove three attaching bolts and washers securing rear quarter trim stick assembly to rear quarter inner panel. See “A” in Figure 7-21.
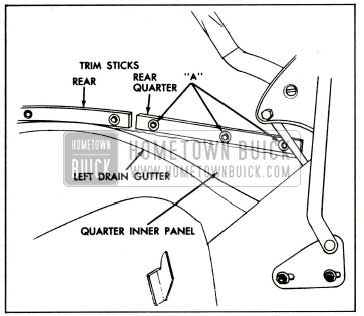
1959 Buick Quarter Trim Stick Attachment
- Remove rear trim stick attaching bolts; then lift trim assembly with attached quarter and rear trim sticks on top of rear compartment front panel.
- Mark old top material in relation to its position on the center trim stick by cutting the selvage top material off flush with the lower edge of the trim stick.
CAUTION: When cutting top material, be careful not to cut selvage edge of back curtain lower panel.- Remove screw securing escutcheon clip at each end of wire-on binding on•rear bow. Then remove wire-on binding from rear bow and detach top material, side stay pads and back curtain with integral quarter stay pads from trim sticks and rear bow; then carefully lower rear bow. The trim sticks, with attached compartment bag, can be removed from body and placed on clean bench.
- Loosen front end of side roof rail front weatherstrip sufficiently to detach top material flap which is cemented to rail.
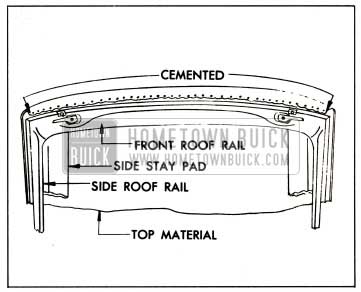
- Remove side stay pads. Stay pads are attached to the front roof rail and the front bow with tacks and to the center bow with screws.
- Lock front roof rail to windshield header.
Installation of 1959 Buick Convertible Top Trim
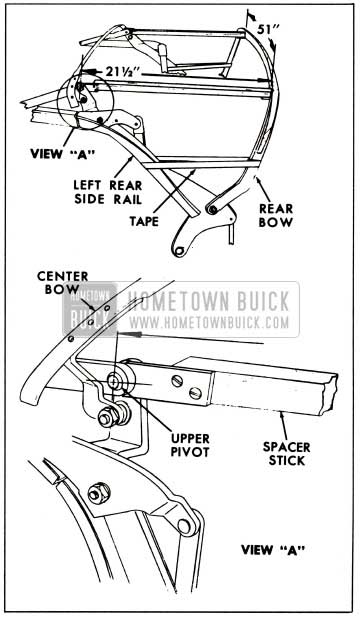
- Position rear bow for proper installation by installing spacer sticks between the lower rolled edge of rear roof bow and the bushing collar of the upper pivot point of each rear side roof rail. (Spacer sticks may be fabricated from wood and steel as shown in Figure 7-22.)
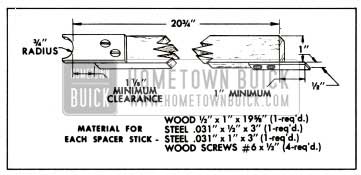
1959 Buick Spacer Stick
Note that the two spacer sticks are placed 51 inches apart, each being 251/2 inches from the centerline of the body as shown in Figure 7-23. Measuring along the side of the spacer stick, the center of the upper pivot point should be 21 1/2 inches from the lower forward rolled edge of the rear roof bow (point of spacer stick contact on rear bow).
- To maintain the proper positioning of the rear bow, temporarily tape the curved section of the rear roof bow to the rear side rail using masking tape as shown in Figure 7-23.
1959 Buick Positioning of Rear Roof Bow
- Tack side stay pads in the conventional manner to the front roof rail, the front bow and the rear bow.
- Position pivoting center bow so that the center of the center bow is 20%. inches from the rolled forward edge of the rear bow. This dimension is measured at the inner edge of the pad.
- Attach side stay pads to center bow with screws and remove spacer sticks and tape.
- Place back curtain window assembly on a clean covered work bench with the exterior (vinyl) surface of the back window valance facing upward. (The large pliable back window must be handled carefully to avoid possible damage due to scratches, abrasions, etc.) Using a hand oiler apply a bead of neoprene-type weatherstrip adhesive to both stitches which secure the back window to the zipper and the back window valance as indicated in Figure 7-24.
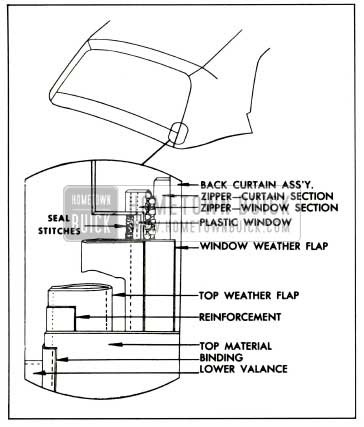
1959 Buick Back Curtain Window Sealing
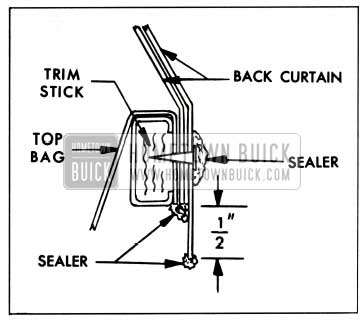
- After sealer has dried, turn back window assembly over with the exterior (vinyl) surface of the back window valance facing down. Apply a bead of 3M Convertible Top Sealer along the inner lower edge of the back window lower curtain inner layer at the area which will be tacked to the rear trim stick. See Figure 7-25.
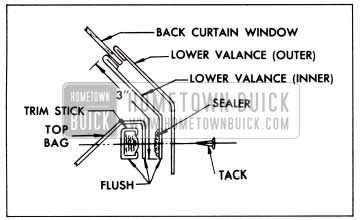
1959 Buick Sealing and Tacking Back Curtain
- Center and position back curtain assembly to rear trim stick over attached top compartment bag. The distance between the lower surface of the trim stick and the upper edge of the back curtain lower valance inner layer must be 3 inches, as shown in Figure 7-25. This dimension can be readily maintained during tacking operations by first placing a chalk mark on the cloth lining surface of the valance inner layer or by cutting the valance along the lower surface of the trim stick.
- Tack curtain assembly to rear trim stick, as shown in Figure 7-26, to a point opposite outer edges of window and leave outer ends of curtain loose. Tacks should be placed close to each side of every bolt hole in trim stick. Then pierce back curtain for each trim stick bolt.
1959 Buick Tacking Back Curtain To Rear Trim Stick
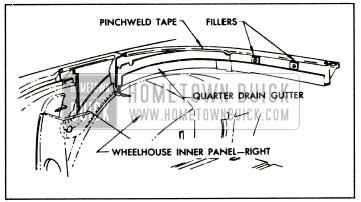
- Inspect rubber trim stick fillers cemented to body below pinchweld as shown in Figure 7-27. Re-cement if necessary.
1959 Buick Checking Trim Stick Filler
- Next, install rear trim stick, with curtain assembly attached, in body. Secure back curtain assembly with one tack in rear bow to prevent damage to plastic sheet. Attach the rear trim stick with bolts at each end, at the sharp bends and at center. Make sure that each bolt is driven completely in to represent finished conditions.
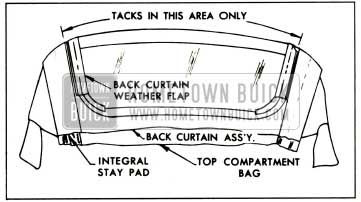
- Tack back curtain assembly to rear bow as shown in Figure 7-28. Make sure all fullness has been drawn from curtain before trimming off excess at rear bow.
1959 Buick Back Curtain Tacked To Rear Bow
NOTE: It may be necessary to install additional trim stick bolts to check the fit of the back curtain along belt line.
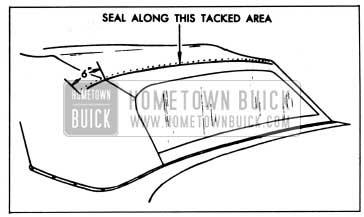
- Apply a bead of 3M Convertible Top Sealer to the inner lining of the top material along the front roof rail. Sealer bead should be roughly parallel with the forward edge of the top material and located so that the sealer will be completely concealed by the front roof rail when top is installed. See Figure 7-20.
- Carefully lay removed top, which was trimmed at the lower edge of the trim stick prior to removal, over the new top. Align old top with new top. Mark cloth lining of new top using the cut edge of the old top as a guide. See step 7 of Removal Procedure.
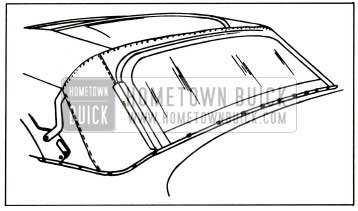
- Position top trim on frame work and center assembly both fore and aft and side to side. Positively locate top by engaging the weather flaps at back curtain as indicated in Figure 7-29.
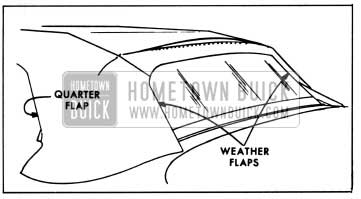
1959 Buick Locate Top By Positioning Flaps
- Apply trim cement to both rear side roof rails at the quarter flap area (see Figure 7-30); to forward ends of both front side roof rails at the front flap areas (see “A” in Figure 7-31) ; and along the leading edge of the front roof rail so that cement covers approximately one inch of upper surface (see “B” in Figure 7-31) and two inches of the lower surface (tacking area) of the front roof rail (see “C” in Figure 7-31).
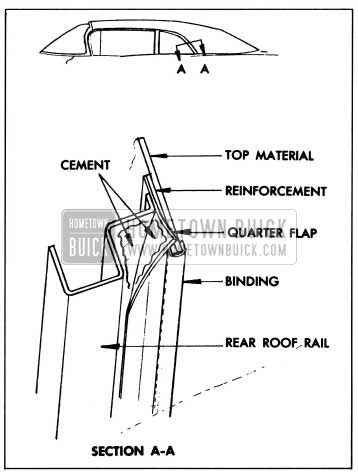
1959 Buick Cementing Flaps To Rear Side Roof Rail
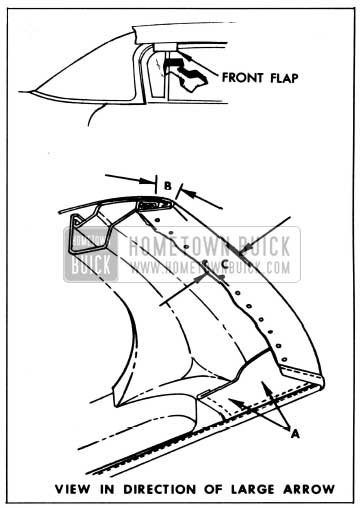
1959 Buick Cementing Top and Front Flap
- Apply trim cement to quarter flaps, carefully position and fasten flaps to rear side roof rails as shown in Figure 7-30.
- Stay-tack top to the rear bow; align and stay-tack the seams on outer ends of rear bow. See Figure 7-29.
- With the top locked to the windshield header, pull top material forward (do not stretch excessively tight) and smooth out on cemented upper surface of front roof rail.
- Unlock top from windshield header, apply trim cement to front flaps and fasten front flaps to side roof rail as shown at “A” in Figure 7-31. Lock top to windshield header.
- Remove trim stick bolts and install top material into body. Trim stick bolts beneath the back window must hold trim stick in position during following operation.
- Inside body draw down outer ends of back curtain and top material. When it has been determined that back curtain and top material are fitting properly together and to the pinchweld finishing molding, install enough trim stick bolts to maintain position and recheck markings on top material. Re-mark top as required.
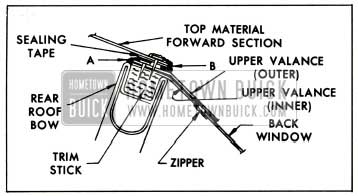
- Draw rearward section of the top material (back curtain upper valance) forward and upward to desired tension (not “drum” tight) and tack material to rear bow.
- Apply a continuous bead of neoprene-type weatherstrip adhesive to the tacked edges of the back curtain upper valance and the back curtain as indicated at “A” in Figure 7-32. Allow adhesive approximately 10 minutes to air-dry.
1959 Buick Sealing at Rear Roof Bow
NOTE: The tacks outboard of seams should be restricted to a distance not to exceed six inches, which is the length wire-on binding extends past seam.
1959 Buick Tacking Top To Rear Roof Bow
- After the rear edge of the forward section of the top material (with the factory installed tape) has been tacked to the rear roof bow and the edges trimmed off, apply a bead of neoprene-type weatherstrip adhesive (or equivalent) to the edge of the 1959 Buick convertible top trim material, around each tack head, and into the two holes pierced into the top material for the wire-on binding clip escutcheons. See “B” in Figure 7-32.
NOTE: Adhesive should be confined as close as possible to the trimmed edge of the top material so as not to be visible after installation of the wire-on binding.- Detach rear trim stick and tack outer ends of back curtain and top material to stick as shown in Figure 7-34. Use previously marked line as locating reference.
1959 Buick Sealing and Tacking of Back Curtain
- Brush 3M Convertible Top Sealer onto all trimmed edges, around each tack head and around each trim stick attaching bolt hole. See Figure 7-34.
CAUTION: All painted surfa.ces adjacent to the belt finishing molding should be adequately covered to prevent possible sealer damage.- Install rear trim stick with all bolts, and install wire-on binding, and clip escutcheons.
- Inside of body, draw quarter section of top material to desired position with short trim stick held in place by hand. Then mark top material along lower edge of trim stick.
- Remove bolts at end of rear trim stick to loosen top material in rear quarter area. Then place small rear quarter trim stick in position along previous marking, roll stick to expose tacking surface and tack top material to trim stick.
- Pierce top material for each trim stick attaching bolt.
- Brush 3M Convertible Top Sealer onto all trimmed edges, around each tack head, around each trim stick attaching bolt hole.
- Install and tighten side and rear trim stick attaching bolts.
- Check alignment of top in quarter area and make any necessary adjustments at trim sticks.
- Check operation and locking action of the top.
- Lock top to windshield header. If necessary, the top material and/or the front flaps may be loosened, repositioned to remove wrinkles and then recemented.
- Unlock top from windshield header and apply trim cement to tacking area of top material (see “C” in Figure 7-31). Tack top material to front roof rail as shown in Figure 7-35.
1959 Buick Cementing and Tacking Top To Front Roof Rail
- When completed, folding top should be free from wrinkles and draws. Install all previously removed trim and hardware and clean any soilage from top material, back curtain or pads.
External Top Material Only – Removal and Installation
To install the external top material only, remove the material without disturbing the back curtain assembly or side stay pads. Then, reinstall the replacement top trim as outlined in the preceding installation procedure, beginning with step 13.
Leave A Comment
You must be logged in to post a comment.