SECTION 13-F 1952 BUICK CONVERTIBLE FOLDING TOP
13-22 OPERATION AND CARE OF 1952 BUICK FOLDING TOP
The 1952 Buick folding tops on convertible coupes are operated by the Hydro-Lectric Power System described in Section 13-G. The following instructions should be observed by anyone operating the top to raise and lower it.
Lowering the 1952 Buick Convertible Top and Installing Boot
- STOP THE CAR. Turn down sunshades and pull rearward on locking handle above center of windshield. Push up the front of top to clear the windshield studs, then return locking handle to locked position.
- With ignition switch turned “ON,” pull top control knob rearward and hold it until top is fully lowered. It is not necessary to lower the rear quarter windows.
- After top is lowered, raise it slightly by hand and pull the top material out from under the roof bow, so that it is in the position on the rear body panel shown in figure 13-52.
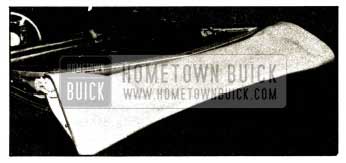
1952 Buick Top in Proper Position on Body Rear Panel
- Pull out top padding on both sides as shown in figure 13-53 and tuck it down into the top compartment. NOTE: Top material and padding must not be pinched by the operating arms of top.
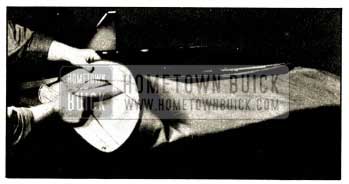
1952 Buick Pulling Out Top Padding
- Fold over the corners of top material, figure 13-54, then roll the material forward into a compact roll and tuck it down into the top compartment.
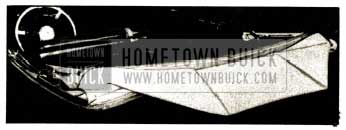
1952 Buick Corners of Top Material Folded Over
- Remove the leather “hold-down” strap from top boot storage bag and slip the end of it through the metal loop located down in the top compartment and also at the center of the front rail, then buckle securely. THIS IS IMPORTANT.
- Place top boot in position over the folded top so that snap fasteners on boot match buttons on belt molding, then snap into place the two rear center fasteners. Loop the fabric straps at inside corners of boot around the top operating arms and buckle snugly. Tuck the front outer flaps of boot down between the top linkage and the inside belt finishing molding, then attach the remaining snap fasteners.
Raising the 1952 Buick Convertible Top
- STOP THE CAR. Remove top boot and unfasten “hold-down” strap. If thoroughly dry, top boot may be folded and placed in the storage bag. Place hold-down strap in storage bag.
- With ignition switch turned “ON,” push forward on top control knob and hold it until top is fully raised.
- Pull rearward on locking handle, draw top down over windshield studs, and push locking handle forward to locked position.
Emergency Operation of 1952 Buick Folding Top
If it becomes necessary, in an emergency, to raise or lower the 1952 Buick convertible folding top when the ignition switch is locked and key is not available, or when the electrical system is inoperative, the top may be operated manually by slowly pushing or pulling on the top front rail. WARNING: Move top very slowly to avoid forcing fluid out of reservoir vent in the power unit. Hydraulic fluid is inflammable and detrimental to car paint. If fluid is lost through vent, reservoir must be refilled to proper level (par. 13-28).
1952 Buick Back Curtain Operations
To lower the 1952 Buick back curtain use zipper fastener at lower right corner, sliding it upward, across the top and down to the opposite corner. Carefully lower the curtain into top compartment.
To raise the back curtain lift it up into position and reverse the operation of zipper fastener. After raising and fastening curtain make sure that the side flaps are inserted into the valance along the sides of curtain opening on the outside.
To remove the back curtain, first slide zipper fastener from the lower left corner to the right corner along bottom of curtain, then slide the other zipper fastener up around top of curtain to free the curtain from window opening.
To install the 1952 Buick back curtain, place it in position in opening and engage bottom zipper fastener at lower corner “A” then slide this fastener over to position “A-1” shown in figure 13-55.
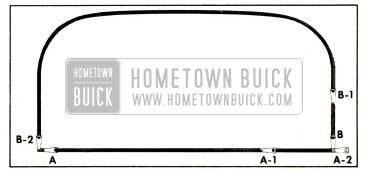
1952 Buick Back Curtain Zipper Fasteners
Engage upper fastener at lower corner “B” and slide this fastener up to position “B-1” while holding curtain upright. Slide bottom fastener from positions “A-1” to “A-2,” then slide upper fastener from positions “B-1” to “B-2” while holding curtain upright. Finally, make sure that curtain side flaps are inserted into the valance along the sides of curtain opening on the outside.
Care and Cleaning of 1952 Buick Convertible Folding Top
- In order to keep the mechanism in good working condition, the top should be operated at least once a month. Once a year, preferably in the Fall, the hydraulic fluid in the Hydro-Lectric Power System must be changed (par. 13-28).
- When the top is folded it MUST be securely strapped down to prevent chafing of top material. The locking handle must also be turned to a locked or horizontal position. Top boot can then be installed to keep top clean and dry.
- To avoid water stains, mildew, or possible shrinkage of the top material, do not permanently keep the top folded if it is damp or water soaked. Raise the top and fasten it above windshield and allow it to dry out. Keep back curtain raised when wet.
- Luggage and miscellaneous objects should not be placed on the folded top, as chafing action of such objects would damage the top material.
- The top compartment behind the rear seat must only be used for storage of the top when it is in a lowered position. The storage of luggage and miscellaneous objects in this compartment will not only interfere with the proper lowering of the top, but may damage or stain the top material or possibly be the cause of back curtain glass breakage.
- Avoid getting grease or oil spots on the top material because when either grease or oil is mixed with ordinary traffic grime it is particularly difficult to remove without leaving evidence of its having been cleaned.
- Do not use a dry cloth to remove dust from the plastic back window. See paragraph 13-2 (e) for instructions on cleaning the back window and top.
- Do not use a scraper to remove frost, snow or ice from the plastic back window. In an emergency, warm water may be used. Use care that this warm water does not contact the glass windows or windshield.
13-23 1952 BUICK FOLDING TOP ADJUSTMENTS
Provision is made for the adjustment of the 1952 Buick Convertible folding top to correct any variation the top linkage and mechanism may have through use.
Normally, the studs on top of windshield header should enter centrally into the guide plates in the top front roof rail. If the top is too far forward, or does not move forward far enough, difficulty may be experienced in latching and unlatching the top at this point. In some cases, more clearance may be needed between the underside of the roof rail and a rear quarter window or the top of a door window.
Service conditions will not be the same on all convertibles, therefore, each job must be carefully studied to determine which of the following adjustments are required. In some cases, a combination of several adjustments will be needed to secure proper top alignment and operation.
Adjustment of Top at Windshield
The top front roof rail should have firm contact with the rubber weatherstrip on windshield header when latched in place. The studs on windshield header are threaded to permit adjustment up or down to provide proper contact of roof rail with weatherstrip. The studs are locked in position by fluted socket set screws which must be loosened before adjustment and tightened after adjustment is completed.
If the top, when in raised position, is either too far forward or back so that studs on windshield header do not enter centrally into the guide plates in top front roof rail, adjust as follows:
- Unlatch the top at windshield and raise top slightly.
- Loosen attaching bolts in corner brace at front end of roof side rail.
- The slotted holes in corner brace will allow a forward or rearward adjustment so that proper alignment may be made with the studs on top of windshield header. Tighten attaching bolts after proper alignment is obtained.
- If the front roof rail is so high, with top fully raised, that it results in difficult locking action or an inadequate weather seal, it may be lowered by placing suitable shims between the side rails and the corner braces at the rear attaching bolts.
- If the front roof rail sets to the right or left so that the guide plates do not center on the studs, the top may be rotated slightly by loosening the hinge attaching bolts in the rear quarters. See figure 13-56.
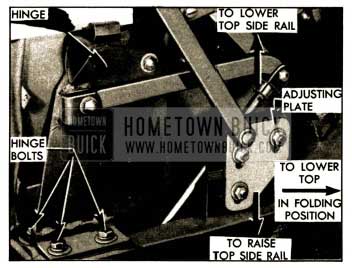
1952 Buick Top Adjusting Plate and Top Bow Hinge In Rear Quarter
Adjustment of Top Up or Down
If the top side roof rail is too high or low in relation to the top of door or rear quarter window, adjust as follows:
- Unlatch the top at windshield and raise the top approximately half way.
- Remove rear seat cushion and back. Remove the rear quarter trim panel on the side to be adjusted.
- Loosen the three attaching bolts at top adjusting plate in rear quarter on side to be adjusted. See figure 13-56. Move adjusting plate straight downward to raise the roof side rail, or move plate straight upward to lower roof rail.
CAUTION: Do not move adjusting plate forward or rearward since the folded position of top will be affected.
- If the side roof rail is still too high or too low after full adjustment of the adjusting plate as described above, further adjustment may be obtained by installing shims under the hinge base at the hinge bolts. A shim under rear end of hinge base will raise the side roof rail and a shim under the forward edge of hinge base will lower the side roof rail.
Adjustment for Folded Position of Top
If the top does not contact the bumper on each side of top compartment when it is down in folded position, loosen the three attaching bolts at top adjusting plate in rear quarter, move plate straight rearward and tighten bolts. See figure 13-56. CAUTION: Do not move plate vertically because this will affect the position of top roof side rail in relation to top of door and rear quarter windows.
Rearward movement of adjusting plate will lower the top further down in its compartment and will add materially to the fit of the top boot in cases where the original folded position of top was too high.
Adjustment of Top Side Rail Weatherstrips to Rear Quarter Windows
When the weatherstrip on a top side rail does not fit properly against the upper edge of a rear quarter window it may be adjusted by loosening the retaining nuts located inside the channel. The retainer bolt holes are slotted to permit lateral adjustment of the weatherstrip.
The weatherstrip at the curved rear end of each quarter window is attached by a sheet metal retainer. To adjust this weatherstrip, pry the beaded outer edge of weatherstrip out of retainer and remove. Loosen retainer attaching screws and shift the retainer as required, then tighten screws and install weatherstrip.
If the weatherstrip does not fit closely enough to the curved rear end of a quarter window, a limited adjustment may be obtained by removing weatherstrip and retainer and placing a waterproof cardboard shim between retainer and the top rear quarter rail. Another method of adjustment is to shift the top bow hinge which is mounted on the body in the rear quarter. By loosening the hinge attaching bolts (fig. 13-49) the hinge may be moved forward or rearward as allowed by oversize bolt holes in hinge. This adjustment also may be used if insufficient clearance exists between rear quarter window and the weatherstrip.
If the methods given above do not provide proper adjustment it will be necessary to adjust the rear quarter window as described in paragraph 13-16.
Leave A Comment
You must be logged in to post a comment.