SECTION 1-A 1958 BUICK LUBRICARE INSTRUCTIONS & 1958 BUICK LUBRICATION CHART
1-1 EVERY 1000 MILES – 1958 BUICK LUBRICARE
- Check engine oil level only after engine has been stopped for at least three to five minutes to allow oil to drain down.
The oil level should be maintained between the “FULL” and “ADD” marks on gauge rod; each space between marks represents 1 quart. Do not fill above the “FULL” mark. See figure 1-3.
See paragraph 1-5 for engine oil recommendations and when to change oil.
- Front Suspension, Steering Linkage, Clutch and Rear Propeller Shaft Lubrication Fittings. Wipe dirt from lubrication fittings, then apply a good grade of water resistant chassis lubricant, under pressure, at the following points (fig. 1-1):
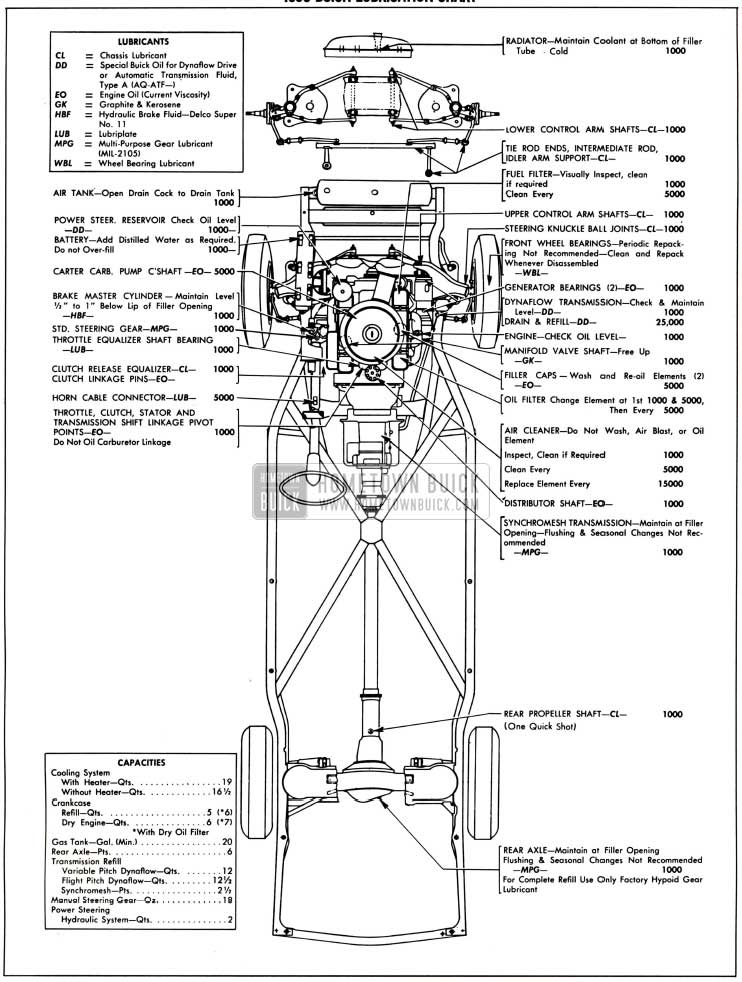
1958 Buick Chassis Lubricare Chart
- Upper Control Arm Shafts (4 fittings)
- Lower Control Arm Shafts (4 fittings)
- Upper Ball Joints (2 fittings)
- Lower Ball Joints (2 fittings)
- Tie Rod Ends (2), Intermediate Rod (2), and Idler Arm Support (1)
- Clutch Release Equalizer (1)
- Rear Propeller Shaft Spline (1) See figure 1-2.
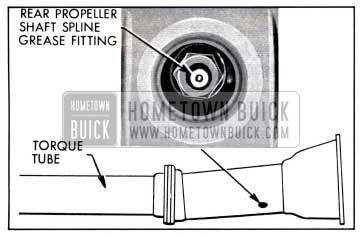
1958 Buick Rear Propeller Shaft Spline Grease Fitting
- Oil Filter. Change original oil filter element at first 1000 miles. Normally serviced every 5000 miles. See instructions in paragraph 1-2.
- Synchromesh Transmission. Check oil level, after allowing time for oil to settle. Clean the surrounding area before removing filler plug. Level should be maintained at filler plug opening by adding Multi-Purpose Gear Lubricant (MIL 2105). Use SAE 90 for temperatures not lower than 10°F. below zero; for temperatures continuously lower than -10°F. use SAE 80. NOTE: Draining and flushing transmission is not necessary unless the lubricant has become contaminated.
- Rear Axle. Check oil level, after allowing time for oil to settle. Clean the surrounding area before removing filler plug. Level should be maintained at filler plug opening by adding SAE 90 Multi-Purpose Gear Lubricant (MIL-2105). When car is operated in temperatures continuously below -10°F., use SAE 80 Multi-Purpose Gear Lubricant. NOTE: Draining and flushing is not necessary unless the lubricant has become contaminated. When complete refilling is required use only Factory Hypoid Lubricant as specified in paragraph 1-6.
- Dynaflow Transmission. Check transmission oil level, with transmission oil warm, transmission in Park, and engine idling. Remove gauge rod located under right side of hood (fig. 1-3), wipe dry with clean cloth then reinstall to full depth. Remove rod and note oil level.
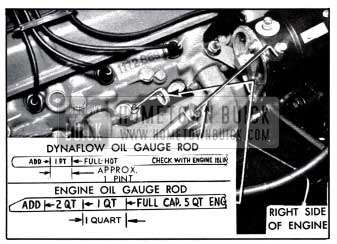
1958 Buick Engine and Dynaflow Oil Gauge Rods
If oil level is more than one inch below the “FULL” mark on gauge rod, add oil specified in paragraph 1-3 but do not fill above the “FULL” mark. Distance between the “FULL” and “ADD OIL” mark represents approximately one pint.
- Fill oil cup with light engine oil.
- Gasoline Filter. Normally cleaned every 5000 miles. However, visually inspect contents of glass bowl and clean if necessary. While bowl is off, inspect filtering element and gaskets and replace if necessary. See instructions in step 4 of paragraph 1-2.
- Air Cleaner. Normally serviced every 5000 miles. If car is operating in dusty territory, however, check condition of air cleaner and clean it if dirty. See instructions in paragraph 1-2.
- Generator; Fan Belt. Fill front and rear oilers to the caps with light engine oil. Wipe off excess or spilled oil.
Inspect fan belt for cracks and for proper tension. See figure 2-38.
- Check coolant level when engine is cold and add coolant to bottom of filler tube. CAUTION: Radiator cap should not be removed when engine is hot because relieving the pressure may cause the cooling system to boil, with resultant loss of water or anti-freeze solution. Filling radiator above correct level may result in loss of water or anti-freeze solution through overflow pipe.
- Add distilled water to bring level to split ring at bottom of filler well. WARNING: Do not overfill. Clean top of battery; if wet with acid, neutralize with soda and wash clean. See figure 1-4.
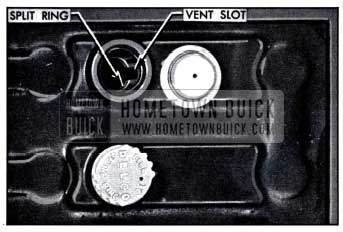
1958 Buick Battery Filler Well Lubrication
- Manifold Valve Shaft. Place a few drops of graphited kerosene on shaft at each end and rotate shaft to work lubricant into bearings. See figure 1-5. If shaft is frozen, free up by tapping ends of shaft lightly with hammer.
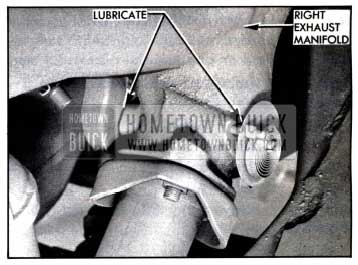
1958 Buick Manifold Valve
- Manual Steering Gear. Clean adjacent area, then remove gear housing filler plug. Add lubricant only as required to bring level to bottom of filler opening, using SAE 90 Multi-Purpose Gear Lubricant as specified for synchromesh transmissions (step 4). Seasonal or periodic change of lubricant is unnecessary.
- Power Steering Gear. Thoroughly clean dirt from reservoir on top of oil pump then remove cover. Add oil specified for Dynaflow.
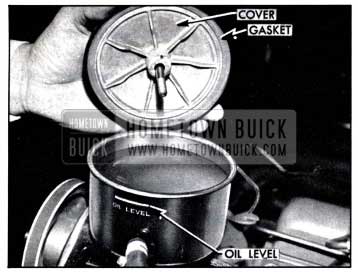
1958 Buick Power Steering Pump Reservoir
- Throttle, Clutch, Stator, and Transmission Shift Linkage Pivot Points. Wipe dirt from pivot points, then apply a good grade of light oil. To lubricate throttle equalizer shaft upper bearing, however, work Lubriplate into bearing. CAUTION: Never oil linkage on carburetor.
- Brake Master Cylinder (or Power Brake Reservoir). On manual brake jobs ‘and on power brake jobs, reservoir is under hood on left side.
Thoroughly clean filler cap nut before removal to avoid getting dirt into reservoir. Add fluid as required to bring level to %” to 1″ below top of filler opening. Use G.M. or Delco Super No. 11 Hydraulic Brake Fluid. Never use reclaimed fluid or any mineral oil.
- Inflate all tires according to tire temperatures, as follows:
- 24 lbs. Starting Pressure-after car has been standing for 3 hours or driven less than one mile.
- 26 lbs. City Pressure-after car has been driven 3 miles or more BELOW 40 MPH.
- 28 lbs. Highway Pressure-after car has been driven 3 miles ABOVE 40 MPH.
WARNING: It is impossible to inflate tires correctly when HOT. Pressure normally increases as tires heat up when driving. Do not deflate tires to offset this increase in pressure.
- Air Poise Reservoir Tank. On Air Poise jobs, open petcock just enough to allow condensed moisture to be blown out. Petcock is located at left end of tank at frame rail and is accessible from beneath the car.
CAUTION: Wear eye protection or avert eyes during this operation. See figure 1-7.
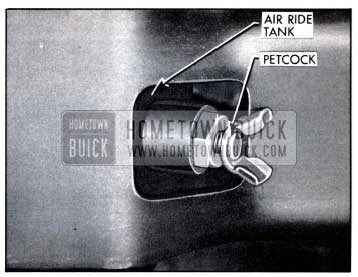
1958 Buick Air Poise Air Reservoir Tank Petcock
EVERY 5000 MILES – 1958 BUICK LUBRICARE
- Oil Filter. Change original filter at first 1000 miles, the second element at first 5000 miles, then change element at each 5000 mile interval thereafter.
Loosen the container bolt and allow oil to drain out. Remove container, element, old gasket. See figure 1-8.
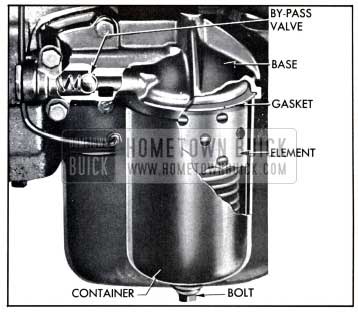
1958 Buick Oil Filter
Wash and dry container and make sure that gasket surfaces are clean. Install new gasket in undercut in filter base; then install new AC Type PF-122 element and old container, tightening bolt securely. Check for oil leaks after engine has run for 5 minutes.
- Air Cleaner and Oil Filler caps. Every 5000 miles (more often under dusty operating conditions) remove the oil filler caps and wash the filtering elements in a non-inflammable solvent. DO NOT USE KEROSENE. Allow elements to drain until dry. Oil the elements and reinstall caps.
For normal operating conditions, remove air cleaner dry element to clean and inspect it every 5000 miles (under dusty operating conditions, every 1000 miles). See figure 1-9.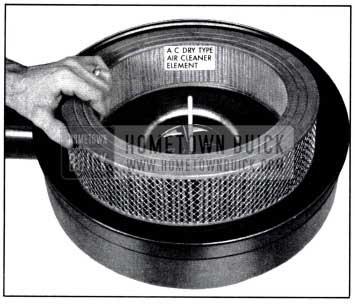
1958 Buick Dry Type Air Cleaner Element
To clean element, repeatedly drop squarely on a flat surface from a height of 2 inches until all loose dust has been removed. Turn element over and repeat process. Do not clean by any other method or element will be damaged. Do not wash, air blast, or oil element.
Thoroughly inspect the element visually for any breaks or holes in the fiber. Replace element if any possible dust leaks are found.
Replace element every 15,000 miles with a new AC Type 63C element. Before installing element, wipe all loose dust from interior of air cleaner. When element and cover are in place, tighten wing nut securely by hand to insure a proper seal on the ends of the element.- Pump Operating Countershaft -Carter Carburetor Only. On 2-barrel carburetors, remove dust cover and apply oil in two oil holes above countershaft. See figure 1-10.
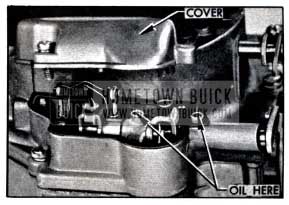
1958 Buick Countershaft Lubrication-Carter 2-Barrel
- Gasoline Filter. Remove glass bowl and dump contents. Soak bowl in a good cleaning solvent to loosen any deposits. Visually inspect filtering element and gaskets; replace if necessary. Wipe bowl clean with a clean cloth and reinstall, tightening finger tight. After assembling fuel filter, always start engine and observe filter carefully to make sure that gasket is not leaking.
- Horn Cable Connector. Pull out plunger of horn cable connector on steering column jacket and apply a small amount of Lubriplate. Work plunger in and out to work lubricant in between plunger and the bakelite insulator.
- Hood Latch and Hinges. Lightly coat hood guide, latch, lever, and dovetail bolt with Lubriplate. Apply engine oil to hood hinge pins.
- Dome Lamp Door Switches. Coat end of switch plunger and contact point on door with stick type lubricant.
- Glove Box Door. Apply a few drops of light engine oil to door hinge pins and wipe off surplus. Sparingly coat lock striker with stick type lubricant.
- Gas Tank Filler Door. Apply a few drops of light engine oil to hinge pins. Wipe off excess oil to prevent accumulation of dirt.
- Lock Cylinders. If key operates roughly in any lock cylinder blow powdered graphite into key slot. DO NOT USE OIL.
- Front Door Hinge Hold-Open Clips. Wipe off dirt and apply a light coat of Lubriplate or its equivalent to hold-open clips.
- Door Lock. Wipe off dirt and apply a thin coat of stick type lubricant on surface of lock bolt housing indicated at “1” in figure 1-11.
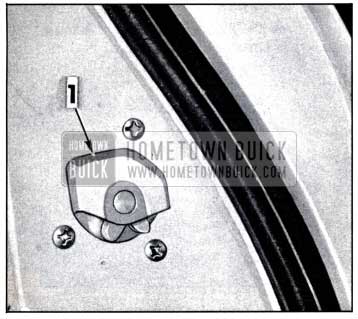
1958 Buick Lubrication of Door Lock
- Door Lock Striker. Wipe off dirt and apply a thin coat of stick type lubricant to top surface of lock bolt striker teeth indicated at “1” in figure 1-12. After lubrication close door several times and remove excess lubricant along the side edge of teeth.
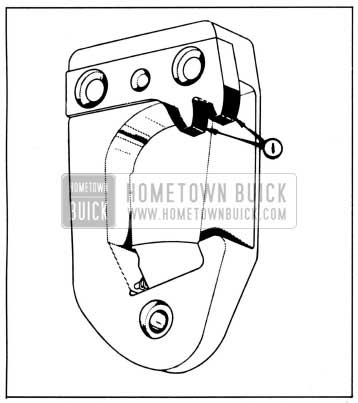
1958 Buick Lubrication of Door Lock Striker
- Rear Door Hinge and Hold-Open Assembly. Wipe off dirt and apply one or two drops of Lubriplate to areas indicated by arrows at “1” in figures 1-13 and 14. Wipe off excess lubricant.
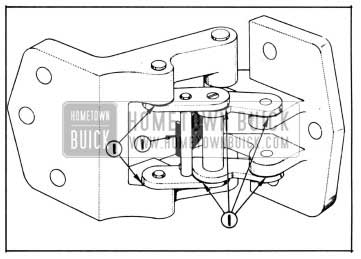
1958 Buick Lubrication of Rear Door Hinge and Hold-Open Assembly-Series 40-60
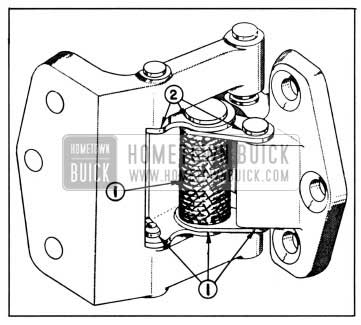
1958 Buick Lubrication of Rear Door Hinge and Hold-Open Assembly-Series 50-70-700
- Rear Compartment Lid Lock Bolt. Apply Lubriplate or its equivalent along area indicated at “1” in figure 1-15. Wipe off excess lubricant.

1958 Buick Lubrication of Rear Compartment Lid Lock Bolt
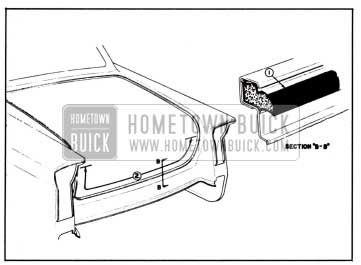
- Front Seat Side Panels-Cars &quipped with Royalite or Leather Seat Side Panels and Leather Seat Trim. Apply a light coat of stick type lubricant along upper edge of front seat side panel indicated at “1”- in section “B-B” in figure 1-16. Wipe off excess lubricant. The panel should be lubricated whenever an objectionable noise due to friction between the side panel and seat trim is present.
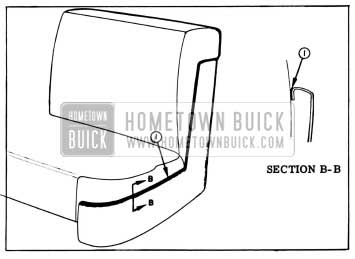
1958 Buick Lubrication of Seat Side Panel
- Folding Top Linkage (Convertibles). Apply a sparing amount of light engine oil to bearing points indicated by arrows in figure 1-17. Wipe off excess lubricant to prevent soiling trim.
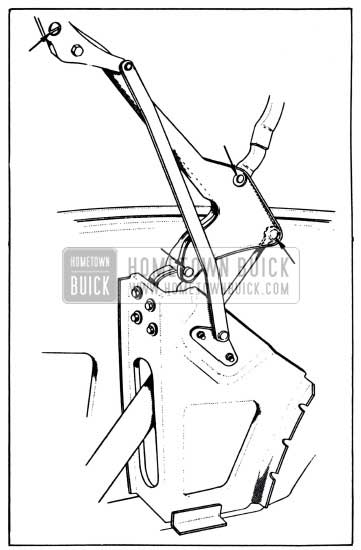
1958 Buick Lubrication of Folding Top Linkage
- Side Roof Rail Weatherstrip (Models) 46R-66R. Apply silicone rubber lubricant to surface of side roof rail weatherstrip indicated in figure 1-18. The lubricant is to be applied along complete length of weatherstrip.
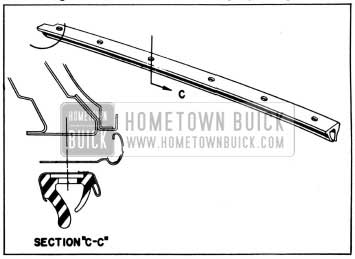
1958 Buick Lubrication of Side Roof Rail Weatherstrip
- Side Roof Rail Weatherstrip (4-Door Rivieras). Apply silicone rubber lubricant to surface of side roof rail weatherstrip indicated in figure 1-19. The weatherstrip section to be lubricated extends from approximately 2″ forward of the front door glass frame edge location and rearward for approximately 12″ as shown in figure 1-19.
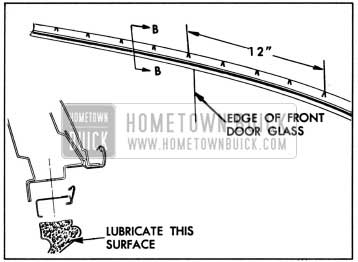
1958 Buick Lubrication of Side Roof Rail Weatherstrip Illustration
- Door Bottom Drain Hole Sealing Strip. Apply sparing amount of silicone rubber lubricant to surface of strip indicated at “1” in figure 1-20. This operation is performed to prevent lip of sealing strip from adhering to inner panel and plugging drain holes in bottom of door.
1958 Buick Lubrication of Door Bottom Drain Hole Sealing Strip
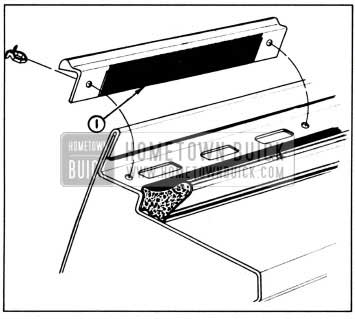
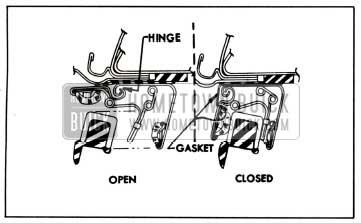
- Roof Side Rail Sealing Strip. The mechanical (“flipper”) type sealing strips mounted on the roof side rails above the doors on some models should be lubricated occasionally to insure proper operation and minimum wear.
- Open the door and apply a coat of Lubriplate to entire length of hinge indicated in figure 1-21. Wipe off any excess. Do not apply this lubricant to the awning gasket.
1958 Buick Sealing Strip Lubricare
- Close the door and apply a thin coat of silicone rubber lubricant along inner lip surface of the awning gasket indicated in figure 1-21. Wipe off excess compound to avoid accumulation of dust.
- Open the door and operate the sealing strip by hand 10 or 15 times to work lubricants into the hinge.
1-3 EVERY 25,000 MILES – DYNAFLOW TRANSMISSION – 1958 BUICK LUBRICARE
At 25,000 mile intervals the transmission should be completely drained, the oil pan and screen should be removed and cleaned, and the transmission should be refilled with fresh oil. Transmission MUST NOT BE FLUSHED when oil is changed.
Approved Oils for 1958 Buick Dynaflow Transmission
The following oils are approved for 1958 Buick Dynaflow Drive and no other fluid should be used.
- Special Buick Oil for Dynaflow Drive, available through Buick Parts Warehouses under Group 4.101.
- Automatic Transmission Fluid, Type A, available through petroleum suppliers. This figure 1-22-Dynaflow Transmission Drain Points fluid must have an AQ-ATF number embossed in lid of the can for identification.
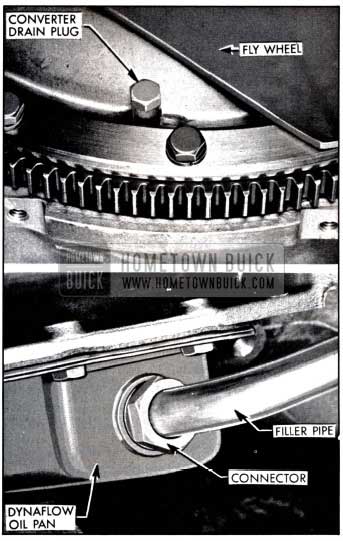
1958 Buick Dynaflow Transmission Drain Points
Draining and Refilling 1958 Buick Dynaflow Transmission
- Warm up transmission, then remove bell housing cover.
- Loosen one converter drain plug, then turn converter until opposite drain plug is straight down and remove this plug to allow converter to drain completely. See figure 1-22.
- Remove filler pipe fitting from oil pan and allow oil pan to drain completely. Do not remove accumulator caps on Variable Pitch Dynaflow. See figure 1-22.
- Remove oil pan and oil screen, clean thoroughly, and reinstall. Install and tighten all drain plugs and filler pipe, then install bell housing cover.
- Put 3 quarts of specified oil (subpar. a.) in transmission. With engine idling and transmission in Parking (P) complete the refilling to bring oil level to “FULL” mark on gauge rod. When transmission oil is warmed up, the oil level should then be at “FULL” mark on gauge rod.
A Variable Pitch Dynaflow transmission refill requires approximately 12 quarts to refill. A Flight Pitch Dynaflow transmission requires approximately 12V2 quarts to refill. A completely dry transmission requires an additional 1 3/4 pints.
1-4 1958 BUICK LUBRICARE – AS REQUIRED OR WHEN ACCESSIBLE
1958 Buick Clutch Internal Lubricare
Lubrication of internal working parts of the clutch is usually required only at time clutch is assembled and installed; however, if lubrication becomes necessary to eliminate squeaks or correct excessive pedal pressure, follow instructions given in paragraph 4-4.
1958 Buick Brake Lubricare
Lubrication of all metal contact points at wheel brake assemblies is normally performed during the major brake adjustment or may be performed whenever a brake drum is removed.
Lubrication of parking brake cables is also performed during the major brake adjustment; however, operation under conditions where mud and water are frequently encountered may require more frequent lubrication. See paragraph 9-9.
1958 Buick Front Wheel Bearing Lubricare
Periodic repacking of the front wheel bearings is not required. Clean as necessary and repack if disassembled, using a good quality water-repellent, high-temperature resisting wheel bearing grease. Follow instructions given in paragraph 7-10.
1958 Buick Rear Wheel Bearing Lubricare
Rear wheel bearings are lubricated by gear lube splash from the differential housing and need no other lubrication. Whenever rear brakes are relined, or drums are removed for other work, it is advisable to inspect for evidence of leaking rear wheel bearing oil seals. Replace seals if leaking.
1958 Buick Speedometer Cable Lubricare
The speedometer cable is factory lubricated with special all-season grease and normally requires no further service unless it becomes noisy. In extremely hot climates or where considerable dirt and water are encountered, however, it may be necessary to lubricate the cable at intervals of approximately 20,000 miles or every two years. See paragraph 10-58.
1958 Buick Sunshade Lubricare
If the sunshade rod turns hard in the support as sunshade is moved up and down, remove retainer screw, pull rod from support and apply stick type lubricant. Do not use oil, which may soil body trim. Install rod in support and adjust retainer screw to proper tension.
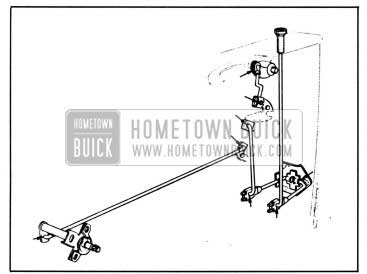
1958 Buick Windshield Wiper Motor Auxiliary Drive and Wiper Transmission Pulleys
Apply Lubriplate or its equivalent to locations indicated at “1” in figure 1-23.
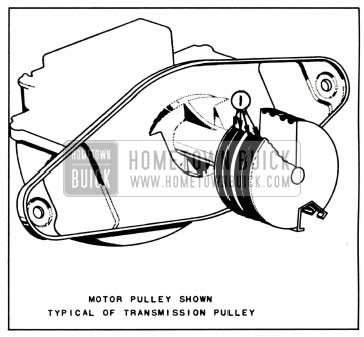
1958 Buick Lubrication of Windshield Wiper Motor Auxiliary Drive and Wiper Transmission Pulleys
Door Lock Outside Handle
Apply light coat of Lubriplate or its equivalent to surface of lock cylinder shaft contacting the bell crank indicated at “1” in figure 1-24.
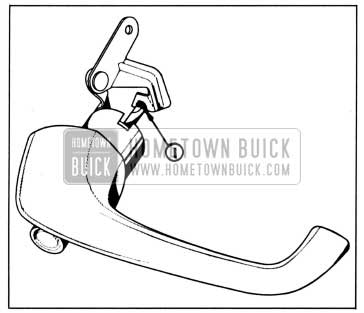
1958 Buick Lubrication of Door Outside Handle
Door Lock Parts
Lubricate moving parts of door lock with Lubriplate or its equivalent.
Front and Rear Door Window Regulator Sector and Channels
Apply a coat of Lubriplate or its equivalent to location of regulator sector indicated at “1” and to sliding surface of window cam and guide channels indicated at “2” in figure 1-25. Although the channel and guide assemblies are different on the rear doors, lubrication of the front door parts is typical of lubrication required on rear door parts.
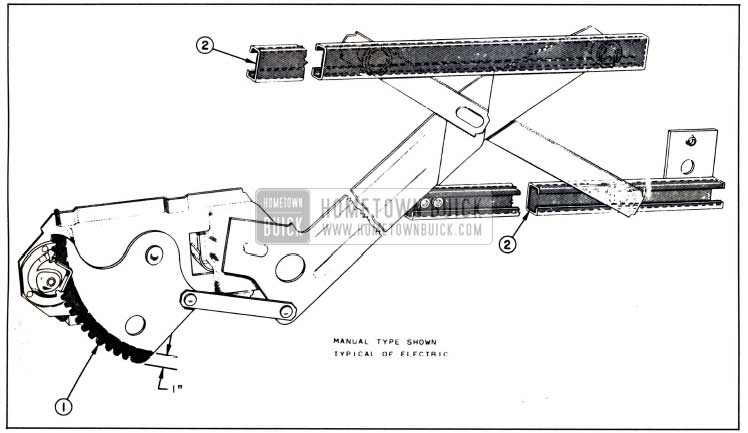
1958 Buick Lubrication of Front and Rear Door Window Regulator and Channels
Seat Regulator Jack Screw (Six-Way Seat)
Thoroughly wipe off old lubricant; then apply Lubriplate or its equivalent to jack screw. Operate seat adjuster to limit of all positions and wipe off excess lubricant.
Rear Quarter Folding Top Trimstick and Support Assembly
Carefully apply a thin coat of Lubriplate to locations indicated in figure 1-26. Wipe off any excess lubricant to avoid soiling the trim material.
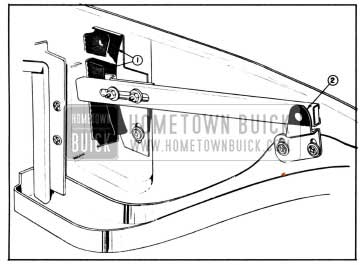
1958 Buick Lubrication of Folding Top Trimstick
Rear Compartment Gutter Weatherstrip
Carefully apply a coat of silicone rubber lubricant to surface of gutter weatherstrip indicated at “1,” and along length of weatherstrip indicated by “2”. The weatherstrip should be lubricated whenever the action of the compartment lid is retarded due to friction with the weatherstrip. See figure 1-27.
1958 Buick Lubrication of Rear Compartment Weatherstrip
Door Locking Mechanism
Apply Lubriplate or its equivalent at pivot joints of inside locking rods as indicated by arrows in figure 1-28.
1958 Buick Lubrication of Door Locking Mechanism
1-5 1958 BUICK ENGINE OIL RECOMMENDATIONS
Choice of 1958 Buick Engine Oil
- Brand of Oil. In the selection of the proper brand of oil it is essential to consider the reputation of the refiner or marketer. It is imperative that the same brand of oil be used at all times.
- Type of Oil. There are several types of oil manufactured for use in internal combustion engines. For use in the Buick engine we recommend that a heavy duty type oil marked “For Service MS” or “For Service DG” be used for maximum protection under all driving conditions. Oils marked “For Service MM” or “For Service ML” are not recommended for any Buick engine.
- Grade or Viscosity. The grade or viscosity (SAE number) of engine oil should be selected for the lowest anticipated temperature at which cold engine starting will be required as recommended in the temperature-viscosity chart below.

1958 Buick Temperature-Viscosity Chart
- Break-in Oils. Break-in oils or compounds are not necessary in Buick engines and their use is not recommended. Some of these break-in oils contain certain materials which may be harmful. Buick HD Concentrate (subpar. d) is not a break-in oil.
When to Change 1958 Buick Engine Oil
The crankcase should be completely drained and refilled with new oil of proper viscosity at the end of the first 1,000 miles and every 2,000 to 3,000 miles thereafter. Adverse driving conditions may require more frequent draining and refilling. Adverse driving conditions are those which may cause early contamination of engine oil, such as operation under unusual dust conditions or short runs with a cold engine in very cold weather.
The color of “Service MS” type oil does not indicate its condition since it normally becomes dark (black or gray) after only a few hundred miles of driving. This is because the detergent content envelopes and holds in suspension extremely fine but harmless soot (soft carbon) and lead particles. The oil filter element does not remove this harmless material but it does remove all harmful particles such as road dust, metal chips and hard carbon.
Engine crankcase oils have a definite effect on ease of starting, oil economy, combustion chamber deposits and engine wear. Many commercial crankcase oils contain heavy nonvolatile deposit forming components which make the type of combustion chamber deposits that greatly increase detonation and particularly pre-ignition, even though these oils may be designated “For Service MS” or “For Service DG.” Some commercial crankcase oils are deficient in anti-wear characteristics and may contribute to rapid wear of camshafts, valve lifter assemblies and other highly stressed engine parts. Owners should be urged to use only crankcase oils that have been proven to produce ease of starting, satisfactory oil economy, minimum combustion chamber deposits and adequate protection against wear.
Crankcase Flushing
Flushing the crankcase with oils or solutions other than a good grade of 10-W engine oil is not recommended. When flushing to remove contamination appears advisable, use 3 quarts 10-W oil (4 quarts if filter is drained) and idle the engine at 1000 RPM (equivalent to 20 MPH) until the oil is hot, then drain crankcase and oil filter immediately after stopping engine. Fill crankcase with correct quantity and seasonal grade of oil.
Use of Buick HD Concentrate
Buick HD Concentrate, available through Buick Parts Department under Group 1.850 is a compound of the materials used by oil refiners to manufacture high detergency motor oils. It is intended for use in engines operating under aggravated conditions where engine deposits, rust and corrosion cannot be adequately retarded by motor oils readily available to the average motorist. It is especially recommended
for engines operated under restricted conditions such as frequent stops, short trips and slow speeds where such symptoms as sticking valves, valve lifters and rings are noticed.
Although HD Concentrate may be used continually it is normally unnecessary to use it with every crankcase refill. When used, the instructions on the container should be carefully observed.
1-6 1958 BUICK REAR AXLE LUBRICANT RECOMMENDATIONS
1958 Buick Rear Axle Lubricant Recommendations
1958 Buick rear axles are filled at the factory with a special hypoid gear lubricant. It is not necessary to remove the original lubricant at any time except when it has become contaminated, or when it is required for inspection of parts or for repairs. Therefore there is no drain hole in the rear axle housing.
Under no circumstances should the factory lubricant be removed from the rear axle to be replaced with any other type of lubricant.
In all cases of complete refilling of rear axle only Factory Hypoid Gear Lubricant is recommended. This is the same lubricant (lead soapactive sulphur type) as furnished with Buick replacement ring and pinion gear sets, and it may be obtained from any Buick Parts Warehouse under Group 5.535.
When adding lubricant to bring it to proper level Factory Hypoid Gear Lubricant is preferred; however, SAE 90 Multi-Purpose Gear Lubricant (MIL-2105) may be used.
In temperatures consistently below -10° F use SAE 80 Multi-purpose gear lubricant.
Leave A Comment
You must be logged in to post a comment.