SECTION 3-D 1958 BUICK FUEL PUMP
3-11 DESCRIPTION AND OPERATION OF TYPE FU FUEL PUMP
Description of 1958 Buick Fuel Pump
An AC Type FU fuel pump is used on all engines. The pump assembly is mounted on the right side of the timing chain cover in an inverted position, and the pump rocker arm is actuated by an eccentric mounted on front side of the camshaft sprocket.
The 1958 Buick fuel pump has a built-in air dome with a diaphragm to dampen out pulsations in the fuel stream. It is a diaphragm type pump and is actuated by the rocker arm through a link and a pull rod. See figure 3-13.
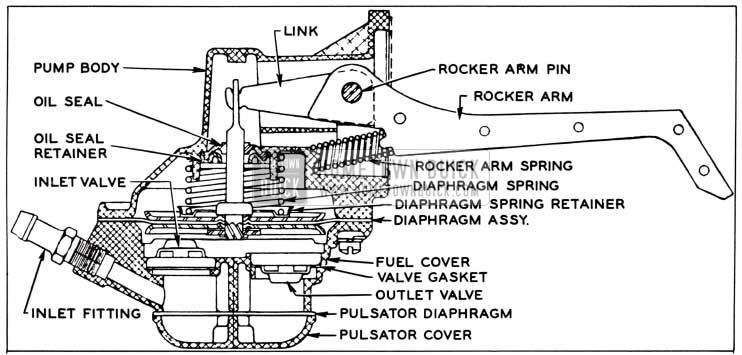
1958 Buick Type FU Fuel Pump
Operation of 1958 Buick Fuel Pump
The 1958 Buick fuel pump draws gasoline from the tank and supplies it to the carburetor in sufficient quantity to meet engine requirements under all operating conditions. The principle parts of the fuel section are shown in figure 3-13.
The rocker arm spring holds the rocker arm in constant contact with the eccentric on the engine camshaft sprocket so that the rocker arm swings up and down as the camshaft rotates. As the arm swings downward, it bears against a shoulder on the link which is pivoted on the rocker arm pin. The link swings upwards, thereby pulling the fuel diaphragm upward by means of the connecting pull rod.
Upward movement of the fuel diaphragm compresses the diaphragm spring and also creates a vacuum in the fuel chamber under the diaphragm. The vacuum causes the outlet valve to close and causes fuel from the gasoline tank to enter the fuel chamber through the inlet valve.
As the rotating eccentric permits the rocker arm to swing upward, the arm releases the fuel link; it cannot move the link downward. The compressed diaphragm spring then exerts pressure on the diaphragm and the fuel in the chamber below diaphragm. This pressure closes the inlet valve and forces fuel out through the outlet valve to the carburetor.
Since the fuel diaphragm is moved downward only by the diaphragm spring, the pump delivers fuel to the carburetor only when the pressure in the outlet line is less than the pressure maintained by the diaphragm spring. This condition arises when the carburetor float needle valve is not seated and the fuel passage from the pump into the carburetor float chamber is open. When the needle valve is closed and held in place by the pressure of the fuel on the float, the pump builds up pressure in fuel chamber until it overcomes the pressure of the diaphragm spring. This pressure results in almost complete stoppage of diaphragm movement until more fuel is needed. Normal diaphragm stroke is approximately 1/64″.
The air dome with diaphragm in the bottom of 1958 Buick fuel pump provides a pocket in which fuel under pressure can compress a certain volume of air. When the pressure is relieved (pump on suction stroke) the pocket of compressed air pushes the fuel on to its destination. The air dome minimizes flow variations experienced with two-cycle pump stroke and increases the pump output.
3-12 1958 BUICK FUEL PUMP INSPECTION AND TEST
If the 1958 Buick fuel pump is suspected of delivering an improper amount of fuel to the carburetor, it should be inspected and tested on the engine, as follows:
- Make certain that there is gasoline in the tank.
- Clean the gasoline filter in tank (par. 3-7).
- With engine running, inspect for leaks at all gasoline feed hose connections at gasoline tank, 1958 Buick fuel pump, and carburetor. Tighten any loose connections. Inspect all hoses for flattening or kinks which would restrict the flow of fuel. Air leaks or restrictions on suction side of fuel pump will seriously affect pump output.
- Inspect for leaks at 1958 Buick fuel pump diaphragm flange. Tighten the cover screws alternately and securely. Do not use shellac or any other adhesive on diaphragm.
- Disconnect feed hose at carburetor. Ground distributor terminal of coil with jumper wire so that engine can be cranked without firing. Place suitable container at end of hose and crank engine a few revolutions. If no gasoline, or only a little, flows from hose the feed hoses are clogged or 1958 Buick fuel pump is inoperative. Before condemning the fuel pump, disconnect feed hoses at pump and blow through them with air hose to make sure that they are clear.
- If gasoline flows in good volume from hose at carburetor it may be assumed that the 1958 Buick fuel pump and feed hoses are okay; however, it is advisable to make the following “static pressure” test to make certain that 1958 Buick fuel pump is operating within specified pressure limits.
- Attach a suitable pressure gauge to the disconnected end of gasoline hose at carburetor height. Run engine at 485 and 1500 rpm on gasoline in carburetor bowl and note reading on pressure gauge.
- If 1958 Buick fuel pump is operating properly the pressure will be 5 1/4 to 6 1/2 pounds and will remain constant at speeds between 485 and 1500 rpm. If pressure is too low or too high, or varies materially at different speeds, the pump should be removed for repairs (par. 3-13). NOTE: If pressure gauge is at pump height instead of at carburetor height, the pressure should be 5 3/4 to 7 pounds.
3-13 FU FUEL PUMP REPAIRS
There are two service kits available: 1. The diaphragm kit consisting of diaphragm, valves, and oil seal. This kit is used for overhauling low mileage pumps. 2. The repair kit consisting of all moving and wearing parts except the rocker arm. This kit is used for overhauling high mileage pumps. However, if a casting is damaged or the rocker arm is badly worn, it is advisable to replace the pump rather than attempt repairing it.
After removal of pump from engine and before disassembly is started, plug all openings and thoroughly wash exterior of pump with cleaning solvent to remove all dirt and grease.
Disassembly of 1958 Buick Fuel Pump
- Mark edges of fuel cover and pump body with file so that cover may be reinstalled in its original position on body. See figure 3-14.
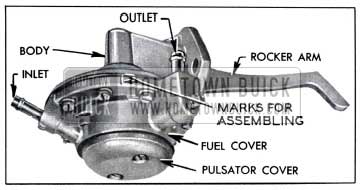
1958 Buick Location of Pump Parts
Removal of 1958 Buick Rocker Arm and Link
To install a diaphragm kit, it is not necessary to remove the rocker arm pin. However, when overhauling a high mileage pump, it is advisable to use the repair kit which contains a rocker arm pin and a link. Remove as follows:
- File or grind riveted end of rocker arm pin flush with steel washer, or cut off end with a 3/8″ drill. Then drive pin out with a drift punch and hammer.
- Remove rocker arm, rocker arm spring, and link from pump body.
Inspection of 1958 Buick Fuel Pump Parts
- Clean and rinse all parts to be reused in solvent. Blow out all passages with air hose.
- Inspect pump body and fuel cover for cracks, breakage, or distorted flanges. Examine screw holes for stripped or crossed threads.
- Inspect rocker arm for wear at pad and at point of contact with link. Check for excessive rocker arm side-play due to wear on rocker arm pin.
- If a damaged casting or a badly worn rocker arm is found, it is advisable to discard old parts and install a new fuel pump.
Assembly of 1958 Buick Fuel Pump
When overhauling the 1958 Buick fuel pump, always use all new parts in kit as amount of wear of these parts cannot be determined visual1y.
- If rocker arm and link were removed (subpar. b above), place new rocker arm spring and link in position in pump body with rocker arm and use a slightly undersize rod through pin hole to line them up. See figure 3-15.

1958 Buick Rocker Arm, Pin, and Link
Drive new rocker arm pin through body, forcing lineup rod ahead of it. Install new steel washer over small end of rocker arm pin, support head of pin on a suitable steel block, and peen small end of pin to retain washer and pin in place.
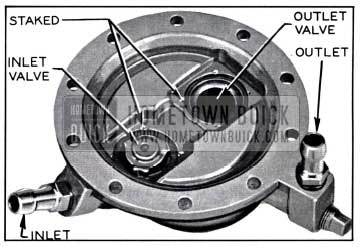
1958 Buick Valves in Fuel Cover
Testing Repaired Fuel Pump
Bench tests of the 1958 Buick fuel pump require equipment which is not available in most service organizations; therefore, tests must be made after installation of the pump on an engine. Test the 1958 Buick fuel pump as described in paragraph 3-12.
Leave A Comment
You must be logged in to post a comment.