SECTION 10-F 1958 BUICK IGNITION SYSTEM
10-39 1958 BUICK IGNITION SYSTEM DESCRIPTION AND OPERATION
1958 Buick Ignition System Components
The 1958 Buick ignition system consists of the 1958 Buick ignition switch, 1958 Buick ignition coil resistance unit, 1958 Buick ignition coil, 1958 Buick ignition distributor, 1958 Buick spark plugs, and the low and high tension wiring. Electrical energy is obtained from the battery while cranking and during idle speeds, and from the generator at higher speeds. These supply circuits must be considered part of the 1958 Buick ignition system.
1958 Buick Distributor and Cap Assembly
- Ignition Switch. The 1958 Buick ignition switch has three positions; “LOCK”, “ON”, and “OFF”. When in the “LOCK” position with key removed, the ignition is turned off and the switch is locked. When in the “ON” position the 1958 Buick ignition is turned on, and in the “OFF” position the ignition is turned off, with or without the key in place in either position.
The 1958 Buick ignition switch has three terminals which are protected against unauthorized bridging by a metal shield attached to the steering column support. For connections to the 1958 Buick ignition switch terminals refer to the chassis wiring circuit diagram in Section 10-J. - Ignition Coil Resistance Unit. The resistance unit (resistor) is mounted on the cowl near the 1958 Buick ignition coil and is connected in series between the 1958 Buick ignition switch and the positive (+) terminal of the coil. The resistance unit limits to a safe maximum the primary current flow through the coil and the distributor contact points, thereby protecting the contact points during slow speed operation when they are closed for longer intervals. It also protects against excessive build up of primary current when the ignition switch is closed with engine stopped and contact points closed.
A separate contact in the cranking- motor solenoid switch is connected directly to the positive (+) terminal of the ignition coil so that the resistor is bypassed during cranking operation. Elimination of the resistor overcomes the effects of reduced voltage due to the cranking motor drain on the battery. - Ignition Coil. The oil filled ignition coil is mounted on the rear end of the intake manifold, adjacent to the 1958 Buick ignition distributor. The positive (+) terminal is connected to the 1958 Buick ignition switch through the resistance unit, and is also connected to the contact in the solenoid switch which bypasses the resistance unit during cranking of engine. The negative (-) terminal is connected to the primary terminal of the distributor. The secondary (high tension) terminal is connected by a short cable to the center terminal in distributor cap.
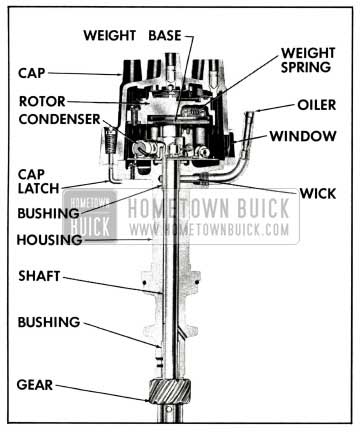
- Ignition Distributor. The 1958 Buick ignition distributor is of the external adjustment type. It is driven clockwise directly from the camshaft through cast iron gears which are automatically lubricated by the engine oiling system. Contact point opening is adjusted through a window in the distributor cap while the engine is idling. Any accurate dwell meter may be used. See paragraph 10-40 for adjustment procedure.
The distributor is of the single contact type with an 8-lobe cam. High speed operation is improved by an especially light contact breaker arm and a high speed cam. See figure 10-36. Maximum operating efficiency of the engine is obtained under all speed and load conditions by the centrifugal advance mechanism, which is located above the circuit breaker cam inside the rotor, and the vacuum advance mechanism built into the distributor. See figures 10-33 and 10-34.
1958 Buick Centrifugal Advance Mechanism
1958 Buick Vacuum Advance Mechanism
The contact point set is replaced as one complete assembly. The service replacement contact set has the breaker lever spring tension and point alignment adjusted at the factory. Only the point opening requires adjusting after replacement.
An additional capacitor must never be connected to the distributor terminal as this will cause excessive pitting of breaker points or engine missing.
1958 Buick Ignition Operating Circuits
To clarify operating principles as well as to simplify the process of tracing troubles, the parts of the 1958 Buick ignition system should be understood to provide two separate and distinct circuits, as follows:
- The Primary Circuit carries the low voltage current supplied by the battery or generator. In addition to these sources of electrical energy, the primary circuit contains the 1958 Buick ignition switch, ignition coil resistance unit, primary winding of the ignition coil, distributor contact points, condenser, and all connecting low tension wiring.
- The Secondary Circuit carries the high voltage surges produced by the 1958 Buick ignition coil, which result in high voltage spark between the electrodes of the spark plugs in engine cylinders. This circuit contains the secondary winding of the ignition coil, coil to distributor high tension lead, distributor rotor and cap, 1958 Buick ignition cables, and spark plugs.
Cycle of Operation
When the 1958 Buick ignition switch is turned on and the distributor contact points are closed, battery or generator current flows through the primary winding of the coil and through the contact points to ground. This flow of current through the primary winding of the coil produces a magnetic field around the coil windings and thereby stores electrical energy in the coil.
When the contact points are separated by the revolving distributor cam, the primary circuit is broken. The condenser absorbs the current which tends to surge across the gap as the points separate, thereby producing a sharp break in the flow of current. If the flow of current were not sharply broken it would form an arc which would burn the points badly and would also drain away most of the energy stored in the coil. There would be insufficient energy left in the coil to produce the necessary high voltage surge in the secondary circuit.
The very rapid change in strength of the magnetic field when the primary circuit is sharply broken causes a high voltage to be induced in every turn of both the primary and secondary windings.
The high voltage surge produced in the secondary winding of the coil travels through the cable to the center of distributor cap, through the rotor to the adjacent distributor cap segment from which it is conducted to the proper spark plug by the 1958 Buick ignition cable. The high voltage surge jumps the gap between the insulated center electrode and the grounded side electrode of the spark plug, thus producing the spark required to ignite the charge in the selected combustion chamber of the engine.
As the spark appears at the spark plug gap the energy in the coil begins to drain from the coil through the secondary circuit, thus sustaining the spark for a small fraction of a second. During this interval the condenser discharges back through the primary circuit, producing an oscillation of the current flow in the primary circuit during the brief instant that is required for the primary circuit to return to a state of equilibrium. Note particularly that the 1958 Buick ignition condenser does not discharge until after the spark has occurred at the spark plug gap.
The sequence of action described above is repeated as each lobe of the distributor cam moves under and past the rubbing block on the contact breaker arm to cause the contact points to close and open.
Control of 1958 Buick Spark Timing
The timing of the 1958 Buick spark with respect to piston position in the cylinder must vary in accordance with operating conditions if best engine performance is obtained. The spark advance for obtaining satisfactory idling should be as low as possible. At high speed, the spark must occur earlier in the compression stroke in order to give the fuel-air mixture ample time to ignite, burn and deliver its power to the piston as it starts down on the power stroke.
Under part throttle light load operation, a smaller amount of fuel-air mixture (by weight) enters the cylinder so that the mixture is less highly compressed. Under this condition, advancing the spark permits fuller utilization of the fuel-air charge. During acceleration or on heavy loads (wide open throttle) the spark advance required to develop the maximum power of the engine is considerably less than that required for light loads.
Control of 1958 Buick spark timing to satisfy these constantly changing operating requirements is obtained in three ways, as follows:
- Initial, manual setting of distributor is made so that contact points open at a specified position of piston, as indicated by a timing mark on crankshaft balancer. See 1958 Buick Ignition Timing (par. 10-41).
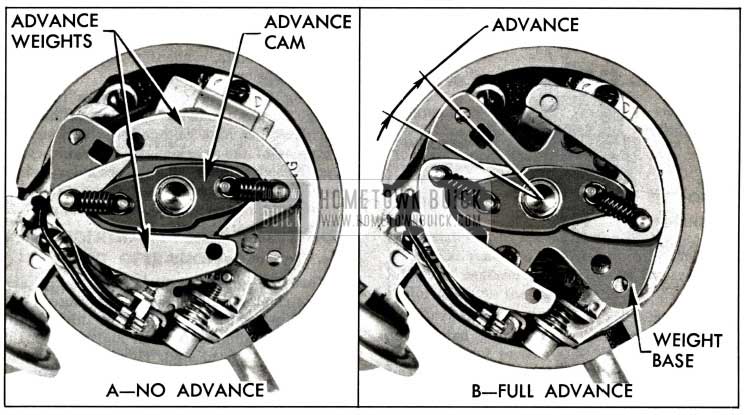
- Centrifugal Advance is governed by engine speed. The centrifugal advance mechanism is located above the circuit breaker cam inside the rotor and consists of an advance cam which is integral with the distributor shaft, a pair of advance weights, two springs, and a weight base plate which is assembled to the distributor cam.
At idle speeds, the springs hold the advance weights as shown in figure 10-33A, so that there is no spark advance and the spark occurs in accordance with the initial manual setting of distributor.
As speed increases, centrifugal force causes the advance weights to throw outward and push against the advance cam, thus rotating the weight base plate and integral distributor cam ahead of the distributor shaft. This causes the distributor cam lobes to open and close the contact points earlier in the compression stroke so that the spark is advanced. See figure 10-33B.
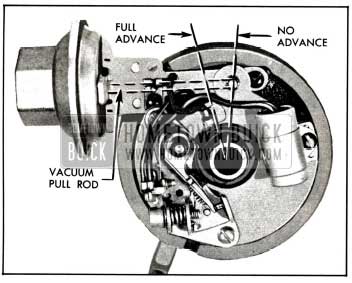
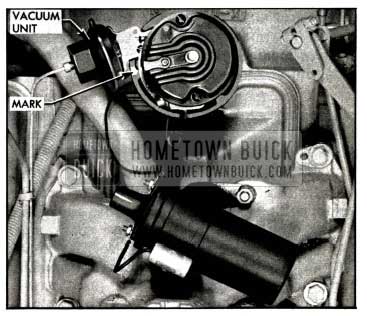
- 1958 Buick Vacuum Advance is governed by manifold vacuum. The contact point set is mounted on a breaker plate which is located below the centrifugal advance mechanism and uses the outer diameter of the upper shaft bushing for its bearing surface. The movable breaker plate is held in position on the upper shaft bushing by a retainer. The vacuum unit is mounted on the distributor base and under the movable breaker plate so that the breaker plate can be rotated around the distributor cam by a link from the vacuum unit. See figure 10-34.
The vacuum unit contains a spring-loaded diaphragm. The spring-loaded side of the diaphragm is connected by a pipe to an opening in the carburetor barrel. This opening is on the atmospheric side of the throttle valve when the throttle is in idling position so that there will be no vacuum to operate the advance mechanism.
When the throttle valve is opened equivalent to approximately 18 MPH, the vacuum at the opening is sufficient to act on the control diaphragm, causing it to compress the spring and to rotate the breaker plate in a counter-clockwise direction. This moves the contact points so that the distributor cam lobes open the points earlier in the compression stroke. The amount of throttle opening and the engine load determine the amount of intake manifold vacuum and thus the amount of spark advance obtained. The advance obtained by the vacuum control is added to the advance obtained by the centrifugal advance mechanism as shown in figure 10-35.
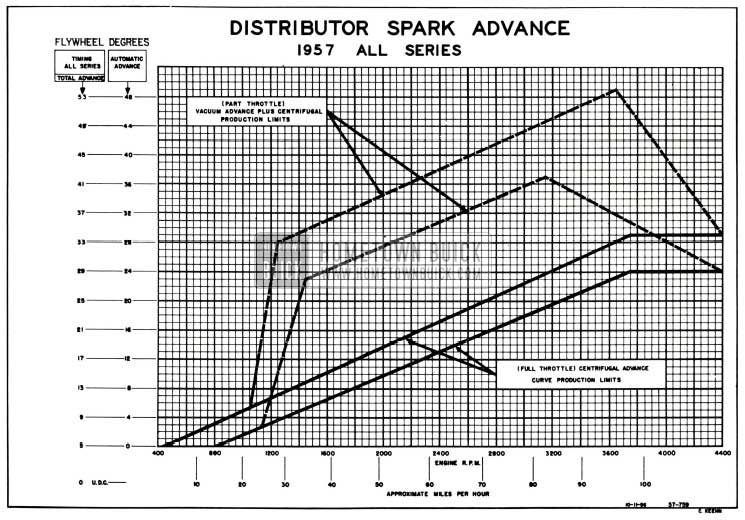
1958 Buick Distributor Spark Advance Chart
10-40 REPLACEMENT AND ADJUSTMENT OF 1958 BUICK DISTRIBUTOR CONTACT POINT SET
When inspection of the contact points as described in paragraph 10-45 shows replacement to be advisable, the following procedure should be used.
NOTE: The service replacement contact point set has the breaker spring tension and point alignment adjusted at the factory.
Removal of Contact Point Set
- Remove 1958 Buick distributor cap by inserting a screwdriver in upper slotted end of cap retainers, press down and turn 90° in either direction. See figure 10-36. Push distributor cap aside and remove rotor. Disconnect the condenser and primary leads from their terminal by loosening the retaining screw. Remove condenser screw, lockwasher, condenser and bracket.
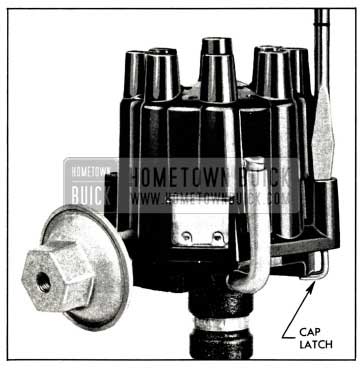
1958 Buick Removing Distributor Cap
Installation of Contact Point Set
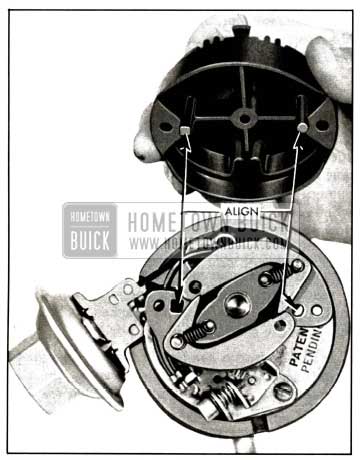
- Place contact point set over boss on breaker plate, aligning the two screw openings in contact point base with the two in the breaker plate. Secure with two screws and lockwashers.
- Check condenser in a reliable condenser tester. Position condenser and bracket over bosses on breaker plate. Then secure with screw.
- Install condenser and primary leads as shown in figure 10-37.
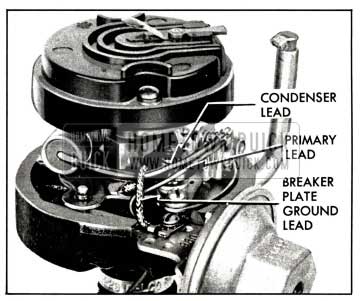
1958 Buick Locating Leads in Distributor
NOTE: Leads must be properly positioned so they will not come in contact with bottom of weight base or rotor.
- With contact arm rubbing block on peak of cam lobe, insert a 1/8″ Allen wrench in adjusting screw and turn screw in (clockwise) until contact points just close. Then back screw out (counterclockwise) 1/2 turn (180°) to obtain a point gap of approximately .015″ for a preliminary setting.
Adjustment of Contact Points-Engine Running
NOTE: When adjusting contact point dwell angle, always follow the instructions which come with the dwell meter.
- Connect dwell tester leads: red to distributor side of coil, black to ground.
- Turn selector switch to position for 8-lobe cam. Turn 1958 Buick ignition switch on.
- Start engine. Lift adjustment window and insert 1/8″ Allen wrench in adjusting screw. See figure 10-38. Set dwell angle at 30 degrees.
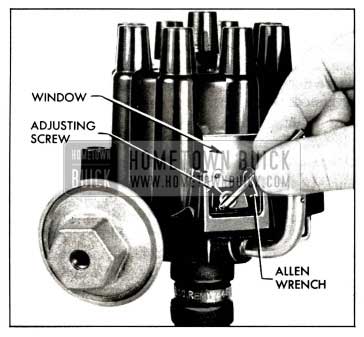
1958 Buick Adjusting Contact Point Dwell Angle
10-41 1958 BUICK IGNITION TIMING
The timing mark is a groove filled with yellow paint, which is on the rear edge of the harmonic balancer. A timing indicator, mounted on the timing chain cover, has four grooves filled with yellow paint. These grooves indicate U.D.C. (marked “0”), 2% degrees, 5 degrees, and 7% degrees before U.D.C. See figure 10-39.
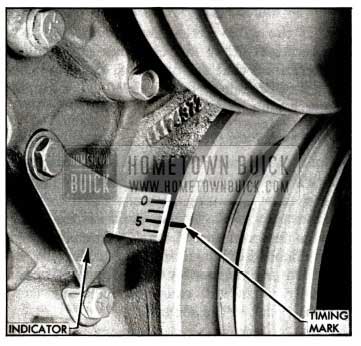
1958 Buick Ignition Timing Mark and Indicator
Correct timing exists when the yellow timing mark on pulley or balancer is aligned with the 5 degree (“5”) groove on the timing indicator at the instant that a spark occurs at No. 1spark plug. Firing then occurs 5 degrees before the piston reaches upper dead center.
Preliminary Timing (Engine Won’t Run)
To time the ignition on any 1958 Buick engine which will run, use subparagraph b only. However, if the timing of an engine is completely off, the following procedure must first be used to get the engine to run.
- With right rocker arm cover removed, rotate crankshaft in a forward direction using a suitable wrench on the harmonic balancer to crankshaft bolt. Continue rotation until both valves for No. 1 cylinder are completely closed and the timing mark on balancer is aligned with the 5 degree mark on timing indicator. See figure 10-39. No. 1 cylinder is now in position to fire.
- Install 1958 Buick distributor in engine with rotor in position to fire No. 1 cylinder and with vacuum control in position to connect vacuum pipe. See figure 10-40.
1958 Buick Installing Distributor In Engine
Install 1958 Buick distributor clamp and bolt with lock washer, leaving bolt just loose enough to permit movement of distributor with heavy hand pressure. NOTE: If distributor does not seat in engine block, press down lightly on distributor while cranking engine with starter. After distributor tang snaps into slot in oil pump shaft, start timing again from step 1, leaving distributor installed.
CAUTION: This must be done very carefully or engine will not start.
- Install 1958 Buick distributor cap. Make sure that spark plug wires are correctly installed in distributor cap, through clips on rocker arm covers, and on spark plugs. See figures 10-45, 46 and 47.
Finish Timing (Engine Running)
Contact point dwell angle should always be checked before adjusting 1958 Buick ignition timing.
- Start engine and set dwell angle at 30 degrees (par. 10-40, c).
- Connect a 12-volt power timing light to No. 1 spark plug, using a suitable adapter and following the instructions of the instrument manufacturer. CAUTION: Do not attach timing light clip directly to spark plug boot, as boot may be punctured so that arc over will occur.
- Start engine and set engine speed at 400 RPM so that vacuum and centrifugal advance mechanisms are not in operation. This is absolutely necessary to insure correct timing.
- Direct beam of timing light on the timing indicator and edge of harmonic balancer. Turn distributor housing slowly until yellow mark on balancer lines up with the 5 degree mark on indicator, then tighten clamp bolt securely. See figure 10-39.
- Recheck timing mark. Then reset idle speed to 485 RPM (550 RPM on air conditioner jobs).
- Stop engine and remove timing light and adapter. Make certain that spark plug wires are pushed all the way down into the distributor cap terminals and onto the spark plugs. Nipples must be pushed firmly over the terminals and boots over the spark plugs.
10-42 1958 BUICK SPARK PLUG AND WIRE SERVICE
Remove and Inspect 1958 Buick Spark Plugs and Wires
- To disconnect wires, pull only on boot because pulling on wire might cause separation of the core of the wire. Remove spark plugs and gaskets using a 13/16″ deep socket wrench. Use care in this operation to avoid cracking spark plug insulators.
- Carefully inspect the insulators and electrodes of all spark plugs. Replace any spark plug which has a cracked or broken insulator, or which has loose electrodes. If the insulator is worn away around the center electrode, or the electrodes are burned or worn so they cannot be adjusted for proper gap, a spark plug is worn out and should be discarded. Spark plugs which are in good condition except for carbon or oxide deposits should be thoroughly cleaned and adjusted.
- The 1958 Buick spark plug wires are of a special resistance type. The core is carbon-impregnated linen. This wire is designed to eliminate radio and television interference radiation, but is also superior in resistance to cross-fire. The resistance type wire, however, is more easily damaged than copper core wire. For this reason care must be taken that the spark plug wires are removed by pulling on the spark plug boots rather than on the wire insulation. Also, when it is necessary to replace a spark plug boot, the old boot should be carefully cut from the wire and a small amount of silicone lubricant used to aid in installing the new boot. If the wire is stretched, the core may be broken with no evidence of damage on the outer insulation. The terminal may also pull off the wire. If the core is broken, it will cause missing. In the case of wire damage, it is necessary to replace the complete wire assembly as a satisfactory repair cannot be made.
- Wipe 1958 Buick ignition wires with cloth moistened with kerosene, and wipe dry. Bend wires to check for brittle, cracked, or loose insulation. Defective insulation will permit missing or cross-firing of engine, therefore defective wires should be replaced.
- If the wires are in good condition, clean any terminals that are corroded and replace any terminals that are broken or distorted. Replace any broken or deteriorated cable nipples or spark plug boots.
1958 Buick Spark Plug Cleaning
1958 Buick spark plugs which have carbon or oxide deposits should be cleaned in a blast type spark plug cleaner. Scraping with a pointed tool will not properly remove the deposits and may damage the insulator. If spark plugs have a wet or oily deposit dip them in a degreasing solvent and then dry thoroughly with dry compressed air. Oily plugs will cause the cleaning compound to pack in the shell.
Carefully follow the instructions of the manufacturer of the cleaner being used, cleaning each plug until the interior of shell and the entire insulator are clean; however, avoid excessive blasting.
Examine interior of plug in good light. Remove any cleaning compound with compressed air. If traces of carbon or oxide remain in plug, finish the cleaning with a light blasting operation. Clean firing surfaces of center and side electrodes with several strokes of fine sandpaper.
When 1958 Buick spark plugs have been thoroughly cleaned, carefully inspect for cracks or other defects which may not have been visible before cleaning.
Adjusting 1958 Buick Spark Plug Gap
Use round wire feeler gauges to check the gap between 1958 Buick spark plug electrodes. Flat feeler gauges will not give a correct measurement if the electrodes are worn. Adjust gap by bending the side electrodes only; bending the center electrode will crack the insulator. Adjust gaps to .030″ Go and .035″ No Go. Setting spark plug gap to any other specification to improve idle or effect other changes in engine performance is not recommended.
Installation of 1958 Buick Spark Plugs
Use AC type 44 spark plugs with 3/8″ long terminal nuts for normal operation. For engines operated mainly at high speeds, the colder AC Type 42 Commercial spark plugs are recommended.
Where spark plug fouling is encountered, and where it can be ascertained that the car will not be operated for long periods of time at very high speeds, an AC-45 spark plug should be used. This spark plug operates hotter than the production AC-44 spark plug; and as a result, tends to burn deposits off the insulator more readily.
When installing spark plugs make sure that gaskets are in good condition to insure a tight seal and that surfaces on plug shells and seats in cylinder head are clean. Screw plugs down by hand into firm contact with new gaskets, then tighten them to 22-28 ft. lbs. torque, using a 13/16″ socket, an extension, and a torque wrench. If a torque wrench is not available, do not tighten plugs excessively.
Installation of 1958 Buick Spark Plug Wires
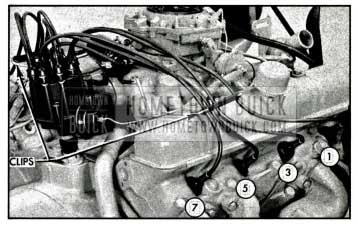
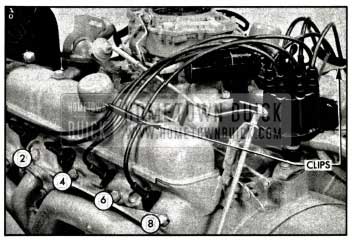
1958 Buick spark plug wires must be arranged to pass through the wire clips on the rocker arm covers in the same order as they are attached to the spark plugs. See figures 10-41 and 42.
1958 Buick Installing Spark Plug Wires-Right Bank
1958 Buick Installing Spark Plug Wires-Left Bank
To insure correct arrangement in the clip, the spark plug wire numbers are stamped in the upper surface of the clip. If spark plug wires are not correctly installed, missing or cross firing may result. For instance, No. 1 and 3 cylinders may cross-fire (since they fire consecutively) unless the rubber grommet is inserted in the clip so that No. 1 and 3 wires are separated.
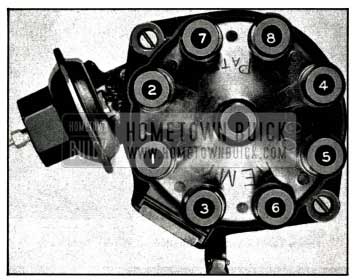
No. 1 spark plug wire is installed in the distributor cap terminal just forward of the vacuum advance unit. The other wires are then installed in a clockwise direction according to the firing order, 1-2-7-8-4-5-6-3. See figure 10-43.
1958 Buick Installing Spark Plug Wires In Cap
10-43 1958 BUICK IGNITION COIL TESTS
Weak Coils
Most ignition coils that are replaced by service stations are classified by them as weak. Many coils rejected as weak actually test up to specifications and give normal performance.
A coil that actually is weak will first affect engine performance when the 1958 Buick ignition reserve is at a minimum. This may be in starting, low speed acceleration or top speed. Eventually the engine will fail to start.
High resistance connections in either the primary or secondary circuit wiring will react the same as a weak coil. Wide spark plug gaps, which require higher voltage than the coil can produce, put the coil under suspicion. High compression and lean carburetors increase the voltage requirements and lead to many needless coil changes. Leakage of high tension current through moisture on an unprotected coil terminal may produce carbon tracks which weaken the coil output voltage. For this reason the nipple on coil high tension terminal must be properly installed and in good condition.
When an ignition coil is suspected of being defective it should be tested as described below before being replaced.
Testing Coil for Open and Grounded Circuits
Before using a coil test instrument, the coil should be tested for open and grounded circuits, using a 110-volt test lamp and test points.
- Apply test points to both primary terminals of coil. If test lamp does not light, the primary circuit is open.
- Apply one test point to the high tension terminal, and the other test point to one of the primary terminals. If secondary circuit is not open, the lamp will not light but tiny sparks will appear at test points when they are rubbed over terminals. If secondary circuit is open, no sparks will occur.
- Apply one test point to a clean spot on the metal coil case and touch the other point to the primary and high tension terminals. If the lamp lights, or tiny sparks appear at the points of contact, the coil windings are grounded.
- A coil with open or grounded windings must be replaced since internal repairs cannot be made. It is unnecessary to test such a coil with instruments. If windings are not open or grounded, a test for short circuits and other internal defects should be made with a reliable coil test instrument.
Coil Test Instruments
Two general types of instruments are used in testing 1958 Buick ignition coils. One type makes use of an open or protected spark gap, while the other reports the condition of the coil on a meter.
The spark gap type of tester should always be used comparatively, that is, the questionable coil should be compared with a coil of same model that is known to be good. Both coils must be at the same temperature and identical test leads must be used. Certain variables caused by altitude, atmospheric or spark gap electrode conditions are usually present in the spark gap type of test.
The meter type testers are usually designed to permit testing the coil without making any connection to the secondary terminal. This eliminates the variables usually present in the spark type of test and avoids the necessity for comparison with a good coil.
Since different makes and models of coil testers differ in their methods of use, as well as in the markings on meters, the instructions of the manufacturer must be carefully followed when using any coil tester. The instrument must be frequently checked to make certain that it is accurately calibrated.
Regardless of instrument or method used, the coil must be tested at normal operating temperature because internal defects often fail to show up on a cold test.
10-44 1958 BUICK DISTRIBUTOR CONDENSER TESTS
When a condenser is suspected of being faulty it should be tested with a reliable condenser tester to determine whether it is actually the cause of ignition trouble. The condenser should be tested for (a) high series resistance (b) insufficient or excessive capacity (c) low insulation resistance.
A special condenser tester is required to make these tests. When using a condenser tester the instructions of the manufacturer must be carefully followed. IMPORTANT: The condenser must be at normal operating temperature when it is being tested.
High Series Resistance
High series resistance in the condenser causes condenser to be slow in taking the charge and, consequently, a higher than normal voltage is developed across the contact points when they first start to open. This higher voltage causes more disturbance at the contact points, which in turn causes more rapid wear and more tendency toward oxidized surfaces. The condition can become severe enough to cause complete failure of the 1958 Buick ignition system. It would first show up during starting and low speed operation.
High series resistance may be caused by internal resistance in condenser or by resistance in the connections. Any defect caused by internal resistance should show up at low mileage since this does not change very much with time or use. The damaging changes are in the connections, in which looseness, corrosion, or broken strands may develop.
New condensers may have a series resistance as low as .05 ohm. Some condenser testers are set to reject condensers which have a resistance of .3 ohm; however, tests show that the resistance can go to .5 ohm before ignition performance is affected.
Insufficient or Excessive Capacity
The condenser specified for use in the 1958 Buick ignition system has a capacity of .18 to .23 microfarads.
If a condenser is used which does not have the specified capacity of .18 to .23 microfarads, excessive pitting of one contact point and a corresponding build-up of metal on the other contact point will result. A condenser having insufficient capacity will cause build-up of metal on the breaker arm (positive) point. See figure 10-44, view A. A condenser having excessive capacity will cause build-up of metal on the contact support (negative) point. See figure 10-44 view B.
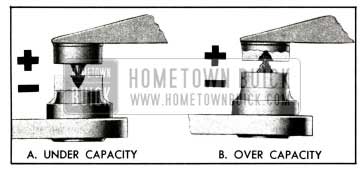
1958 Buick Result of Under or Over Capacity Condenser
In exceptional cases, pitting and metal buildup on contact points may be experienced even when condenser capacity is within the specified limits. In such cases the life of contact points will be improved by installing a condenser of high-limit capacity if metal build-up is on breaker arm point, or a condenser of low-limit capacity if metal build-up is on contact support point. There is usually sufficient variation in the capacities of stock condensers to permit selection of a high or low limit condenser by testing the available stock.
Low Insulation Resistance
A weak or leaking condenser is usually one that has absorbed water so that the insulation resistance of the winding is lowered to the extent that the condenser will not hold a charge satisfactorily. A condenser with low insulation resistance will drain sufficient energy from the 1958 Buick ignition system to lower the secondary voltage seriously. The condenser specified for use in the 1958 Buick ignition system is sealed to prevent absorption of water, and no other type should be used.
A leaky condenser usually does not affect engine performance except when hot. It is unlikely that a condenser with low insulation resistance would cause missing at low or medium speeds under conditions where the condenser does not get hot. A condenser that has low enough resistance to affect engine performance when cold would probably be indicated as broken down on most condenser testers.
Condenser testers equipped to check condensers for low insulation resistance usually give a reading in megohms, a megohm being one million ohms. The scale is marked to indicate whether the condenser is good or bad.
When testing a condenser for low insulation resistance the lead should always be disconnected from the distributor. Since the distributor terminals and the connected circuit have much lower insulation resistance than the condenser, failure to disconnect the condenser lead will give a reading much too low.
10-45 1958 BUICK DISTRIBUTOR SERVICE OPERATIONS
Removal and Disassembly of 1958 Buick Distributor for Inspection
- Disconnect the 1958 Buick distributor primary wire from coil and disconnect pipe from vacuum unit. Remove distributor cap by inserting a screwdriver in upper slotted end of cap latches; then press down and turn 90° in either direction. See figure 10-36.
- Make a mark on 1958 Buick distributor base in line with rotor. Then carefully note the location of the vacuum unit in relation to engine so that the distributor can be replaced in the exact same position after it is serviced. See figure 10-40. CAUTION: If engine is turned over while distributor is out, complete 1958 Buick ignition timing procedure must be followed (par. 10-41).
- Remove distributor clamp and lift distributor out of crankcase.
- Remove rotor from end of distributor shaft by removing two attaching screws, lock washers, and flat washers. See figure 10-45.
1958 Buick Removing and Installing Rotor
Inspection of 1958 Buick Distributor Parts
- Wash the 1958 Buick distributor assembly in clean solvent, holding housing horizontal to avoid getting cleaning solvent into the lubricant reservoir. Dry parts thoroughly. NOTE: Leave oil filler in place for normal service operations.
- Wipe out 1958 Buick distributor cap with a clean cloth and inspect it for chips, cracks, and carbonized paths which would allow high-tension leakage to ground. Such defects require replacement of cap. Clean any corrosion from surfaces of terminal segments inside the cap. Do not use emery cloth or sand paper. If segments are deeply grooved, the cap should be replaced. Pull cables from terminal sockets and inspect sockets for corrosion. Clean sockets, using a stiff wire brush to loosen corrosion.
- If rotor is cracked, spring contact is badly worn, or rotor tip is badly burned, rotor must be replaced.
- Inspect condenser and primary leads for loose or frayed terminal connections. Check condenser in a reliable condenser tester as described in paragraph 10-44.
- Vacuum Advance Unit. Inspect rod end for excessive wear. Push rod into unit as far as possible, hold finger tightly over threaded hole, and then release rod. After about 15 seconds, release finger from hole and notice if air is drawn in. If not, diaphragm is leaking and unit must be replaced.
- Contact Points. Carefully examine the mating surfaces of the contact points, noting whether they are flat and making good contact, or whether they are blackened, pitted, burned, or worn excessively. Contact points which have been in service for some time will appear dull and gray. This condition is normal and such points should not be replaced.
Contact points which are blackened or only slightly burned or pitted may be cleaned with a thin contact stone or a clean fine-cut contact file. Remove high points only; it is not necessary to remove all buildup or pit. CAUTION: Do not use emery cloth or sandpaper to clean contact points because particles of these materials usually embed in contact surfaces and cause points to burn.
Excessively burned, pitted or worn contact points cannot be cleaned up and aligned satisfactorily; therefore, they must be replaced to insure satisfactory ignition (par. 10-40).
If contact points are excessively burned, pitted, or blackened it is advisable to check for cause and make the necessary correction so that new points will give satisfactory service. Burned or pitted points may be caused by:
- Ignition coil resistance unit not properly connected into circuit. Connect between 1958 Buick ignition switch and coil positive (+) terminal.
- Defective condenser. Test the condenser (par. 10-44).
- Insufficient contact point opening. Adjust contact point dwell as described in paragraph 10-40 (c).
- Oil vapors getting into the distributor and depositing on contact surfaces of points. This causes arcing and rapid burning of contact points. Oil vapor entering distributor usually produces a smudgy line under the points.
- High voltage, or any other condition in electrical system causing excessive flow through contact points. This results in a blue scale forming on point surfaces. Check condenser for high series resistance (par. 10-44). Check voltage and current regulator (par. 10-26).
- Radio capacitor connected to distributor terminal. This will cause excessive pitting of contact points. Capacitor should be connected to the positive (battery) terminal of coil.
- If any remaining parts are defective, the distributor must be completely disassembled to replace them. Before disassembling distributor further, inspect parts as follows:
- Centrifugal Advance. Inspect for excessive wear between centrifugal weights and advance cam, or pivot pins. Turn weight base plate in a clockwise direction until weights are fully extended, then release and allow springs to return weights to retard position. Repeat several times. Springs should return weights to stop without sticking and there should be no excess free movement in the retard position.
- Cam and Weight Base Plate. Inspect cam lobes for scoring or excessive wear. Check weight base plate for bind or excessive looseness on distributor shaft.
- Breaker Plate. Attempt to rotate plate to check for excess free motion between plate and vacuum advance unit linkage. Check plate for excess looseness on O.D. of upper distributor shaft bushing. Check breaker plate ground lead for poor spot-weld at plate end or for loose or frayed terminal connections.
- Distributor Shaft. Check for excessive wear between shaft and bushings in housing.
- Driven Gear. Inspect gear for scoring of teeth or excessive wear.
- To replace any part found to be defective in step 7, the distributor must be completely disassembled as follows:
- File or grind the staking from the driven gear pin and drive out the pin using a hammer and drift punch. See figure 10-46. CAUTION: Be careful not to bend distributor shaft or damage gear when driving pin out.
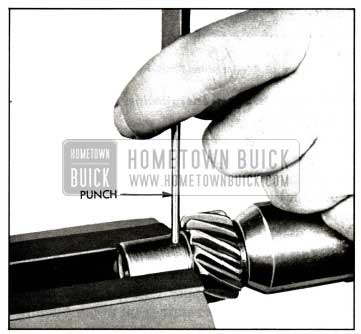
1958 Buick Removing Distributor Gear Pin
Assembly and Installation of 1958 Buick Distributor
NOTE: The first five steps apply only if the 1958 Buick distributor has been completely disassembled.
- Install distributor primary lead and rubber grommet. Install vacuum advance unit with ground lead terminal from breaker plate under outer mounting screw and lock washer. See figure 10-37.
- Install felt washer over upper bushing and apply a few drops of light oil. Then place breaker plate over upper bushing and vacuum advance link. Install retainer on upper bushing. See figure 10-47.
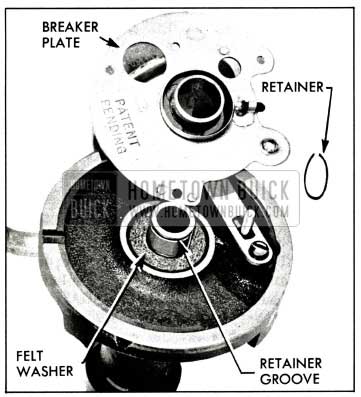
1958 Buick Installing Breaker Plate and Retainer
NOTE: The square and round lugs on the bottom of the rotor must be positioned in the corresponding holes in the weight base plate. See figure 10-45.
- If a reliable distributor tester is available, check the distributor to make certain that the centrifugal and vacuum advance mechanisms are operating according to the specifications given in paragraph 10-4(c). NOTE:
Mount distributor in tester with all end-play of the distributor shaft in the up position; this is to eliminate any possible drag between the centrifugal advance cam and weight base plate.
- Install new O-ring seal on distributor housing.
- Insert distributor in engine block so that rotor is pointing to mark made on distributor base, with vacuum advance unit pointing in exact original direction. Connect vacuum pipe to advance unit. Fill oiler on housing with light engine oil.
- Install distributor clamp and bolt with lock washer, leaving bolt just loose enough to permit movement of the distributor with heavy hand pressure.
- Connect primary wire to distributor side of coil. Install distributor cap.
- If spark wires were removed, make certain that they are arranged as shown in figures 10-41, 42 and 43. Wires must be pushed all the way down into the distributor cap terminals and onto the spark plugs. Nipples must be pushed firmly over the terminals and boots over the spark plugs.
- Start engine and adjust contact point dwell angle (par. 10-40, c). Then adjust ignition timing (par. 10-41, b). NOTE: If engine was accidentally turned over while distributor was out, complete 1958 Buick ignition timing procedure must be followed (par. 10-41, a & b).
10-46 1958 BUICK IGNITION SWITCH AND LOCK REPAIRS
1958 Buick Ignition Switch Key
If 1958 Buick ignition key sticks or feels rough as it is inserted into the lock, examine it for burrs and smooth up with a fine cut file. Blow finely powdered graphite into lock cylinder, then work key in and out of cylinder a number of times to work graphite into tumblers. Do not use oil in lock cylinder as this will cause tumblers to stick.
If 1958 Buick ignition switch key is lost and key code number is not known, the code number will be found stamped on the door safety lock, which must be removed. A new key can be cut by using this code number.
1958 Buick Lock Cylinder Replacement
To remove 1958 Buick lock cylinder, insert key and turn 1958 Buick ignition switch to “OFF” position. Insert a stiff wire (paper clip) in small hole in face of cylinder to depress the pin which locks the cylinder, turn cylinder clockwise and pull out. To install lock cylinder insert key, place cylinder in switch slightly clockwise from “OFF” position, press inward and turn cylinder counterclockwise.
1958 Buick Ignition Switch Replacement
- Disconnect battery cable from junction block to avoid a possible short circuit when disconnecting wires from switch terminals.
- Remove lock cylinder (subpar. b, above).
- Remove shield which is attached to steering column support.
- Remove switch attaching screws, remove switch from forward side of instrument panel, and disconnect wires from switch terminals.
- When switch is installed be careful to connect wires to terminals as shown in the chassis wiring circuit diagrams in Section 10-J. Be sure to install switch terminal shield with new “theft proof” screws. Connect battery ground cable in proper manner to make an initial winding of clock and set clock. See paragraph 10-56.
Removal of 1958 Buick Lock Cylinder Which Cannot be Unlocked with Key
When 1958 Buick ignition switch fails to unlock with the proper key, and lock has previously been operating satisfactorily, the lock cylinder can be removed as follows:
- Draw a centerline on cylinder at 90° to key slot, insert key, and make a prick punch mark on centerline 3/8″ from side of key. Carefully drill a .0465 hole (No. 56 drill) through cylinder flange at this point.
- File the end of a stiff wire (paper clip) to a taper. Insert this end of wire in drilled hole to pry the cage bar assembly down so that lock cylinder can be turned. After turning cylinder slightly, remove the wire to avoid wedging, then remove lock cylinder in the regular manner (subpar. b, above).
- Stake cage bar in place at four points. Staking must not distort cage. Reinstall lock cylinder and check operation with key. If operation is satisfactory, plug the drilled hole with a small pin No. 00 x 1/8″ (Parker Kalon type “U”).
Leave A Comment
You must be logged in to post a comment.