GROUP 12 – 1953 BUICK SHEET METAL
12-1 DESCRIPTION OF 1953 BUICK SHEET METAL
1953 Buick Front End Sheet Metal Assembly
The front end sheet metal assembly consists of both front fenders, fender skirts and tie panel, hood latch mounting panel, radiator grille frame, radiator pan, radiator core and mounting strap, fan shroud. On Series 40 it also includes the outside air intake ducts which are attached to fender skirts. The ducts are built into the fender skirts on Series 50-70.
All parts are joined together in an assembly that may be removed and installed as one unit, or the separate parts may be replaced without difficulty. The front end of the 1953 Buick sheet metal assembly is supported and stabilized by attachment of the fender skirts to the frame side rails by means of bolts provided with rubber shims similar to body mountings. See Figure 12-1.
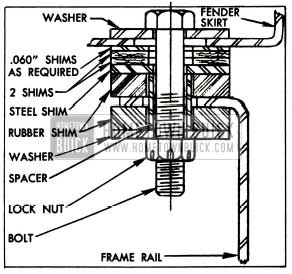
1953 Buick Fender Skirt Mounting Bolt and Shims
On Series 40, the rear ends of fenders are attached directly to the body cowl. On Series 50-70, the rear ends of fenders are attached to the body cowl through adjustable fender supports.
1953 Buick Hood, Hinges, and Latch Mechanism
The 1953 Buick hood panel is of one-piece construction which is strengthened and held to shape by front and rear transverse reinforcements of stamped sheet steel. The 1953 Buick front end is also strengthened by two lateral braces.
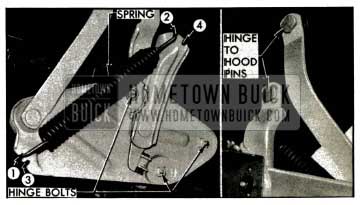
The 1953 Buick rear end of the hood is attached to the body cowl on each side by hinge assemblies which permit the front end of hood to be raised, alligator type. A heavy coil spring on each hinge assembly assists in raising the hood and holds it up when in the open position. The springs exert a downward pull when hood is in closed position. See Figure 12-2.
1953 Buick Hood Hinge-Left Side
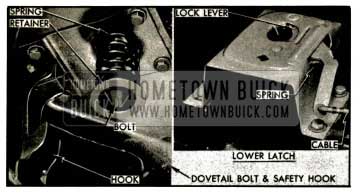
The 1953 Buick front end of hood is locked down by a dovetail bolt on hood which engages a lock lever in the latch mounted on a panel of the front end sheet metal assembly. Proper tension on the latching parts is maintained by a spring and retainer which surrounds the dovetail bolt.
1953 Buick Hood Latch and Dovetail Bolt
The 1953 Buick hood is unlocked by pulling a knob located at lower left side of instrument panel. The knob operates a control cable attached to the lock lever in the latch assembly. A safety hook mounted on the hood must then be pulled forward before the hood can be raised. See Figures 12-4.
1953 Buick Hood Guide Bracket
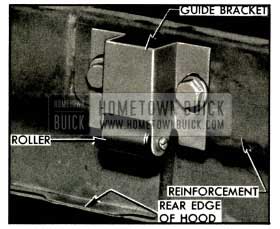
A roller type guide mounted on the rear hood reinforcement at center contacts a guide pad mounted on the body cowl to provide proper clearance between hood and cowl when hood is raised and lowered. See Figure 12-4.
12-2 1953 BUICK FENDER AND HOOD ALIGNMENT INSPECTION
The 1953 Buick hood and front fenders must be aligned with each other on every car to take care of slight variations in form and dimensions of the individual parts. 1953 Buick sheet metal parts stamped in a given set of dies will vary somewhat in form and dimensions due to variations in the hardness of different batches of sheet metal, which cause the stampings to spring in varying amounts when released from the dies.
The 1953 Buick hood and front fenders are properly aligned during the installation at the factory; however, some readjustment may be required after a car has been shipped or has been in service for some time. This is because 1953 Buick sheet metal parts may take a different “set” as a result of vibration and shock incident to shipping or operation during the break-in period. In judging the need for readjustment it must be understood that exactly uniform fit and spacing cannot be obtained on all cars of a given model.
IMPORTANT: After any work on front end sheet metal assembly which changes fender position, be sure to check aiming of headlamps as described in paragraph 10-49.
1953 Buick Hood Noises or Panel Flutter
Squeaks or grunting noises in the hood when driving over rough roads do not necessarily indicate misalignment of hood and fenders. These noises may be caused by metal contact at some point where clearance should exist or by worn or dry hood bumpers.
If the hood squeaks, check with 1/16″ thick feeler all around the hood for clearance at radiator grille frame, fenders and cowl. If an edge of metal is making contact at any point where clearance should exist a bright metal spot will usually be found. Such spots may be depressed by spring hammering to provide clearance.
A grunting noise in the hood is usually caused by dry rubber bumpers or cowl ledge lacing. Lubricate all rubber bumpers on fender rails and cowl with Lubriplate (Finch Refining Co., No. 110). To correct a persistent case of squeaking or grunting where hood top panel contacts ledge lacing, even when lubricated, cement a 1/16″ thick strip of felt to panel where the lacing makes contact.
To prevent hood panel flutter, the rear end of hood panel must have firm contact with the rubber lacing attached to cowl ledge. The hood may be raised or lowered by adjustment at hinges. If cowl ledge lacing is loose, recement it in place and make sure that all fasteners are properly installed.
Preliminary Tightening
Before deciding upon any adjustment to correct hood or fender misalignment it is advisable to check tightness of all attaching screws and bolts, since a true picture of correction requirements cannot be obtained when the sheet metal is loose and free to shift.
After all parts are properly tightened inspect fender and hood alignment at front doors (subpar. c) and hood alignment (subpar. d). Make all inspections before performing any adjustments because an adjustment at one point will usually alter alignment at other points. The preliminary inspection should determine the adjustments that will produce the best overall alignment of hood and fenders at all points.
1953 Buick Fender and Hood Alignment at Front Doors
With front doors closed there should be no metal-to-metal contact between doors and rear ends of front fenders. Check for clearance at frequent points, using a strip of fibre or other soft material 1/32″ thick.
The spacing between rear end of front fenders and the shoulder on front edge of doors should be approximately 1/8″, and fairly uniform from top to bottom. The spacing between rear end of hood and front edge of doors should be fairly uniform on both sides, and sufficient to prevent contact as door is opened.
Before making any adjustment of 1953 Buick sheet metal to provide necessary clearance at points mentioned, first make sure that front doors are properly aligned in the body openings as described in paragraph 13-7 in the 1952 Buick Shop Manual.
On Series 40 if fender and door panel surfaces are not reasonably flush correction may be made by adding or removing plain washers between the fender support and the cowl panel. On Series 50-70, adjustment of fender with reference to door panel may be made by loosening the fender attaching bolts at fender support and rocker panel. This will permit movement of fender in or out, forward or rearward. Fenders must not be moved so much that proper alignment of hood is affected.
Where spacing between end of front fender and edge of door is objectionably uneven from top to bottom it may be necessary to adjust the shims between frame rails and the sheet metal supports on front fender skirts.
Improper spacing or interference between hood and doors may be corrected by hood hinge adjustment.
1953 Buick Hood Alignment Inspection
When closed and locked, the hood should bear firmly against the rubber bumbers on radiator grille frame and the rubber lacing attached to the cowl ledge.
A clearance of approximately 1/8″ should exist between each side of hood and the fender, and the spacing should be fairly uniform from front to rear. Along the sides, the hood and fender contours should be in reasonably close horizontal alignment.
A clearance of approximately 1/8″ should exist between the rear edge of hood and the shoulder of cowl panel, and the spacing should be fairly uniform from side to side.
Raise and lower the front end of hood slowly several times to check for proper alignment between the dovetail bolt in hood and the latch on sheet metal panel. Dovetail bolt should enter the opening in latch without any side strain or other interference. As hood is raised and lowered, observe whether the rear edge contacts the body cowl due to improper adjustment of the hood guide bracket and roller pad.
12-3 1953 BUICK FENDER AND HOOD ADJUSTMENTS AND REPLACEMENTS
1953 Buick Front Fender Adjustment
If the front end of the 1953 Buick sheet metal assembly is too high or too low, resulting in objectionably unequal vertical spacing between front fenders and doors, it will be necessary to change the shims located under the supports on front fender skirts. Adjustment of shims also may be required if the front end of the sheet metal assembly is tilted to right or left so that proper alignment of hood and fenders cannot be obtained by hood adjustment.
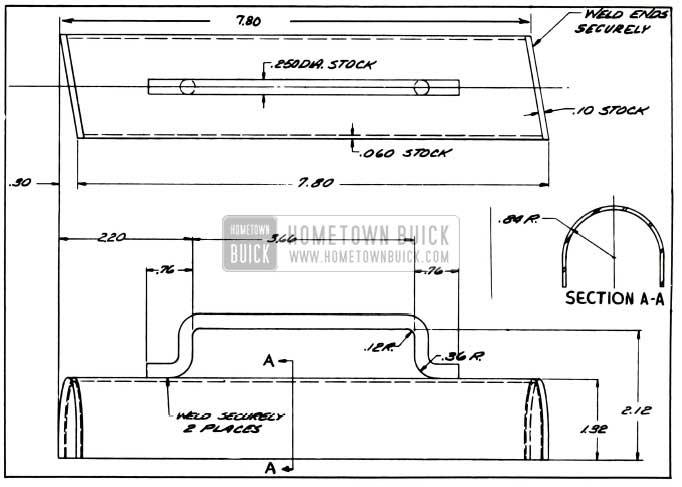
At the point where each front fender skirt support is attached to frame rail a rubber shim is placed on each side of the frame rail top flange, with a steel washer 1/8″ steel shim and tubular spacer placed to control compression of the rubber shims as the bolt is tightened. Two steelbestos shims are placed between the 1/8″ steel shim and the fender skirt. When additional shimming is required one or more extra steel shims .060” thick are placed between the steelbestos shims and the fender skirt. See figure 12-1.
1953 Buick Hood Adjustments
- 1953 Buick Hood Hinges. Each hood hinge is attached to the body cowl with three bolts and the hinge arms are attached to the hood with threaded pins. The two lower hinge bolts screw into nuts welded to the hinge plate and are installed from the inside of cowl. See figure 12-2.
Oversize holes in cowl and a slotted hole in hinge plate permit movement of the hinge and hood in any direction required to obtain proper alignment of hood with adjacent parts. To reach the two lower hood bolts it is necessary to remove the cowl trim (kick) pad.
- 1953 Buick Hood Latch Dovetail Bolt. The dovetail bolt may be turned to move up or down when the locknut on the upper end is loosened. See figure 12-3. The bolt should be adjusted so that the head engages under the lower latch lock lever without excessive vertical play when the front end of hood rests firmly on the rubber bumpers mounted on the radiator grille frame.
- 1953 Buick Hood Lower Latch. Slotted bolt holes in the lower latch permit sidewise movement of the latch to provide proper alignment with the dovetail bolt in hood. See figure 12-3. The latch must be set so that the dovetail bolt enters without sideward strain or other interference. The latch must not be used to force the nose of hood into alignment with fenders as difficulty in unlocking the hood may result. Proper sidewise alignment of hood should be obtained by adjustment of hood hinges.
- 1953 Buick Hood Guide Bracket. Slotted bolt holes permit endwise movement of the hood guide bracket on hood reinforcement. See figure 12-4. The guide roller pad on body cowl is not adjustable.
The guide bracket should be set so that the rear edge of hood will have good clearance with the cowl as hood is raised and lowered. It should not be set so far back, however, that hood will stick and tend to buckle at rear edge as it is raised.
1953 Buick Hood Hinge Spring Tool
1953 Buick Hood Hinge Spring Tool
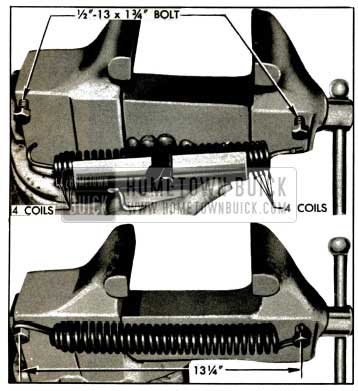
Figure 12-5 shows details of a tool for removing and installing hinge springs. The tool should be made locally, making sure that all metal is of indicated thickness for necessary strength, that ends are of indicated angle to avoid possible slippage out of spring, and that ends are soundly welded in place.
1953 Buick Vise Used to Stretch Hinge Spring
Figure 12-6 shows a vise equipped with two bolts to be used for loading and unloading the spring in removal tool. Drill and tap 5/8″ deep for two 1/2″-13 bolts 1 3/4″ long. Bolts should be located on the stationary and movable jaws so that the distances between them may be changed from 9 1/2″ to 13 1/4″ by opening the vise.
1953 Buick Hood Hinge Spring Removal
- Raise 1953 Buick hood to the “center” position where the hinge springs are extended to their greatest length.
- Place spring removal tool (fig. 12-5) on spring so that four coils are exposed at each end of tool, force ends of tool between spring coils as far as possible, then wrap a suitable strap around spring and tool to avoid slippage. See figure 12-6.
- Raise hood until spring tension is taken by the removal tool and ends of spring can be unhooked from hinge.
- Either lower the hood or prop it up securely.
- Hook ends of spring over bolts installed in vise (fig. 12-6), open vise until removal tool and strap can be removed then close vise to remove spring.
1953 Buick Hood Hinge Spring Installation
- Close vise until ends of spring can be hooked over the bolts then open vise until distance between bolt centers is 13 1/4″. See figure 12-6.
- Install the removal tool (fig. 12-5) on spring so that four coils are exposed at each end, then wrap a strap around spring and tool before removing the assembly from vise.
- If only one spring is being installed, engage spring ends in the same notches in the hinge assembly as used on the opposite hood hinge.
If both hinge springs are being installed, the springs may be engaged in different notches to suit individual preferences for “pull down” and ease of raising hood, as follows:
- When springs are engaged in notches numbered 2 and 3 in figure 12-2, they provide substantial “pull down” and easy hood raising. This is the standard production setting.
- When springs are engaged in notches numbered 1 and 2 (fig. 12-2) they provide maximum ease in raising the hood but a minimum of “pull down” on hood when closed.
- When springs are engaged in notches numbered 1 and 4 or 3 and 4 (fig. 12-2) they provide greater “pull down” on the closed hood but also provide the least assistance in raising hood. Notches 3 and 4 are not recommended because of extreme effort required when raising hood.
Emergency Unlocking of 1953 Buick Hood
If the 1953 Buick hood latch control becomes inoperative or it is necessary to open the hood when car doors are locked, the hood latch may be operated with screwdriver as shown in figure 12-7.
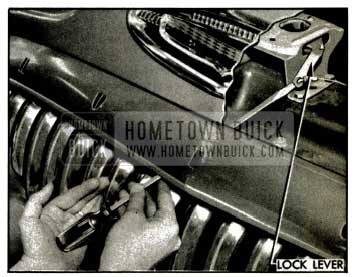
1953 Buick Unlocking Hood with Screwdriver
1953 Buick Buick Motor Division, Flint, Michigan
Leave A Comment
You must be logged in to post a comment.