SECTION 13-E 1957 BUICK REAR END (SERIES 40-60)
13-14 1957 BUICK BACK WINDOW (SERIES 40-60)
The 1957 Buick back window area is entirely new in design consisting of a center and two side glass assemblies. Each assembly includes a glass and a one-piece rubber channel, and is installed from inside the body into a separate body opening. The assemblies are secured against the pinchweld flange by retainers which are positioned under the inner lip of the rubber channels. Two newly designed reveal moldings are installed around each window opening. These “U” shaped moldings are positioned over the pinchweld flange as shown in Figure 13-93.
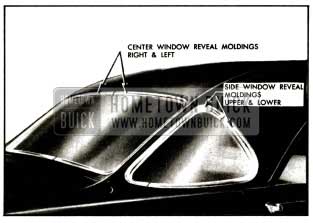
1957 Buick Back Window Reveal Moldings
The garnish moldings consist of an upper, side, lower and inner division moldings.
Removal of 1957 Buick Garnish Moldings and Back Window Assemblies
- Place necessary protective covering over interior trim.
- On inside of body remove screws securing back window garnish moldings and remove moldings from body.
- Remove the tacks or staples securing headlining along the top and sides of 1957 Buick rear window openings and detach headlining sufficiently in rear quarter areas to gain access to all retainer attaching screws.
- At bottom of center window, loosen screws securing center window lower retainer sufficiently to allow removal of center window.
- At each side window, loosen screws securing side lower rear and side lower front retainers sufficiently to allow removal of glass.
- Along top of center window and side windows, remove screws securing both right and left upper retainers. Remove retainers from rubber channel.
- At each division channel, remove screws securing division retainer; then remove each side of retainer from rubber channel and remove from body. (See Section “A-A” in Figure 13-92.)
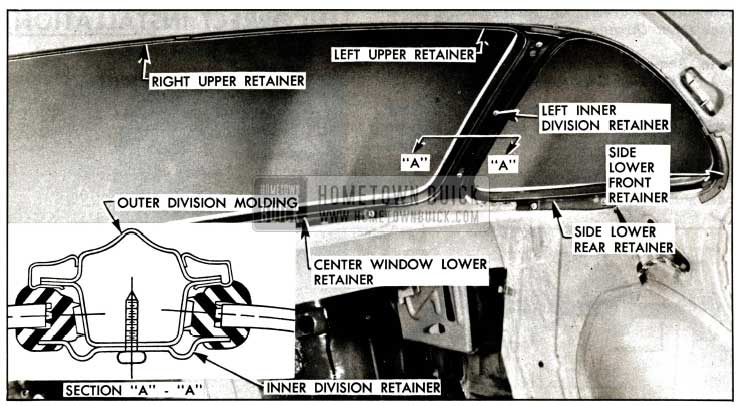
1957 Buick Back Window Retainers
NOTE: When removing side window, remove rubber band which is installed around perimeter of rubber channel. This rubber band is to be used when installing glass.
Installation of 1957 Buick Garnish Moldings and Back Window Assemblies
- Remove sealer from rabbet of pinchweld flange to insure a clean sealing surface.
- Check each side window drain gutter and d rain hose opening for obstructions and clean out if necessary.
- Using pressure type gun, apply bead of medium-bodied sealer in corner of rabbet adjacent to pinchweld around each window opening as shown in figure 13-93.
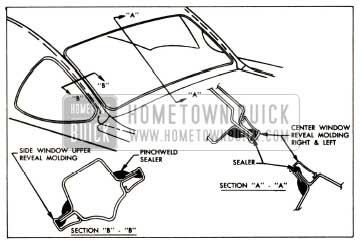
1957 Buick Back Window Sealing
NOTE: When installing retainers make certain retainers are properly positioned under lip of rubber channel(s).
Removal of 1957 Buick Back Window Reveal Moldings
- Remove back window assembly from affected window opening.
- On side windows, use a suitable tool and carefully disengage formed escutcheon at each end of lower side reveal moldings from upper side reveal molding and remove molding from pinchweld flange. Then remove upper side reveal molding.
- At center window use a suitable tool and carefully disengage formed escutcheon at each end of right hand center reveal molding from left molding and carefully remove molding from pinchweld flange. Then remove left hand side reveal molding.
Installation of 1957 Buick Back Window Reveal Moldings
- Clean off pinchweld flange and inside of reveal molding to insure a clean sealing surface.
- Using pressure type gun flow bead of medium-bodied sealer in channel of reveal moldings as shown in figure 13-93. Then position moldings over pinchweld with inner edge of channel against pinchweld (See Section “A-A” figure 13-93).
- On inside of body apply bead of medium-bodied sealer in corner of rabbet adjacent to pinchweld around entire perimeter of window opening. Install window assembly and all previously removed parts.
- Clean off excess sealer and remove protective covering.
13-15 1957 BUICK REAR COMPARTMENT (SERIES 40-60)
The 1957 Buick rear compartment lid hinges, guide, lid lock and cylinder assembly are similar to those used on previous styles. The following new features have been incorporated for the 1957 bodies:
- The 1957 Buick rear compartment weatherstrip is now secured in the compartment gutter rather than on the compartment lid.
- The Convertible Style incorporates new link-type lid hinges to provide the required lid travel.
Removal and Installation of 1957 Buick Rear Compartment Lid
The 1957 Buick rear compartment lid is secured to the body by two hinges which incorporate torque rods to assist in opening the compartment lid and holding it in the “up” position when opened.
- Open lid and place protective covering along edges of rear compartment opening to prevent damage to painted surface.
- Disengage wire harness from clips on hinge and rear compartment lid inner panel and remove wire harness from lid.
- Scribe location of hinge straps on lid inner panel.
- Remove two (2) bolts shown in figure 13-94 securing lid to each hinge strap and with aid of helper remove rear compartment lid.
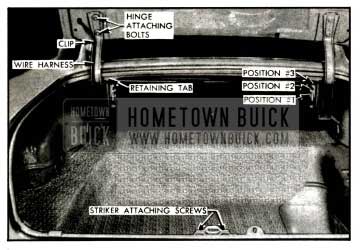
1957 Buick Rear Compartment
Adjustment of 1957 Buick Rear Compartment Lid
- To adjust compartment lid forward or rearward, or from side to side in body opening, loosen both hinge strap attaching bolts and adjust lid as required; then tighten bolts.
- To adjust compartment lid at hinge area up or down, install shims between lid inner panel and hinge straps as follows:
- To raise front edge of lid at hinge area, place shim between lid inner panel and forward portion of one or both hinge straps.
- To lower front edge of lid at hinge area, place shim between lid inner panel and rearward portion of one or both hinge straps.
- To check lid lock bolt engagement with striker see “Rear Compartment Lid Lock Striker Engagement Check.”
- To adjust rear compartment lid guide, loosen attaching screws and adjust guide as required; then tighten screws. (See figure 13-94.)
Removal of 1957 Buick Rear Compartment Lid Hinge
- Place protective covering over body around upper portion of rear compartment opening and provide support for lid on side where hinge is to be removed.
- Remove rear compartment trim at hinge area. If left hinge is being removed disengage wire harness from clip on left hinge.
- Scribe location of hinge strap on lid inner panel and remove bolts securing hinge strap to lid.
- With a suitable length of pipe disengage torque rod from notched retainer on inboard face of opposite hinge body.
NOTE: Mark retainer notch before removing torque rod to insure rod is installed in same position.
- Disengage opposite end of torque rod from lower movable portion of hinge strap and remove rod.
- On all styles except convertibles, bend back tab on inboard face of hinge box at retaining pin location, remove pin and then remove hinge from box.
- On convertible styles bend back tab on inboard face of hinge box at each of two (2) retaining pin locations, remove pins, and then remove hinge from box required to open the lid results from this adjustment.
Installation of 1957 Buick Rear Compartment Lid Hinge
- Position hinge in box and install hinge pin (s). Bend over retaining tab (s) to secure hinge pin (s).
- Position hinge strap within scribe marks on lid inner panel and install attaching bolts.
- Install “U”-shaped end of torque rod to hinge box making certain outer end of rod is engaged in hole in outboard face of hinge box.
- Engage torque rod to lower movable portion of hinge and engage other end of rod to correct retaining notch on inboard face of opposite hinge box.
- Check alignment of rear compartment lid and make any necessary adjustments.
- Replace wire harness if left hinge was removed. Replace all previously removed trim.
1957 Buick Rear Compartment Torque Rod Adjustment
The torque rods on the rear compartment lid hinge assemblies can be adjusted to obtain the desired effort required to open and close the lid. With the torque rod set in Position No. 1, (see figure 13-95) a decrease in the effort required to open the lid can be had by adjusting the torque rod to Positions No. 2 or No. 3.
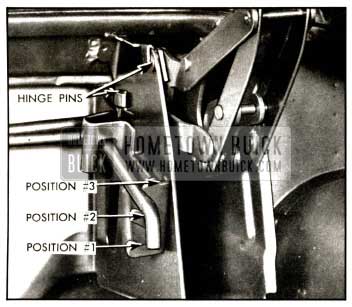
1957 Buick Rear Compartment Hinge-Convertibles
A corresponding increase in the effort required to close the lid results from this adjustment. With the torque rod set in Position No. 3, a decrease in the effort required to close the lid can be had by adjusting the torque rod to Positions No. 2 or No. 1. A corresponding increase in the effort.
Removal and Installation of 1957 Buick Rear Compartment Lid Lock Cylinder
The 1957 Buick rear compartment lid lock cylinder, lock and protector cover are located in the rear compartment lid. The rear compartment lid lock striker is located at the rear end panel.
The key-operated lock cylinder is held to the rear compartment lid outer panel by a sliding retainer located between the lid outer and inner panels.
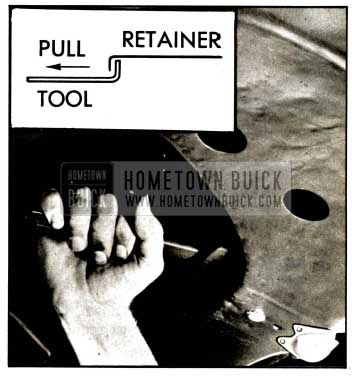
1957 Buick Rear Compartment Lock Cylinder Removal
- Through opening in rear compartment lid inner panel, insert suitable hooked tool to pull the lock cylinder retainer away from lock cylinder.
- Remove lock cylinder and gasket from outer panel of rear compartment lid.
- To install, reverse removal procedure after weathersealing lock cylinder gasket to lid outer panel.
Removal and Installation of 1957 Buick Rear Compartment Lid Lock and Protector Cover
- Remove 1957 Buick rear compartment lid lock cylinder.
- Remove two screws securing protective cover to lid inner panel.
- Remove three screws securing lock and protective cover to lid inner panel and remove cover and lock.
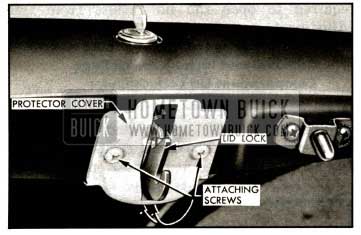
1957 Buick Rear Compartment Lid Lock and Protector Cover
Removal and Installation of Rear Compartment Lid Lock Striker
- Scribe location of striker and remove two attaching bolts; then remove striker. (See figure 13-94.)
- To install, position striker within scribe marks and reverse removal procedure.
Adjustment of 1957 Buick Rear Compartment Lid Lock Striker
- To adjust striker up or down, loosen attaching bolts, adjust striker as required; then tighten bolts.
- To adjust striker forward, loosen attaching bolts and install emergency spacer between striker and support; then tighten bolts.
1957 Buick Rear Compartment Lid Lock Bolts and Striker Engagement Check
To check the amount of engagement of the rear compartment lid lock bolt with the lock striker, use the following procedure:
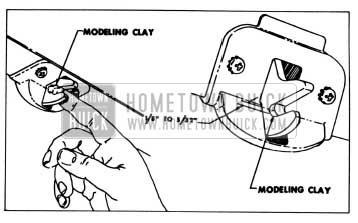
1957 Buick Checking Lid Lock Engagement
- Insert a small quantity of modeling clay at bottom of bolt slot and close lid with a moderate slam.
- Open lid and check amount of engagement of lock bolt with striker as indicated by compression of the clay. With a ruler measure the distance between the base of the “U” in clay to base of “U” in lock bolt. This dimension should be 1/8″ to 5/32″.
- Adjust striker as required and/or if necessary use a spacer or shim for extreme cases of lid lock striker adjustment. Tighten all attaching screws.
Removal and Installation of 1957 Buick Rear Compartment Weatherstrip
The weatherseal at the rear compartment area is provided by a one-piece weatherstrip which is secured to the body by the compartment opening gutter. An additional seal is obtained by application of weatherstrip cement to the rear compartment gutter at the weld joint, as shown in Section “C-C” of figure 13-99, prior to installation of the weatherstrip.
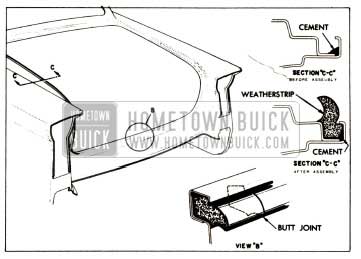
1957 Buick Rear Compartment Weatherstrip
- Separate “butt” ends of weatherstrip at bottom of compartment opening. With flat bladed tool carefully disengage weatherstrip from its cemented foundation in the gutter across the bottom, up the sides and across the top. Remove weatherstrip.
- Check gutter around rear compartment opening to make certain surface is clean.
- Using a pressure-type gun flow a bead of weatherstrip cement along weld joint at lower inner corner of the rear compartment gutter around entire perimeter of gutter as shown in “C-C”, figure 13-99.
- Center weatherstrip at area between lid hinges using color identification mark at center of weatherstrip as guide.
- Using a flat-bladed tool such as putty knife with rounded corners or a headlining inserting tool, insert weatherstrip into gutter across top, down sides and across bottom of rear compartment.
- Trim ends of weatherstrip to form “butt” joint. Brush weatherstrip cement on both ends of weatherstrip and secure ends together as shown in View “B”.
Leave A Comment
You must be logged in to post a comment.