SECTION 13-M 1957 BUICK HEADLINING AND SEATS (SERIES 50-70)
13-36 1957 BUICK HEADLINING (SERIES 50-70)
The 1957 Buick headlining in Series 50-70 bodies is serviced the same as the headlining in Series 40-60 bodies. For removal and installation procedures, see paragraph 13-12 for all series bodies.
13-37 1957 BUICK SEATS (SERIES 50-70)
1957 Buick Front Seat
Several new design changes have been incorporated in the front seat assembly, some of which require new service procedures. All “70” Series have a one-piece seat back panel assembly. Seat back robe cords and ash tray and lighter assemblies are new. The power operated horizontal and power operated six-way seat adjusters are new in design and require new service procedures.
Removal and Installation of 1957 Buick Front Seat Control Switch (Power Seats)
- Remove two screws securing switch and escutcheon assembly to seat side panel. Disconnect switch control harness block from terminals of switch and remove switch and escutcheon assembly from seat.
- Through holes in sides of switch escutcheon, depress tabs of clips and remove clips securing switch to escutcheon.
- Remove switch from escutcheon. Component parts of switch and escutcheon assembly for six-way seat adjusters are shown in figure 13-226.
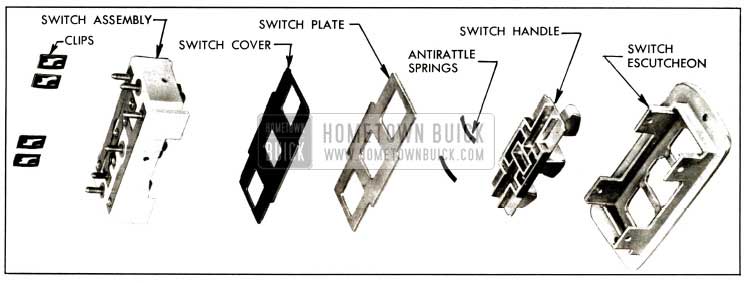
1957 Buick Front Seat Switch and Escutcheon
- To install front seat control switch, reverse removal procedure. Assemble parts of the six-way seat control switch in the order, shown in figure 13-226. Install clips so that tab of each clip engages hole in escutcheon.
Removal and Installation of 1957 Buick Front Seat Side Panels
- If removing left side panel on seats with manual seat adjusters, remove control knob.
- Remove panel attaching screws at front and rear of panel. Disengage panel from front and center supports.
- If removing left side panel on seats with power operated horizontal or six-way seat adjusters disconnect control harness switch block from terminals of switch.
- To install front seat side panel, reverse removal procedure.
Removal and Installation of 1957 Buick Front Seat Back Robe Cord (Model 73)
- Remove robe cord escutcheon attaching screws at both ends of robe cord.
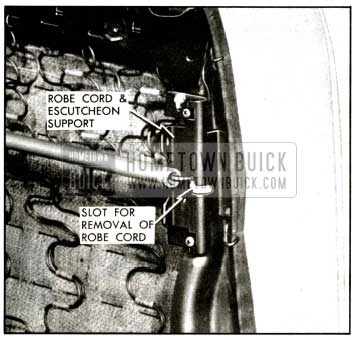
- At right side of robe cord move wire loop downward and remove through slot in robe cord support. At left side of robe cord move wire loop upward and remove through slot in robe cord support. See figure 13-227.
1957 Buick Robe Cord Attachment
- To install robe cord, reverse removal procedure.
Removal and Installation of 1957 Buick Front Seat Back Ash Tray and Lighter Assembly (Four-Door Models)
- Raise ash tray cover. Remove two screws securing ash tray to seat back frame.
- Detach ash tray from seat back frame and disconnect lighter feed wire and ground wire from lighter.
- To install ash tray and lighter assembly, reverse removal procedure.
Removal and Installation of 1957 Buick Front Seat Back of Back Panel and/or Robe Cord (Two-Door Models)
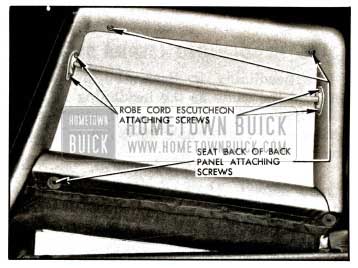
- Remove robe cord escutcheon attaching screws at both ends of robe cord.
- At right side of right seat back move wire loop of robe cord downward and remove through slot in robe cord support. At left side of left seat back move wire loop of robe cord upward and remove through slot in robe cord support. See figure 13-227.
- Remove seat back of back panel attaching screws. Lift panel upward to disengage from supports at top of seat back frame, then remove panel from seat back.
- Remove screw securing inboard end of robe cord and remove robe cord from seat back.
- To install front seat back of back panel and/or robe cord, reverse removal procedure.
1957 Buick Front Seat Back of Back Panel (Series 70 Only)
- Remove seat side panels and remove ash tray and lighter assembly where present.
- Remove robe cord, See “ROBE CORD – Removal and Installation.”
- Remove back of back panel attaching screws, figure 13-228A.
1957 Buick Robe Cord Escutcheon and Seat Back Attachment
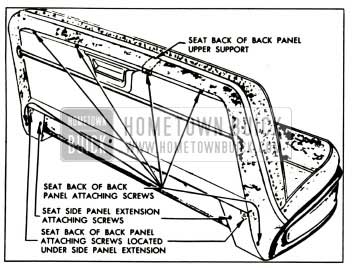
1957 Buick Front Seat Back of Back Panel Removal
- Remove seat side panel extension attaching screws, then disengage side panel extensions sufficiently to remove back of back panel attaching screw located under side panel extensions, figure 13-228A.
- Lift panel upward to disengage from supports at top of seat back frame, then remove panel from seat back.
- To install seat back of back panel, reverse removal procedure.
Removal and Installation of 1957 Buick Front Seat Back (Two-Door Models)
- Remove front seat side panels.
- Remove retainer and washer from seat cushion frame hinge pin.
- With the opposite seat back tilted forward, pull seat back towards outside of body sufficiently to disengage outer support arm from hinge pin.
- Rotate the seat back forward sufficiently to disengage hooked end of center hinge pin from its retainer and remove seat back from body.
- To install seat back, reverse removal procedure.
Removal and Installation of Front Seat Back (Model 73)
- Remove front seat back of back panel assembly.
- On seats with seat back lighter, detach lighter feed wire from clips along bottom of seat cushion frame.
- Remove four seat back-to-seat bottom frame attaching bolts from each side of seat back and Remove Back Assembly.
- To install seat back assembly, reverse removal procedure.
Removal and Installation of Rear Seat Back Center Arm Rest (Four-Door Models)
- Position rear seat back center arm rest in down position.
- Pull out extension flap to gain access to two screws securing arm rest anchor plate to shelf panel supports.
- Remove two securing arm rest anchor plate to shelf panel supports.
- Remove rear seat back from body.
- Remove four center arm rest hanger plate attaching bolts and remove arm rest assembly.
- To install arm rest assembly, reverse removal procedure. Prior to installing seat back assembly into body adjust arm rest assembly so that it fits properly in the opening and operates properly.
Adjustment of 1957 Buick Rear Seat Back Center Arm Rest
To adjust the rear seat center arm rest assembly up or down in the seat back opening, remove the seat back assembly, loosen the four anchor plate-to-seat frame attaching screws sufficiently to disengage slots in anchor plate from tabs on seat back frame, then adjust assembly as required.
Removal and Installation of 1957 Buick Rear Seat Cushion and Back
- Remove rear seat cushion by lifting front edge of cushion to disengage tabs from holes in floor pan.
- On styles with center arm rest position arm rest in down position, pull out extension flip and remove two screws arm rest anchor plate to shelf panel supports.
- On Rivieras, straighten attaching tabs securing lower end of seat back. On Convertibles remove two screws and washers securing lower end of seat back. Lift seat back upward and remove from body.
Removal and Installation of Front Seat Including Seat Adjusters
Operate seat midway between extreme forward and rearward positions. Remove seat side panels.
- Loosen sill plates, turn back floor carpet and remove two seat adjuster to floor pan bolts from rear of each adjuster.
- On styles with seat back lighter, disconnect lighter wire from feed wire and detach lighter wire from clip on floor pan.
- Aided by helper pull entire seat assembly rearward to disengage seat adjuster front legs from attaching brackets and remove seat assembly from body.
- To install, reverse removal procedure.
Removal and Installation of 1957 Buick Front Seat Adjuster
- Remove seat assembly from body and place upside down on clean surface.
- Remove adjuster-to-seat bottom frame front and rear attaching bolts.
- With seat adjuster detached from seat bottom frame, the locking rod can be disengaged from seat adjuster. NOTE: If a new locking rod is installed, remove the slack from rod and its attaching parts by using a suitable tool and gripping rod near right s at adjuster. See figure 13-229.
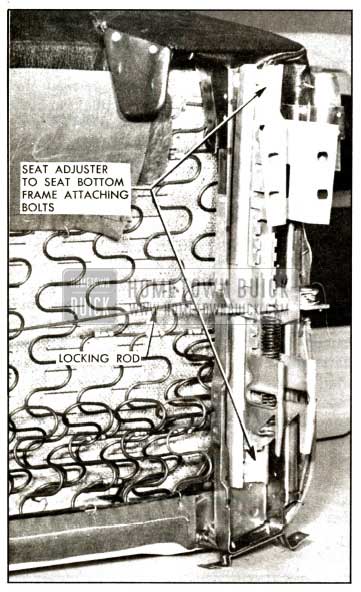
1957 Buick Locking Rod Installation
This operation is performed to insure a proper locking and unlocking action of right seat adjuster when operating control handle on left seat adjuster.
- To install, reverse removal procedure. NOTE: When attaching seat adjuster to seat bottom, be sure that right and left sliding mechanisms are in same relative position.
Adjustment for Additional Rearward Movement of Front Seat
An additional 5/8 inch rearward travel of the front seat assembly can be obtained by bending tab in rear supports to clear lock bar support. To bend tab, remove lower seat side panel and with suitable tool bend tab to a vertical position. Perform same operation on the opposite adjuster.
Adjustment for Additional Rearward Movement of Front Seat (Model 73 Horizontal Power Seats)
An additional 5/8 inch rearward travel of the front seat assembly can be obtained be removing the spring steel stop (clip) on the forward end of the jackscrew. Stop can be removed with plier or similar tool. NOTE: This operation does not necessitate removal of seat assembly.
Leave A Comment
You must be logged in to post a comment.