SECTION 13-O 1957 BUICK EXTERIOR MOLDINGS (SERIES 50-70)
13-40 REMOVAL AND INSTALLATION OF 1957 BUICK EXTERIOR MOLDINGS (SERIES 50-70}
The 1957 Buick exterior moldings are secured by any one or a combination of clips, screws, bolt and clip assemblies, and joint plates. Before removing any molding which has to be pried from the body, apply a strip of masking tape to the painted surface adjacent to the molding to prevent possible damage to the paint finish. If any sealed components are removed to gain access to molding attachment areas, make certain the components are properly sealed when reinstalled. Prior to installing any moldings, apply medium-bodied sealer or body caulking compound around the attaching holes.
Front Door Window Front Reveal Molding
The molding is secured by a screw at the front and rear end of the molding. Remove the door belt finishing molding. Remove the screw securing the front end of the molding to the door ventilator frame and the screw securing both the door ventilator and the rear end of the molding to the door outer panel. Loosen the door ventilator to relieve any tension on the molding and carefully remove the molding. To install, reverse the removal procedure.
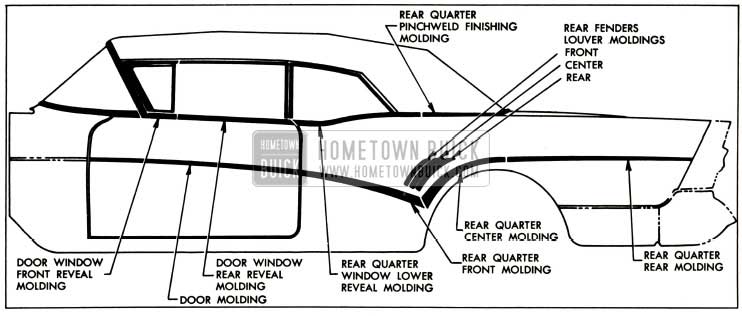
1957 Buick Exterior Moldings-50-70 Convertibles
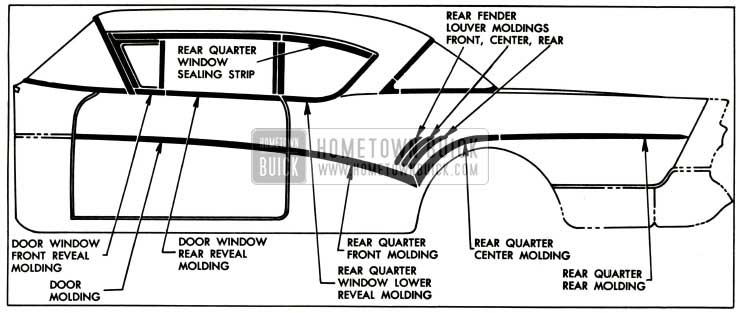
1957 Buick Exterior Moldings-Model 56R-76R
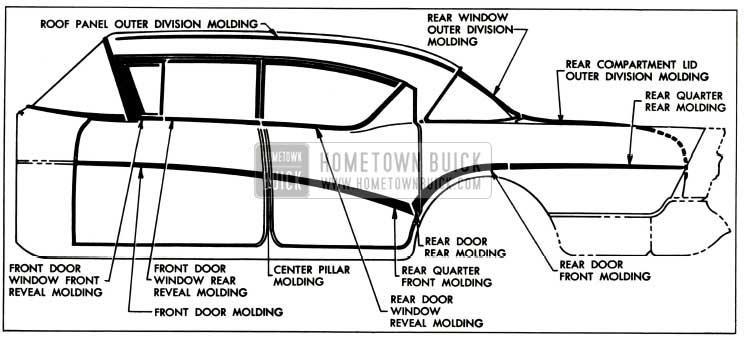
1957 Buick Exterior Moldings-Model 73
Front Door Window Rear Reveal Molding
The molding is secured to the return flange of the front door outer panel by screws. Loosen the door window front reveal molding rear attaching screw. Remove the door trim assembly and the water deflector. Disengage the window lower sash channel from the cam channel and rest the window on the lower stop support. Remove the screws securing the molding and remove the molding. To install, reverse the removal procedure.
Rear Door Window Reveal Molding (Models 53-73}
The rear door window reveal molding is secured to the return flange of the door outer panel by screws. Remove the door trim assembly, water deflector, and the door glass assembly. Remove the screws securing the molding to the door and remove the molding. To install, reverse the removal procedure.
Front Door Lower Molding
The molding is secured to the door outer panel by snap-in clips and by a screw at each end of the molding at the hemming flange. Remove the screw securing each end of the molding. Then, with a flat-bladed tool, carefully pry the molding from the body. To install the molding, reverse the removal procedure.
Rear Door Lower Molding-Front and Rear (Models 53-73)
The rear end of the rear door lower molding, front, and the front end of the rear door lower molding, rear, are secured together by screws necessitating the removal of both moldings as an assembly. The molding assembly is secured to the door outer panel by snap-in clips and by a screw at each end of the assembly at the hemming flange. Remove the screw at each end of the assembly. Then, with a flat-bladed tool, carefully pry the assembly from the body. To disassemble the moldings, remove the screws securing the center flanges. To install, reverse the removal procedure.
Rear Quarter Molding-Front and Rear (Models 53-73)
The rear quarter lower moldings front and rear are secured to the rear quarter outer panel by bolt and clip assemblies and attaching nuts. In addition, the rear end of the front molding and the front end of the rear molding are held in place by a joint plate. Remove the nuts and washers securing the moldings and joint plate and remove the moldings. Each molding can be removed independently. To install, reverse the removal procedure.
Rear Compartment Lid Outer Division Molding (Series 70)
The molding is secured to the rear compartment lid outer panel by bolt and clip assemblies, attaching nuts and sealing washers. In addition, on the 73 and 76R bodies, the front end of the molding is secured by a clip assembly with an attaching screw and washer. Raise the compartment lid. On the 73 and 76R bodies, remove the attaching nuts, sealing washers and the front attaching screw and sealing washer. On the 76C, remove the attaching nuts and sealing washers and remove the molding. To install, reverse the removal procedure.
Roof Panel Outer Division Molding (Models 73-76R)
The molding is secured to the roof panel by bolt and clip assemblies and attaching nuts. The attaching nuts contain integral sealing washers. In addition, a sleeve at the rear end of the molding secures the upper end of the back window outer division molding. Remove the back window outer division molding and detach the headlining sufficiently to gain access to the molding attaching nuts. Remove the attaching nuts and remove the molding. To install, reverse the removal procedure.
Roof Drip Molding Scalp (Model 73)
The molding is positioned over the roof drip molding and is secured to the side roof rail by screws. Remove the side roof rail weatherstrip and retainer and remove the screws securing the molding to the side roof rail. Then rotate the lower portion of the molding outboard to disengage it from the drip molding and remove the molding. To install, reverse the removal procedure.
Rear Quarter Front Molding (Two-Door Models)
The molding is secured to the rear quarter outer panel by bolt and clip assemblies with attaching nuts. Remove rear quarter trim and access hole cover to gain access to forward attaching nuts. To install, reverse the removal procedure.
Rear Quarter Center Molding (Two-Door Models)
The molding is secured to the rear quarter outer panel by bolt and clip assemblies with attaching nuts and washers. In addition the rear end of the molding and the forward end of the rear molding is secured to the body by a joint plate. Remove the attaching nuts and washers securing the rear quarter center molding and the joint plate, and loosen the nuts securing the forward end of the rear quarter rear molding. Carefully disengage the molding with the attaching bolts and clips from the body and slide the molding forward to disengage the rear end of the molding from the joint plate; then remove the molding from the body. To install, reverse the removal procedure.
Rear Quarter Rear Molding (Two-Door Models)
The molding is secured to the rear quarter outer panel by bolt and clip assemblies with attaching nuts and washers. In addition, the forward end of the molding and the rear end of the center molding are secured by a joint plate. Remove the attaching nuts and washers securing the rear molding and the joint plate and loosen the attaching nut securing the rear of the center molding. Disengage the molding with attaching bolts and clips from the body. Then carefully slide the molding rearward to disengage it from the joint plate and remove the molding from the body. To install the molding, reverse the removal procedure.
Rear Fender Lower Molding – Front, Center and Rear (Two-Door Models)
Each louver molding is secured to the rear quarter outer panel by retaining clips which are positioned in the attaching holes from outside of the body. Use a suitable fiat-bladed tool and carefully pry the molding, with attaching studs, from the retaining clips on the body. To install, replace the molding retaining clips, if necessary, and reverse the removal procedure.
Rear Quarter Window Lower Reveal Molding (Models 56R-76R)
The molding is secured to the return flange of the rear quarter outer panel by screws. Remove the rear quarter window. Then remove the screws securing the molding and remove the molding. To install, position the molding over the molding support and reverse the removal procedure.
Roof Drip Molding Scalp (Model 76R)
The scalp is a snap-on type molding positioned over the drip molding. Remove the rear quarter window reveal molding. With a suitable fiat-bladed tool, carefully disengage the lower portion of the scalp from the drip molding. Then rotate the scalp outward and disengage it from the drip molding. To install, position the scalp over the drip molding and reverse the removal procedure.
Rear Quarter Window Lower Reveal Molding (Convertibles)
The molding assembly is secured to the rear quarter outer panel reinforcement by screws. To remove the molding assembly, remove the rear quarter windows. Through the access holes in the rear quarter inner panel remove the screws securing the molding assembly. To install, reverse the removal procedure.
Rear Quarter Pinchweld Finishing Moldings (Convertibles)
The right and left finishing moldings are secured to the body by retaining clips and screws. The right molding which overlaps the left molding must be loosened prior to removing the left molding. To remove a molding, remove the front end of the folding top compartment bag from the rear seat back panel, and detach the center and quarter trim stick assembly from the body to gain access to the molding attaching screws. Remove the screws securing the molding tabs to the body. Then with a cushioned block and hammer, carefully detach the molding from the pinchweld flange. Slide the molding rearward to disengage it from the rear quarter window lower reveal moldlJ1g. To install the molding, place waterproof tape over the pinchweld flange, replace clips where required, position the molding under the reveal molding and reverse the removal procedure.
Center Pillar Molding (Models 53-73)
The molding is secured to the center pillar by two (2) screws. To remove the molding, open the doors and remove the attaching screws. To install, reverse the removal procedure.
Leave A Comment
You must be logged in to post a comment.