12-1 1958 BUICK FRAME
Buick’s Air-Poise and Coil Spring Suspensions require the use of different frames in 1958. The frames are basically the same with the exception of the construction of the front and rear cross-members. See Figure 12-1.
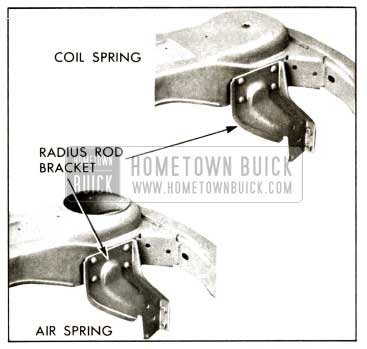
1958 Buick Air-Poise and Coil Spring Rear Cross-Member
NOTE: Conversion from one type of suspension to the other is not possible without fame change.
The 1958 frame will accommodate any of the three transmissions with the use of different detachable mounting brackets.
The side rails have been extended forward and the front bumper back bars are shorter to allow room just forward of the front cross-member for the air pressure tank. New upper brackets for the front shock absorbers are mounted to the side rails. Front and rear bumper back bars are mounted along the frame side rails rather than across the front and rear cross-members as in past models. Thus, bumpers are more easily aligned and more rigidly supported.
Because of these changes in bumper to frame mounting, it is possible in 1958 to make use of a more convenient bumper jack for lifting the car. The side rails at the rear of the frame have been widened for stronger support at the rear spring cross-member. Also a new radius rod bracket is used to accommodate the longer radius rod.
12-2 1958 BUICK CHASSIS SHEET METAL
In 1958, new center point rubber shims are used to mount the front sheet metal assembly ahead of the radiator to the frame. A rubber shoulder surrounds the bolt hole in the shim and extends through the mounting hole in the frame, preventing metal-to-metal contact. This center mounting improves control of the sheet metal motions under severe road conditions. New hood bumpers of improved material composition are used to eliminate hood “flutter.”
Each front fender skirt now consists of an outer skirt, inner skirt assembly, and front skirt assembly. The front skirt assemblies are joined at the front by the radiator mounting panel and the radiator pan. The support for the complete front end sheet metal is through the radiator mounting panel and its rubber mount, to a new channel section of the front frame cross member.
NOTE: In jacking the front of the car with a floor jack, be certain jack is placed under front cross member and not under sheet metal mounting .
12-3 ACRYLIC LACQUER
General Description
For 1958 acrylic lacquer will be available on all models. This new paint differs from both standard lacquers and enamels. Therefore, correct materials and procedures are essential to produce a satisfactory repair and refinish. Extreme care must be exercised in the ordering of refinish and repair materials for these models. Many repair and refinish products which may appear to be acceptable could have adverse effects on the finish of a car following paint repairs.
Special Precautions
- The acrylic lacquers, thinners, and undercoats used with them are not compatible with standard lacquers, thinners, and undercoats. Therefore, the two lines of materials should not be mixed when refinishing.
When using acrylic lacquers, use the entire line of materials. When using standard line lacquers, use the entire standard line of materials.
- No repairs or panel repairs may be made with standard line lacquers over surfaces previously finished in acrylic lacquer. The standard line lacquer will chalk or dull much more rapidly than the surrounding area of acrylic lacquer and will present an objectionable appearance in a short time.
- If it is desired to completely refinish or two-tone a car previously finished in acrylic lacquer, standard line lacquer may be used provided the original acrylic lacquer color coat is sanded to almost complete removal or to a point where the undercoat is showing over approximately 90 % of the surface to be refinished. The reason for this is that objectionable softening may occur if the acrylic lacquer color coat is not removed before applying standard line lacquer. Note that it is not necessary to remove paint to bare metal, only to the primer or undercoat.
NOTE: Replacement sheet metal parts (hood , fenders) are primed at the factory. Acrylic lacquer cannot be used over this primer. The primer must be removed to bare metal before any attempt is made to refinish with acrylic materials.
Repair and Refinishing
- Before any sanding is done, wipe: surface with a clean cloth soaked with enamel reducer to remove all traces of wax, polish, and grease. Wipe dry with a clean, dry cloth.
- Cut down the edges of broken spots with coarse sandpaper. If large areas are to be stripped, use “Klean Strip,” “Stripeeze,” etc. Feather edge with 400 paper. Sand an y rusty metal or new panels with a metal conditioner such as “Metal-Prep.” Wash with water and dry thoroughly.
- Spray bare and feathered areas with primer surfacer #90 reduced 2 parts primer surfacer #90 with 1 part undercoat thinner. Apply two or more medium coats rather than heavy wet coats. Permit each coat to flash (become dull) before applying succeeding coats. Allow final coat to dry at least thirty minutes before sanding. Best results will be obtained by sanding with 360 paper and water. If dry sanding is preferred , use 400 paper. If any imperfections still show, knife out with PX Putty and allow to dry one to two hours. Sand same as primer-surfacer. Seal sanded PX Putty with one medium coat Primer Surfacer # 90, reduced as above, and dry 30 minutes before sanding to smoothness.
- In spot repair area, rub around patches with rubbing compound to remove overspray and scratches in old finish. Wipe clean with cloth dampened with enamel reducer.
- Dust off surface to be finished and tack wipe.
- Spray three or four wet double coats of acrylic color coat, reduced 1 part of acrylic color coat with 1 1/2 parts topcoat thinner. Allow each coat to flash before applying succeeding coats.
In spot repair, extend each color coat a little beyond previous coat so as to blend into surrounding finish. Spray mist coat thinner to improve leveling and gloss.
- Allow to air dry at least four hours, preferably overnight; or force dry with infra-red lamps or oven to heat the finished area at least 10 minutes at 180 deg. F. Then process the area by hand rubbing with rubbing compound or by machine rubbing with lacquer machine polishing compound. In spot repair be careful not to compound too far out-stay within the area of the fresh color coat. Polish the entire area with polish, or dry buff with “Amcor” Disc No. 5 or lambs wool bonnet.
Acrylic lacquer ma y lose original brilliance due to shrinkage caused by loss of solvent after buffing. This shrinkage is reduced by increasing the dry or forced dry time before buffing. Rebuffing after shrinkage is complete (2 weeks or longer) will permanently restore brilliance.
NOTE: Allow at least TWO MONT H S for acrylic lacquer to harden before applying wax or silicone polish.
Road Oil and Tar Removal
When removing road oils and tar from acrylic lacquer finishes, care must be exercised to use a cleaner that is not harmful to this finish. Ordinary tar and lacquer removers developed for cleaning regular lacquer may be harmful to acrylic finish. Instances have been reported where these commercial cleaners have caused spotting, and in some cases, dissolving of the acrylic lacquer, causing extensive paint damage.
Any cleaner is satisfactory if it is recommended for use on regular lacquer, enamel and acrylic lacquer. Number Seven “Dissolvo,” newly developed and marketed by Du Pont, and a new “Prepsol” mixture or their equivalents can be used safely for removing road oils and tars from acrylic lacquer. This same new cleaner is compatible for use on regular line lacquers, enamels or acrylic lacquers, and any equivalent product would be as acceptable. When purchasing, make certain that the instructions on the container specifically state that the contents can safely be used on acrylic and other finishes.
Leave A Comment
You must be logged in to post a comment.