SECTION 13-C 1958 BUICK REAR QUARTER (SERIES 40-60)
13-10 1958 BUICK REAR QUARTER TRIM (SERIES 40-60)
Removal and Installation of 1958 Buick Rear Quarter Belt Finishing Molding (Models 46R-48-66R)
- Remove rear seat cushion and seat back.
- Remove belt finishing molding attaching screws and remove molding.
- To install, reverse removal procedure.
Removal and Installation of 1958 Buick Rear Quarter Belt Finishing Molding (Convertibles)
- Lower folding top.
- Remove molding attaching screws and remove molding.
- To install, reverse removal procedure.
Removal and Installation of 1958 Buick Rear Quarter Trim Assembly (Model48)
- Remove rear seat cushion and back.
- Remove 1958 Buick rear quarter belt finishing molding.
- Remove window regulator handle.
- Remove arm rest assembly.
- Remove drive nail from rear of trim panel.
- Use special tool, such as Tool J-6335, or equivalent to loosen trim assembly nails from body lock pillar nailing strip and remove trim assembly.
- To install, reverse removal procedure.
Removal and Installation of 1958 Buick Rear Quarter Trim Assembly (Convertibles)
- Remove 1958 Buick rear quarter belt finishing molding.
- Remove folding top compartment side trim panel.
NOTE: On cars with manually-operated windows, remove window regulator handle and anti-friction washer.
- Swing rear of quarter trim assembly forward. Remove tacks at front and remove assembly.
- To install, reverse removal procedure.
Removal and Installation of 1958 Buick Rear Quarter Trim Assembly (Models 46R-66R)
- Remove rear seat cushion and seat back.
- Remove belt finishing molding.
NOTE: On cars with manually-operated windows, remove 1958 Buick rear quarter window regulator handle and anti-friction washer.
- Remove arm rest assembly.
- Remove drive nail at rear of trim assembly and swing assembly forward to gain access to front attaching tacks.
- Remove front attaching tacks and remove trim assembly.
- To install, reverse removal procedure.
Removal and Installation of 1958 Buick Rear Quarter Arm Rest (Model48)
- Remove arm rest attaching screws and remove arm rest.
- To install, reverse removal procedure.
Removal and Installation of 1958 Buick Rear Quarter Arm Rest Assembly (Models 46R-66R)
- Remove rear seat cushion and seat back.
- Remove arm rest attaching screws at front and rear of assembly.
- Raise and move arm rest inboard to disengage it from rear quarter panel.
- Disconnect electrical leads as required and remove arm rest.
- To install, reverse removal procedure.
Removal and Installation of Folding Top Compartment Side Trim Panel (Convertibles)
- Remove rear seat cushion and seat back.
- Remove attaching screws from front and rear side of trim panel.
- Raise trim panel and move it inboard.
- Disconnect electrical leads as required and remove side trim panel.
- To install, reverse removal procedure.
13-11 1958 BUICK REAR QUARTER WINDOWS (SERIES 40-60)
Removal and Installation of 1958 Buick Rear Quarter Window Switch (Models 46R-66R and Convertibles)
- Remove 1958 Buick rear quarter arm rest assembly on model 48. On convertibles, remove folding top compartment side trim panel.
- Disconnect switch terminal block from switch assembly.
- Depress spring clips on each side of switch and remove switch and escutcheon as an assembly.
- To remove switch from escutcheon, depress switch retaining springs at ends of switch.
- To install, reverse removal procedure. See Figure 13-69.
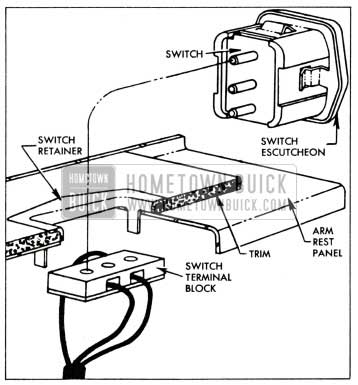
1958 Buick Rear Quarter Window Switch Attachment
Removal and Installation of 1958 Buick Rear Quarter Window (Model 48)
- Remove 1958 Buick rear quarter arm rest and trim assembly.
- Remove access hole cover.
- With window raised, remove lower sash channel attaching screws through upper access holes, and disengage lower sash channel from cam channel.
- Carefully lower and rotate window and remove.
- To install, reverse removal procedure. See Figure 13-70.
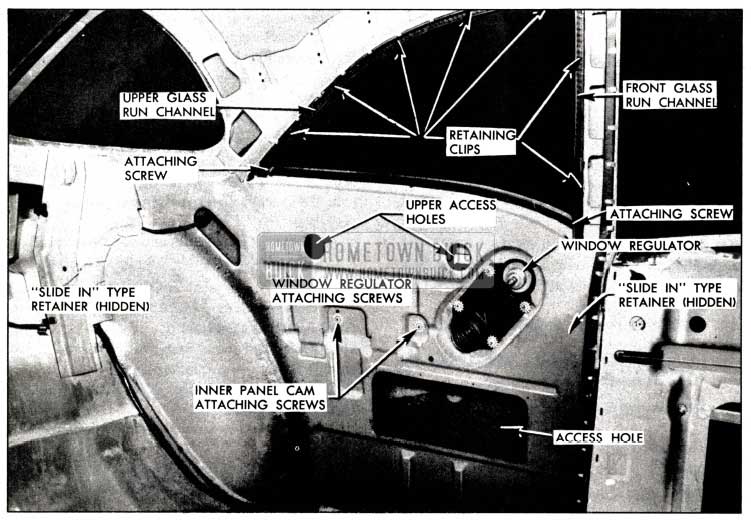
1958 Buick Rear Quarter Window Installation
Removal and Installation of 1958 Buick Rear Quarter Window (Manual and Electric) (Model 46R-66R)
- Remove 1958 Buick rear quarter arm rest and trim assembly and belt finishing molding.
- Remove access hole cover.
- With window in “up” position, remove rear guide attaching screws and remove rear guide.
- Carefully lower window to disengage regulator lift arm from window lower sash channel.
- Disconnect battery positive cable.
- Disengage window front roller from front guide and remove window from body.
- To install, reverse removal procedure. See Figure 13-71.
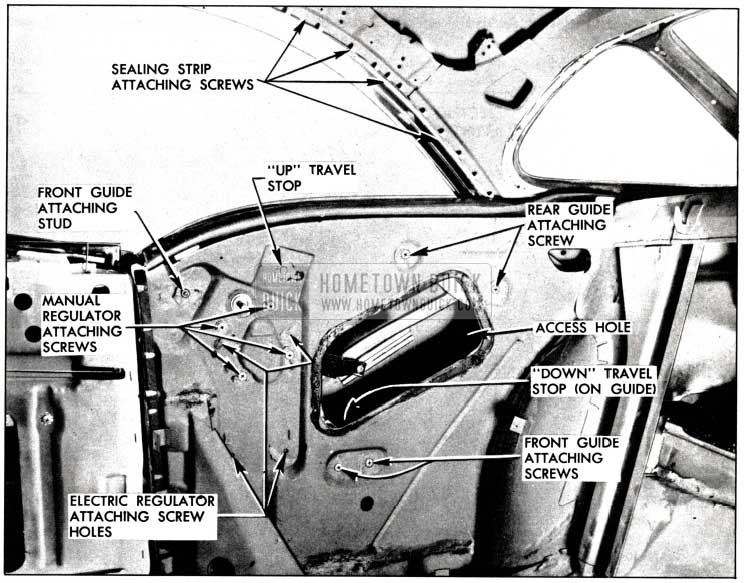
1958 Buick Rear Quarter Window Installation Overview
Adjustment of 1958 Buick Rear Quarter Window (Manual and Electric) (Model 46R)
- Remove 1958 Buick rear quarter arm rest and trim assembly.
- To adjust 1958 Buick rear quarter window “fore or aft”: loosen front and rear guide attaching screws; adjust quarter window as desired and tighten guide attaching screws.
- To adjust rear quarter window “in or out” at lock pillar: loosen front guide upper attaching nut, turn adjusting stud in or out as desired and tighten attaching nut.
- To adjust rear quarter window “up” travel when upper travel limits are reached: loosen “up” attaching screw, adjust stop as desired and tighten attaching screw.
- Remove access hole cover. To adjust rear quarter window “down” travel when lower travel limits are reached: loosen “down” stop attaching screw at lower area of front guide; adjust “down” stop as desired, and tighten attaching screw. See Figure 13-72.
1958 Buick Rear Quarter Window Installation Procedure
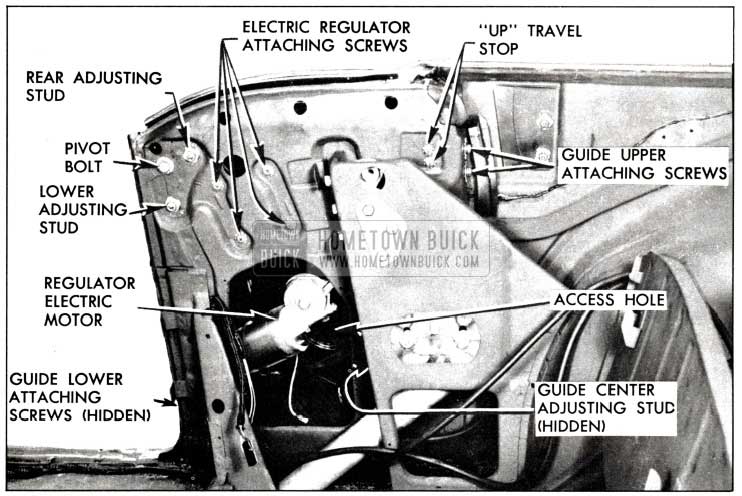
Removal and Installation of 1958 Buick Rear Quarter Window (Manual and Electric) (Convertibles)
- Remove 1958 Buick rear seat cushion and seat back, then lower folding top.
- Regulate window to half-down position. On cars with power windows, disconnect battery positive cable to prevent accidental operation of quarter window.
- Remove rear quarter belt finishing molding, folding top compartment side trim panel, and inside handle on manual cars.
- Swing rear quarter trim panel from rear quarter inner panel to gain access to pivot bolt and remove pivot bolt.
- Remove access hole cover.
- Disengage window male hinge from female hinge plate lifting front of window. Then raise window to disconnect lower sash channel cam from window regulator and remove window.
- To install, reverse removal procedure.
CAUTION: Do not operate regulator motor after window is disengaged from regulator. Operation of motor with load removed may damage unit.
Adjustment of 1958 Buick Rear Quarter Window (Manual and Electric) (Convertibles)
- Remove folding top compartment side trim panel and turn trim panel away from inner panel to gain access to pivot bolt and adjusting studs.
- To adjust 1958 Buick rear quarter window “up or down” or “fore or aft,” loosen pivot bolt and adjusting stud nuts. Position window where desired and tighten pivot bolt and adjusting stud nuts.
- To adjust top of quarter window “in or out” when raised: loosen pivot bolt and adjusting nuts; turn lower adjusting stud in or out until the desired adjustment is attained; and tighten bolt and nuts.
- To adjust rear of quarter window “in or out” when lowered: loosen pivot bolt and adjusting nuts; turn rear adjusting stud in or out until the desired adjustment is attained; and tighten bolts and nuts.
- To adjust quarter window “up” travel when upper travel limits are reached: loosen “up” stop attaching screws; move stop up or down as desired; and tighten stop attaching screws.
In connection with preceding adjustments, it may be necessary to adjust 1958 Buick rear quarter window guide. To adjust guide; loosen guide upper, center and; or lower attachments; adjust guide to desired location and tighten guide attachments. See Figure 13-72.
Removal and Installation of 1958 Buick Rear Quarter Window Regulator (Manual and Electric) (Models 46R-66R)
- Remove 1958 Buick rear quarter arm rest and trim assembly and belt finish molding.
- Remove access hole cover.
- On electric regulators, disconnect motor leads from wire harness. Disconnect front guide at lower attachment. Remove regulator attaching screws, disconnect regulator from lower sash channel cam and remove regulator through access hole.
- On manual regulators, remove rear quarter window and disconnect front guide at upper attachment. Remove regulator attaching screws and remove regulator through access hole.
- To install, reverse removal procedure. See Figure 13-71.
NOTE: The procedure for removing the electric motor from the 1958 Buick rear quarter window regulator is the same as outlined for the front door window electric regulator.
Removal and Installation of 1958 Buick Rear Quarter Window Regulator (Manual and Electric) (Convertibles)
- Remove rear quarter window.
- On cars with electric regulators, disconnect motor leads from wire harness.
- Remove regulator attaching screws and remove regulator though access hole.
- To install, reverse removal procedure. See Figure 13-72.
NOTE: The procedure for removing the electric motor from the rear quarter window regulator is the same as outlined for the front door window regulator.
Removal and Installation of 1958 Buick Rear Quarter Window Regulator (Model48)
- Remove 1958 Buick rear quarter trim and arm rest assembly.
- Remove access hole cover.
- Remove regulator cam to lower sash channel attaching screws.
- Prop glass in full up position.
- Remove rear quarter inner panel cam.
- Remove rear quarter window regulator attaching screws and remove regulator and regulator cover plate.
- To install, reverse removal procedure. See Figure 13-70.
Removal and Installation of 1958 Buick Rear Quarter Window Front Guide (Models 46R-66R)
- Remove 1958 Buick rear quarter window.
- Remove rear quarter window front guide upper attaching nut and lower attaching screws and carefully remove front guide from body through access hole.
- To install, reverse removal procedure. See Figure 13-71.
Removal and Installation of 1958 Buick Rear Quarter Window Rear Guide (Models 46R-66R)
- Remove 1958 Buick rear quarter arm rest and trim assembly and belt finish molding.
- Remove access hole cover.
- With rear quarter window in full “UP” position, remove rear quarter window rear guide attaching screws and remove rear guide.
- To install, reverse removal procedure. See Figure 13-71.
Removal and Installation of 1958 Buick Rear Quarter Window Guide (Convertibles)
- Remove 1958 Buick rear quarter window.
- Remove guide attaching screws at upper and lower attaching points. Lower guide and remove through access hole.
- To install, reverse removal procedure. See Figure 13-72.
Removal and Installation of 1958 Buick Rear Quarter Window Glass Run ChanneI – Upper and Front (Model48)
- Remove 1958 Buick rear quarter belt finishing molding and garnish molding.
- Lower rear quarter window and remove lower attaching screw from upper glass run channel.
- Use a flat bladed tool to disconnect upper glass run channel retaining clips.
- Pull upper glass run channel forward to disconnect channel from lower attachment and remove from body.
- Remove lower attaching screw from front glass run channel and disconnect channel retaining clips.
- Pull front glass run channel upward to disconnect channel from lower attachment and remove from body.
- To install, reverse removal procedure. See Figure 13-70. Check for proper installation of run channel in “slide in” type retainer at lower end.
Removal and Installation of 1958 Buick Rear Quarter Window Sealing Strip (Models 46R-66R)
- Remove 1958 Buick rear quarter belt finishing molding.
- Remove sealing strip attaching screws.
- Carefully loosen front end of sealing strip downward with flat bladed tool and pull sealing strip forward to remove from body.
- To install, reverse removal procedure. Seal quarter window sealing strip by applying 3/16″ diameter ribbon of heavy-bodied sealer to top surface of sealing strip along outboard side of attaching holes prior to installation. At front end, seal is to be diverted inboard along front edge.
Adjustment of 1958 Buick Rear Quarter Window Sealing Strip (Models 46R-66R)
The 1958 Buick rear quarter window sealing strip attaching holes are over-sized to permit “in and out” and “fore and aft” adjustment. To adjust, loosen attaching screws and adjust as required; then tighten screws. See Figure 13-71.
1958 Buick Rear Quarter Inner Panel Sealing Procedure (Model 48)
An inner panel water deflector consisting of a wax impregnated waterproof paper is cemented to the 1958 Buick rear quarter inner panel as shown in Figure 13-73.
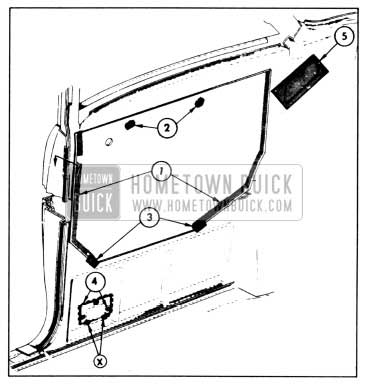
1958 Buick Rear Quarter Inner Panel Sealing
The deflector fits into a slot at the lower half of the quarter panel and deflects the water to the drain holes in the rocker inner panel. Whenever any work is performed where the water deflector has been disturbed, it must be properly sealed and cemented to the quarter inner panel as specified in the following procedure.
For service operations requiring access to the inner panel, the water deflector may be cut and turned back to provide access to the inner panel. Cut (DO NOT TEAR) water deflector straight and over portion of inner panel with the least depressions to facilitate resealing with waterproof body tape.
To reseal water deflector, tape full length of cut with waterproof body tape. Roll or press tape to assure a complete bond.
To install a new water deflector, the following procedure may be used.
- Removal of 1958 Buick rear quarter inner panel water deflector.
- Remove quarter trim assembly; then remove strips of body tape securing lower edges of deflector to inner panel.
- With a sharp scraper, break cement bond securing edges of water deflector to the inner panel and at spot locations shown in Figure 13-73; then remove deflector from the inner panel.
- Installation of 1958 Buick rear quarter inner panel water deflector.
- Using the original water deflector as a template, trim new deflector to proper size and cut holes for window regulator handle or window control switch.
- Apply an approved rubber cement to the quarter inner panel along a line contacted by the front and rear edges of water deflector as indicated by “1” in Figure 13-73. Application should be continuous with no skips. In addition, apply cement at spot locations indicated at “2.”
- Position water deflector to the inner panel with the lower edge in the retaining slot; roll or press cemented areas to obtain a good bond.
- Apply waterproof body tape to deflector and inner panel at both ends of retaining slot as indicated at “3.”
NOTE: If the lower access hole cover has been removed, apply medium-bodied sealer along top and side of cover as indicated at “4.” Also, apply sealer at cover attaching screws and at the corners of the cover indicated by “X.” If original tape has been removed from access hole indicated at “5,” apply a new piece of waterproof tape at this location. - Install the quarter trim assembly and previously removed parts.
1958 Buick Rear Quarter Panel Sealing Procedure (Models 46R-66R)
Each numbered step in the sealing procedure below refers to the corresponding numbered arrow in the illustration. See Figure 13-74.
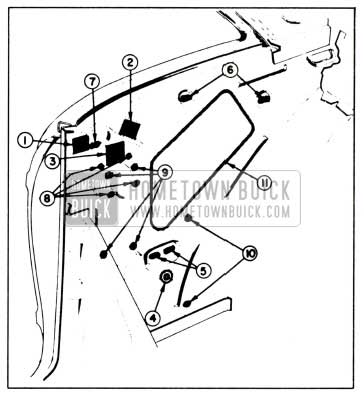
1958 Buick Rear Quarter Inner Panel Sealing-Models 46R-66R
- 1, 2 and 3. Apply waterproof body tape over access holes as shown. On manual window cars, apply weatherstrip cement over exposed surface of regulator spindle hole sealing washer to seal pores of sponge rubber and joint between inner panel and washer.
- On electric window cars, apply medium-bodied sealer around grommet and around electric wire at grommet to seal between grommet and inner panel and between wire and grommet. On manual window cars, seal this opening with waterproof body tape.
- Apply body caulking compound to seal window guide attaching holes.
- Apply body caulking compound to seal window guide rear attaching holes.
- Apply body caulking compound to seal window guide front attaching slot.
- Apply body caulking compound to seal manual window regulator attaching holes.
- Apply body caulking compound to seal electric wiring clip attaching holes.
- After assembly of access hole cover apply medium-bodied sealer completely around joint of cover and inner panel to effect a watertight seal.
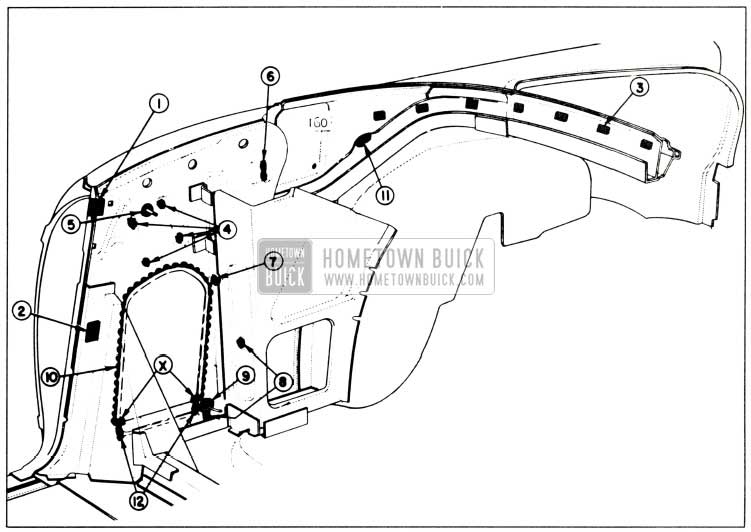
1958 Buick Rear Quarter Inner Panel Sealing Procedure (Convertibles)
Each numbered step in the sealing procedure below refers to the corresponding numbered arrow in the illustration. See Figure 13-74.
- and 2. Apply waterproof body tape over access holes as shown.
- Use weatherstrip cement to cement rear belt rail trim stick fillers to body. Seal around trim stick attaching holes with cement before installing fillers.
- Apply body caulking compound to seal window regulator attaching holes.
- On manual window cars, apply weatherstrip cement to exposed surface of regulator spindle hole sealing washer. Cement is required to seal pores of sponge rubber and joint between inner panel and washer.
On electric window cars, apply waterproof body tape over window regulator spindle hole.
- Apply body caulking compound to seal rear quarter window upper stop attaching slots.
- Apply body caulking compound to seal electric window regulator attaching holes.
- Apply body caulking compound to seal window guide and wiring clip attaching holes.
- On manual window cars, apply medium-bodied sealer to seal joint between sealing plug and inner panel.
On electric window cars, apply medium-bodied sealer to seal joints between grommet and inner panel and between wire and grommet.
- Apply medium-bodied sealer along top and side joints of access hole cover to inner panel. Use care to seal offset at lower corners indicated by arrows marked “X.”
- Prior to installation of trim stick support assembly, apply body caulking compound over attaching holes in gutter.
- Apply medium-bodied sealer to seal joints of access hole cover and inner panel below offset at lower corners. This seal should be completed before performing sealing operation, number 10, above.
1958 Buick Rear Quarter Inner Panel Sealing-Convertibles
Leave A Comment
You must be logged in to post a comment.