1950 BUICK WINDSHIELD GLASS AND GLASS CHANNEL
- Protect the finish by masking around the 1950 Buick windshield opening and laying a suitable covering across the hood and front fender.
- Inside the car, remove the rear view mirror, inner division molding, including upper and lower escutcheons also the garnish molding.
- At bottom of windshield remove the defroster air deflectors by removing attaching screws. (See drawing .)
- Outside the car , remove the 1950 Buick windshield wiper arm, transmission burr, transmission nut, transmission escutcheon, and belt finishing molding at base of windshield .
- Underneath the instrument panel detach the windshield washer tubing, disconnect wiper cables, and remove the transmission attaching bolts and transmission.
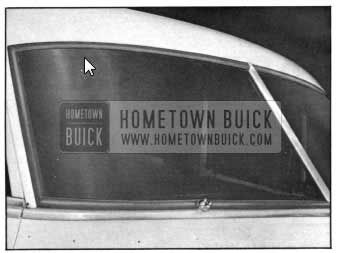
1950 Buick Windshield Glass and Glass Channel
- With the palm of the hand against the inside surface of the glass, carefully force the assembly outward until the lip of the rubber channel has been removed from the pinchweld- flanges of the opening. Hand pressure may be applied alternately at the upper and lower corner s until. separation begins. In some cases, it may be necessary to use a putty knife to loosen the seal between the rubber and pinchweld flange. Remove the glass and rubber channel section as a unit.
- Next, loosen the seal of weatherstrip cement between the glass and rubber channel and disengage the rubber channel from the glass.
INSTALLATION
- Before installing glass assembly, inspect the con tour of the pinchweld flange around the opening for any irregularities and correct. New glass can b used as a template. Using a scraper and oleum spirits, remove all old cement from around opening and dry thoroughly. Also clean rubber channel.
- Before installation, apply “3M Weatherstrip Cement” to the flanges of the opening as indicated in lower drawing.
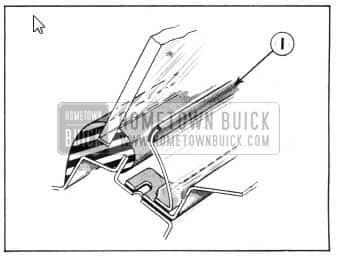
1950 Buick Cross Section of Windshield
- Apply a 3 /16″ bead of cement along the front edge of rabbet, completely around windshield opening.
- Apply a bead of cement across the top and bottom of the windshield center bar, particularly at the offset edges of this bar where it joins the roof and top of the cowl.
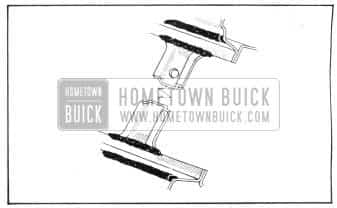
1950 Buick Cross Section of Windshield Opening
- Insert a strong cord into the pinchweld cavity of the windshield rubber channel.
- Install windshield glass into rubber channel. Work channel over edge of glass all around except at the center division edge. Inject a small amount of mild soap and water solution into the center division glass cavity of the rubber channel to facilitate easy installation of the glass.
- Lower the glass and its channel into the opening and move the glass so that its inner edge enters into the center division groove of the glass channel.
- With a helper, position and hold the glass and its channel firmly in the windshield opening; then use the string to pull the inner lip of the rubber channel over the pinchweld.
- After installation, using a cement gun, seal the lip of the weatherstrip to the glass. In addition, apply a bead of cement under the inner lip of the weatherstrip where it straddles the pinchweld .
- Before reinstalling outer division molding, apply “3M Autobody Sealer” to attaching screw holes and also to the belt molding attaching screw hole at the front body pillar.
- To complete the installation, replace defroster air deflector , windshield outer and inner division and garnish moldings. Replace wiper transmission, using a mild soap and water solution to facilitate installation of wiper shaft through rubber weatherstrip. Apply “3M Autobody Sealer” around base of wiper shaft on outside of body , then replace belt molding , wiper transmission, escutcheon, nut , burr and wiper blade.
1950 BUICK WINDSHIELD WIPER TRANSMISSION BURR
REMOVAL
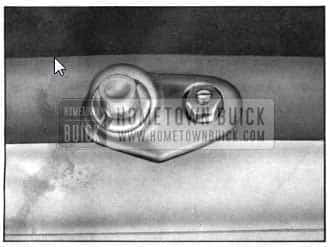
1950 Buick Windshield Wiper Transmission
The transmission shaft of the 1950 Buick windshield wiper protrudes through the 1950 Buick windshield rubber glass channel and transmission shaft escutcheon as shown in Figure 4. For attachment of the wiper blades, a metal “burr” is pressed in the end of this transmission shaft (similar to 1949 Buick Styles). To remove the wiper transmission and its escutcheon, the “burr” must first be removed so as to allow the shaft to slip down through the windshield glass channel.
- To remove the transmission shaft ”burr,” obtain a Burr Removing Tool as illustrated, and unscrew the little set screw from the handle of the tool and thread it into the end of the transmission shaft.
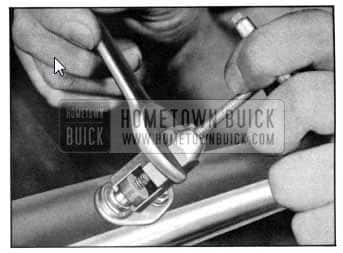
- Assemble the tool as illustrated Figure No. 5 and place it in position so that clutch end of barrel grips the under surface of the “burr.”
- Holding the “hex” shaped barrel of tool stationary with an open end wrench, turn handle of tool counterclockwise until burr is removed.
1950 Buick Removal of Windshield Wiper Transmission
INSTALLATION
- Obtain a new “burr” do not use the old one. Place new burr in position on shaft of transmission and align it properly. The inside diameter of the new burr is not serrated. The splined shaft of the wiper transmission cuts serrations in the inside diameter of the soft metal burr during installation.
- Adjust the Burr Removing Tool shown in Figure No. 6 so that pointed end of barrel is at bottom, then screw the threaded pilot of the tool into the end of the transmission shaft as shown.
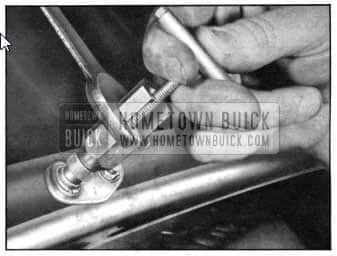
1950 Buick Installing Windshield Wiper Transmission
- Holding the “T” handle of the tool as shown, carefully and gradually turn the “hex” shaped barrel of the tool counterclockwise with an end wrench until burr has been pushed on to its proper position.
1950 BUICK WINDSHIELD WIPER TRANSMISSION
- Remove wiper arm and blade, then remove the “burr” from the end of the transmission shaft.
- Remove windshield washer nut and nozzle “A”, also transmission nut “B” and escutcheon “C” from end of wiper shaft. See Figure No. 7.

1950 Buick Windshield Wiper Transmission Attachment
- To avoid damage to chrome finish in removing nut “B”, a special tool should be made to fit’ this type of nut. This tool can be easily made by re working a standard socket wrench into a spanner type wrench that will fit over the end of the transmission shaft.
- On the right side, remove the instrument panel compartment box.
- Underneath the instrument panel, remove the windshield washer tubing and loosen the tension on the wiper cables at the tensioner. (See Wiper Tensioner Removal.)
1950 Buick Windshield Wiper Mechanism
- Remove ends of cable from motor drive unit.
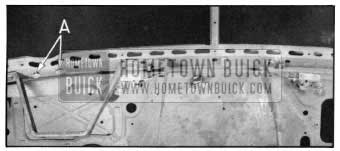
- Remove the two “hex” head screws attaching wiper transmission to front end assembly, indicated at “A” Figure No. 8. Lower transmission out of position and remove.
- To install, reverse this procedure. For ease of installation use mild liquid soap around shaft of wiper transmission when inserting it through rubber glass channel. On outside of body apply “3M Auto body Sealer” around base of wiper shaft prior to installing escutcheon and nut. When completely reinstalled, check operation of the wiper assembly.
1950 BUICK WINDSHIELD WIPER TENSIONER
- Underneath instrument panel apply slight pressure to the tensioner ratchet spring “A,” see Figure No. 9.
- Rotate upper section containing pulleys until locking pin hole is in line with similar hole in lower section.
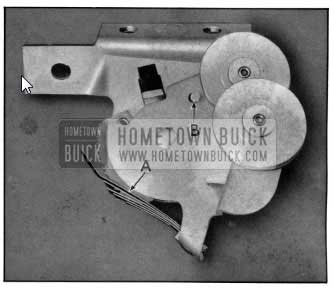
1950 Buick Windshield Wiper Tensioner
- Insert a 1/8″ lock pin or drift through aligned holes as shown at “B,” Figure No. 9.
- Unhook wiper cables and remove three (3) screws holding tensioner to dash and remove tensioner, see Figure No. 8.
- To replace, mount tensioner in place with its three (3) retaining screws.
- Install cable over pulleys.
- Apply slight pressure to tensioner ratchet spring and rotate upper pulley section until locking pin drops out of hole. Gradually allow upper section to return until tension forces pulleys against cables.
CAUTION: Do not allow upper section to snap into place.
- Release pressure on ratchet spring.
1950 BUICK WINDSHIELD WIPER MOTOR
- Lift up hood of car and remove the vacuum hose from wiper motor at “A.” See Figure No. 10
- Loosen the screw and washer “B” to allow the wiper control cable to be detached from motor. IMPORTANT: Prior to loosening this screw, note the position of the control cable at this attaching point. The cable must be reinstalled in this position to attain the same control in effect prior to removal.
- Remove the two (2) screws “C” holding the motor to the drive unit and remove motor.
- To remove the drive unit, first remove the tension from the wiper cables underneath the instrument panel by adjusting and “pinning” the tensioner (See Windshield Wiper Tensioner).
- Detach sleeve of cables from grooves in drive unit linkage (underneath instrument panel).
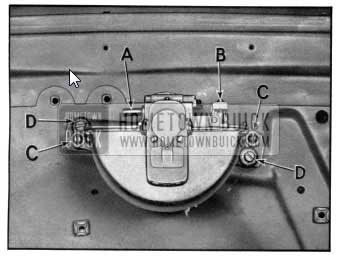
1950 Buick Windshield Wiper Motor
- On the front of the dash, remove the two (2) screws “D” retaining drive unit to dash and remove.
- To install, reverse this procedure. When reinstalling control cable an adjustment can be made by loosening s crew “B” and adjusting cable the desired amount.
Leave A Comment
You must be logged in to post a comment.