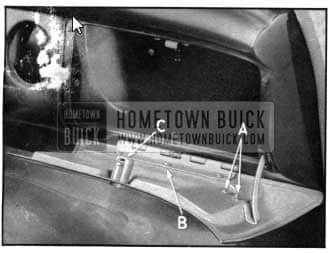
1950 BUICK INSTRUMENT PANEL COMPARTMENT DOOR
- Remove two screws “A” holding single curved door stop to inner face of door. See Figure No. 11.
- Remove three screws “B” holding hinge to inner face of door.
- To install, reverse this operation.
ADJUSTMENT
1950 Buick Instrument Panel Compartment Door
For in and out adjustment at top of door, loosen the two doo r lock striker screws at upper opening.
For in and out adjustment at bottom of door, loosen the three screws holding door hinge to flange of 1950 Buick instrument panel.
For up and down adjustment, loosen the three screws holding door hinge to the inner door panel at bottom of door.
For adjustment and alignment of the curved door stop, loosen the screws attaching door stop to door inner panel.
1950 BUICK INSTRUMENT PANEL COMPARTMENT DOOR LOCK
- The lock is released by removing one screw and washer on the lock retainer cap, shown at “C” Figure No. 11.
- To install, reverse this procedure.
1950 BUICK INSTRUMENT PANEL COMPARTMENT BOX
- Open 1950 Buick instrument panel compartment door and re move all screws (6) holding box to 1950 Buick instrument panel. Note respective positions of different type screws before removing. The striker plate at top of opening need not be removed in this operation. See Figure No. 11.
- To install, reverse this operation.
WINDSHIELD BELT MOLDING
Note: The windshield belt molding is made in two sections. The right hand section overlaps the left hand section. This operation explains removal of only one section.
- To obtain clearance in removing belt molding, loosen or remove the windshield wiper transmission escutcheon. (See Windshield Wiper Transmission Removal.)
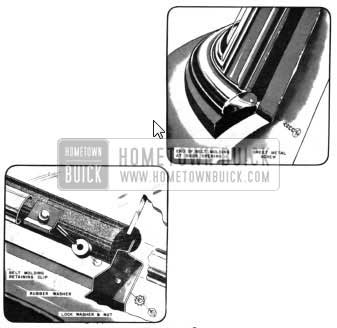
1950 Buick Windshield Belt Molding
WINDSHIELD OUTER DIVISION MOLDING
- Under 1950 Buick instrument panel remove belt molding retaining nut and washer at center of body below windshield division bar.
- From inside body at windshield inner division molding, remove the three (3) barrel nuts retaining inner and outer division moldings.
- From outside body remove outer division molding.
- To install, reverse this procedure. Prior to installing molding, seal around the three (3) molding retaining screw holes on the center division section of the rubber glass channel. Use “3M Autobody Sealer.”
Leave A Comment
You must be logged in to post a comment.